For example: `https://agentassist.kore.ai/koreagentassist-sdk-v3/UI/agentassist-iframe.html` | Agent AI > Flows & Channels > Digital > Web/Mobile Client > JWT App Details | | Capture AI Agent Information in Kore Data Table | AudiohookEnabled | A setting or flag indicating whether Kore audio processing runs for the AI Agent. | Set to `true` to turn on Kore audio processing, or `false` to turn it off. | | Capture AI Agent Information in Kore Data Table | QueueIdentifier | A unique identifier in the Data Table to fetch AI Agent details at run time. | | | Capture AI Agent Information in Kore Data Table | KvpConfig | The key-value pairs (KVPs) to include in SecureCustomData. JSON object containing the necessary keys and xpath (paths to locate the value in Genesys Conversation API result JSON object). [Genesys API Explorer](https://developer.genesys.cloud/devapps/api-explorer#get-api-v2-conversations--conversationId)
**Note:** Optional column. You need it to send secure custom data to Agent AI. | **Sample:**
`{`
"queueName": "participants\[0].queueName,"
"callStatus": "participants\[0].calls\[0].state"`}` | | Capture AI Agent Information in Kore Data Table | JWEPublicKey | Public key assigned to the Client App. | Agent AI > Flows & Channels > Digital > Web/Mobile Client > JWT App Details | | Capture AI Agent Information in Kore Data Table | RSPrivatePem | The Private Key that corresponds to the Public Key supplied during the creation of a Client App using the RS256 or RS512 algorithm. | **RSPrivatePemKey** is an optional column, and you need it only when the algorithm is RS256 or RS512.
(Not supported) | | Capture AI Agent Information in Kore Data Table | Algorithm | Algorithm assigned to the Client App. | The value must be HS256. | | Install Audiohook for Voice Streaming | Voice Gateway | For the US region, value is `savg-webserver.kore.ai`.
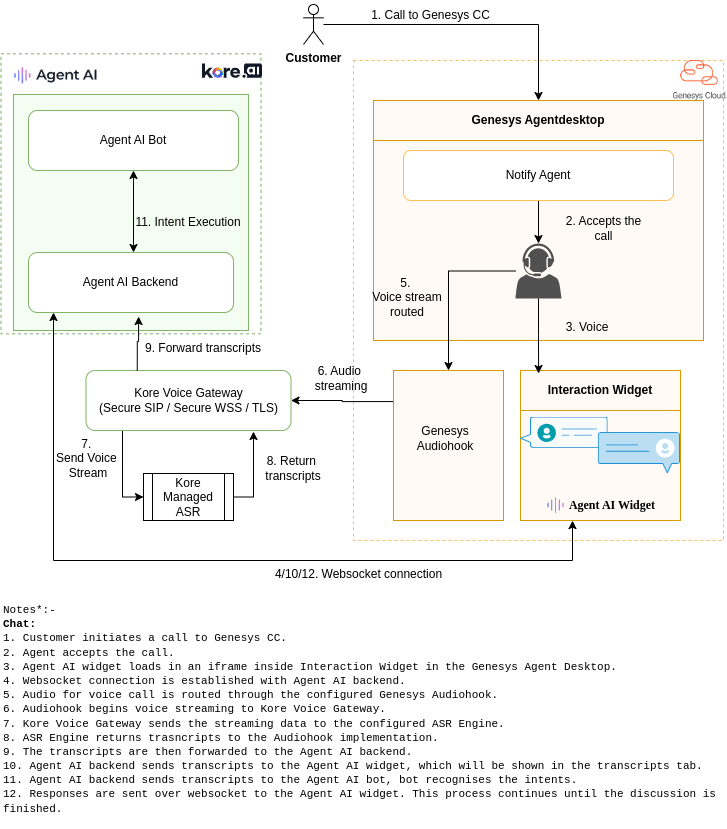
For on-prem, refer to corresponding host. | | ## Architecture Diagrams **Chat**
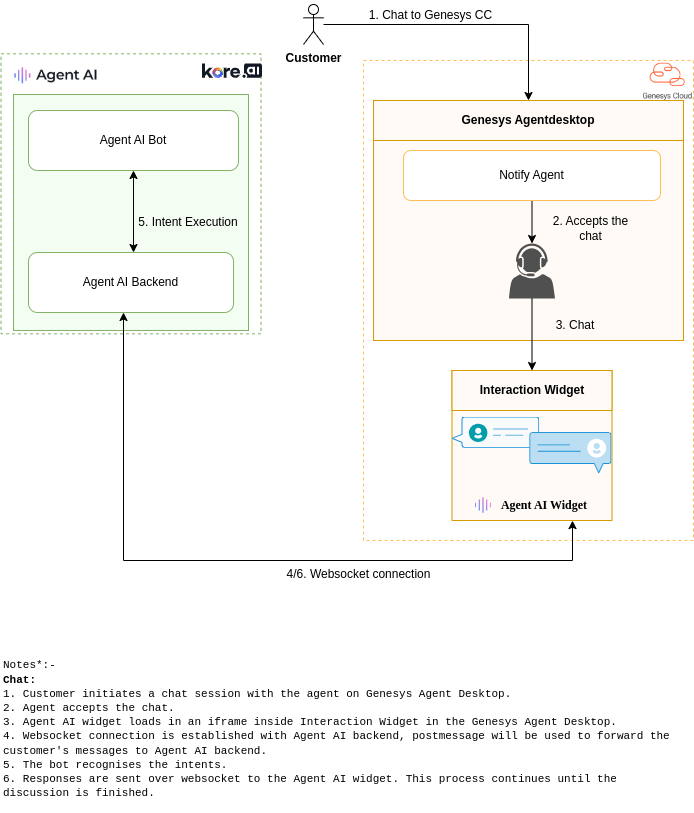 **Voice**
 ## Interaction Sequence
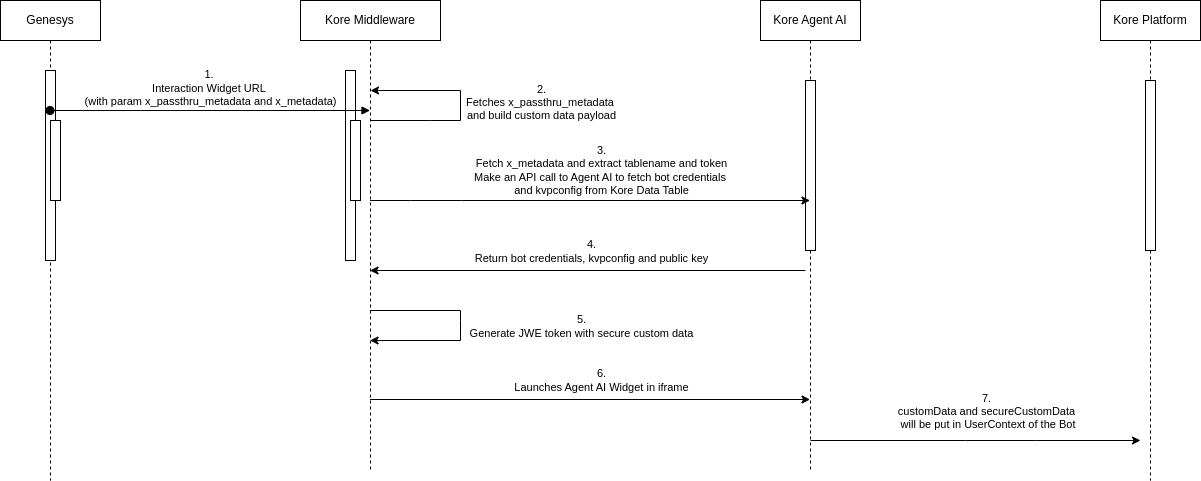 ## Activities on Platform
* [Capture AI Agent information in Kore Data Table](#capture-ai-agent-information)
* [Access Custom Data and Secure Custom Data in Agent AI](#access-custom-data-and-secure-custom-data-in-agent-ai)
## Activities on Genesys Cloud
* [Generate an Oauth ID to connect Kore Services with Genesys](#generate-an-oauth-id-to-connect-kore-services-with-genesys)
* [Create an Interaction Widget in Genesys for Agent AI](#create-an-interaction-widget-in-genesys-for-agent-ai)
* [Provide Interaction Widget Access to Agents](#provide-interaction-widget-access-to-agents)
* [Create a Queue in Genesys](#create-a-queue-in-genesys)
## Chat Setup
* [Create or Update Architect Inbound Message Flow in Genesys for the Agent Queue](#create-or-update-architect-inbound-message-flow-in-genesys-for-the-agent-queue)
* [Create Messenger Configuration](#create-messenger-configuration)
* [Create Messenger Deployments](#create-messenger-deployments)
* [Steps to start a Chat Request Simulation](#post-installation-setup)
## Voice Setup
* [(Optional) Install Audiohook for Voice Streaming](#optional-install-audiohook-for-voice-streaming)
* [Create or Update an Architect Inbound Call Flow in Genesys for the Agent Queue](#create-or-update-architect-inbound-call-flow-in-genesys-for-the-agent-queue)
* [Steps to start a Voice Request Simulation](#post-installation-setup)
## Prerequisites
* Genesys Administrator with access to a Genesys Cloud account with Admin rights
* Platform Administrator with access to Agent AI instance
## AI for Service Configuration
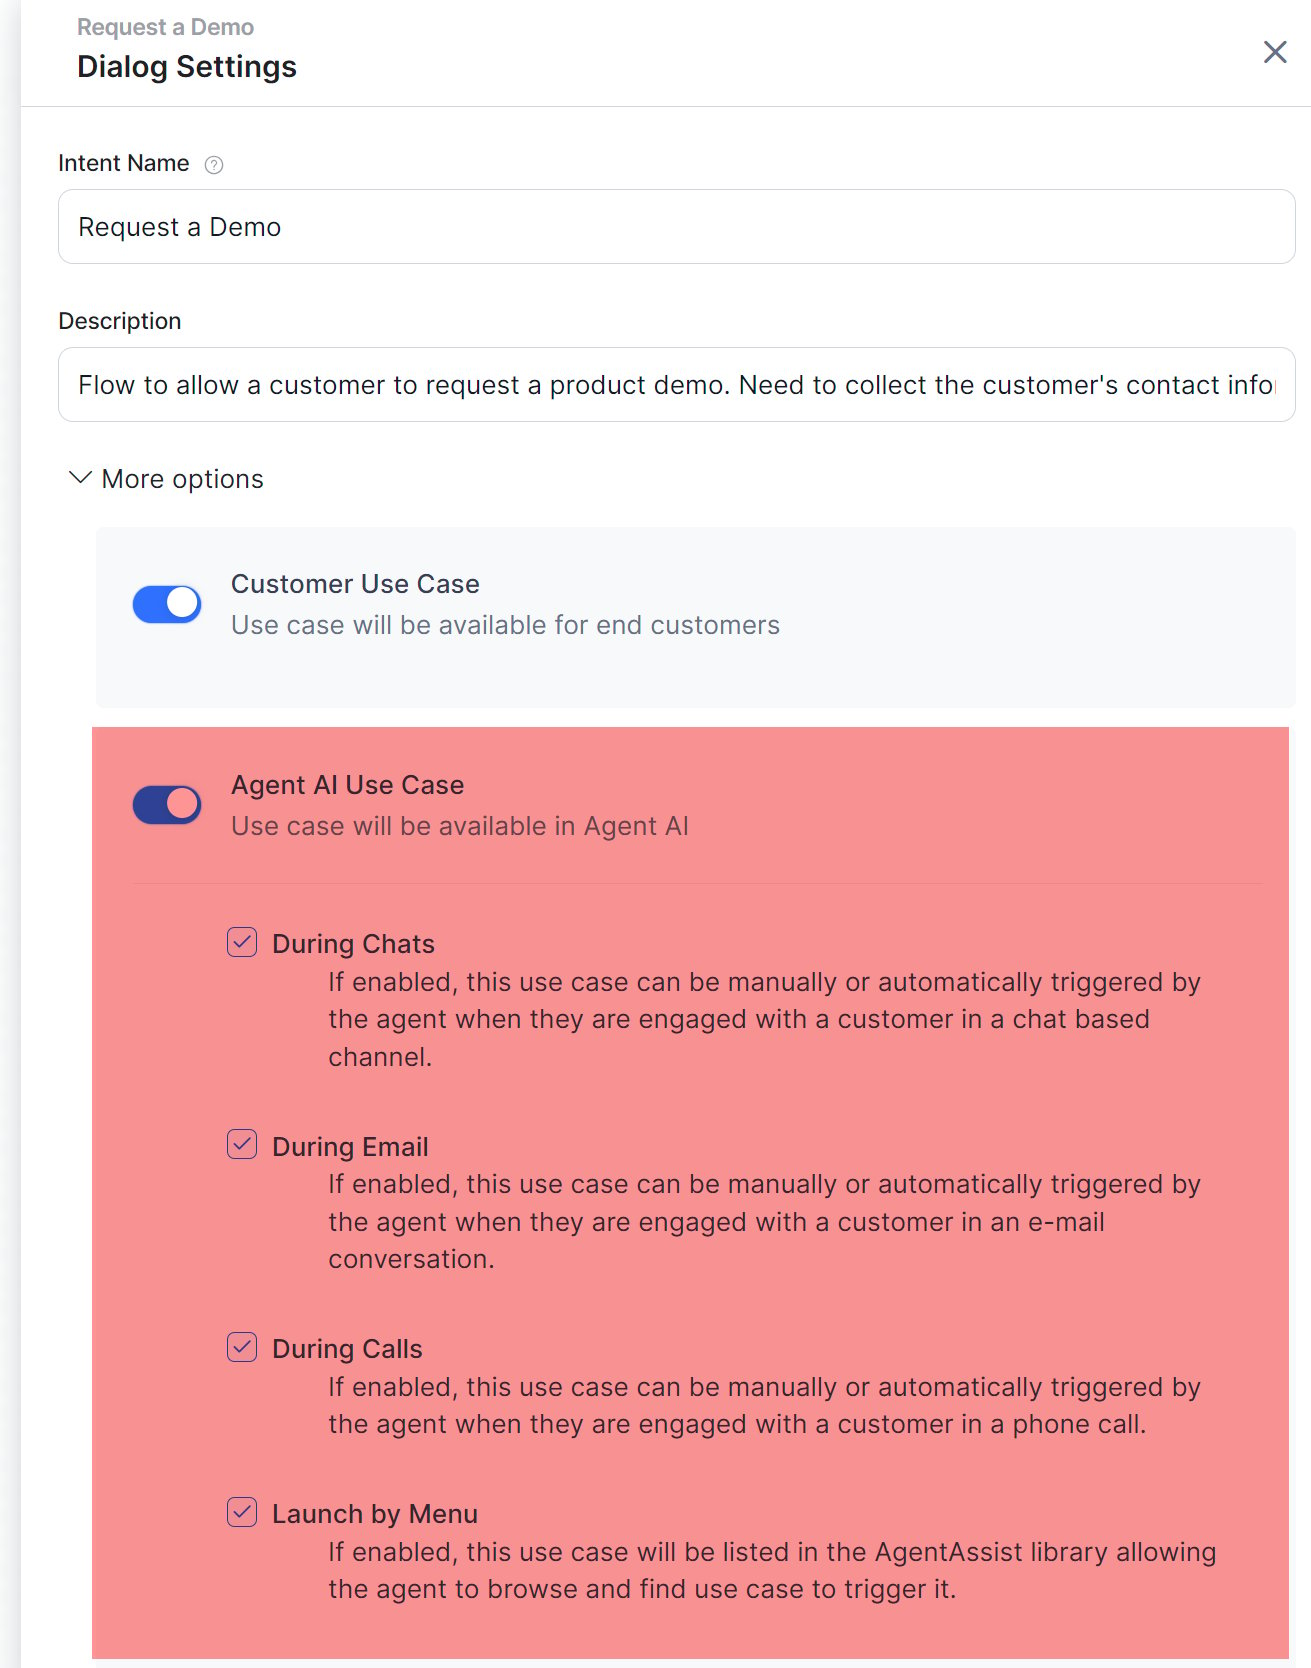
For the configured app, ensure configuration of at least one Dialog Task for Agent AI use.
## Activities on Platform
* [Capture AI Agent information in Kore Data Table](#capture-ai-agent-information)
* [Access Custom Data and Secure Custom Data in Agent AI](#access-custom-data-and-secure-custom-data-in-agent-ai)
## Activities on Genesys Cloud
* [Generate an Oauth ID to connect Kore Services with Genesys](#generate-an-oauth-id-to-connect-kore-services-with-genesys)
* [Create an Interaction Widget in Genesys for Agent AI](#create-an-interaction-widget-in-genesys-for-agent-ai)
* [Provide Interaction Widget Access to Agents](#provide-interaction-widget-access-to-agents)
* [Create a Queue in Genesys](#create-a-queue-in-genesys)
## Chat Setup
* [Create or Update Architect Inbound Message Flow in Genesys for the Agent Queue](#create-or-update-architect-inbound-message-flow-in-genesys-for-the-agent-queue)
* [Create Messenger Configuration](#create-messenger-configuration)
* [Create Messenger Deployments](#create-messenger-deployments)
* [Steps to start a Chat Request Simulation](#post-installation-setup)
## Voice Setup
* [(Optional) Install Audiohook for Voice Streaming](#optional-install-audiohook-for-voice-streaming)
* [Create or Update an Architect Inbound Call Flow in Genesys for the Agent Queue](#create-or-update-architect-inbound-call-flow-in-genesys-for-the-agent-queue)
* [Steps to start a Voice Request Simulation](#post-installation-setup)
## Prerequisites
* Genesys Administrator with access to a Genesys Cloud account with Admin rights
* Platform Administrator with access to Agent AI instance
## AI for Service Configuration
For the configured app, ensure configuration of at least one Dialog Task for Agent AI use.
 ## Capture AI Agent Information
### Genesys Data Table
Create a Genesys Data Table with Agent AI bot details:
## Capture AI Agent Information
### Genesys Data Table
Create a Genesys Data Table with Agent AI bot details:
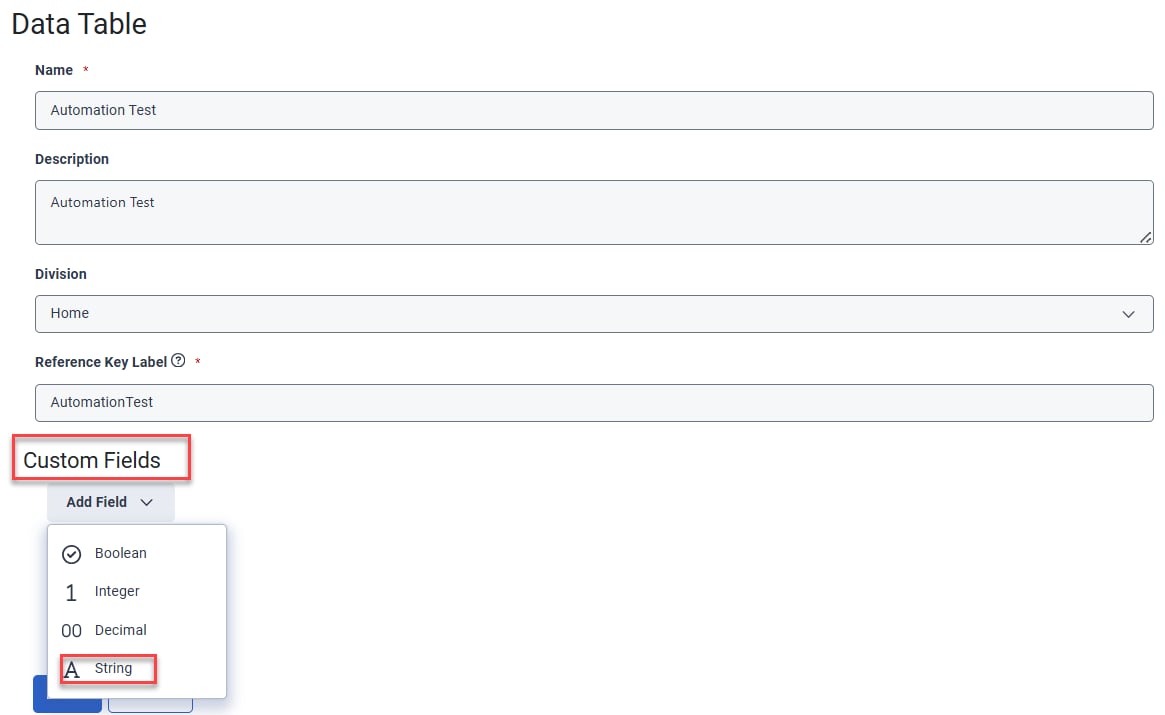 8. Add the custom fields with bot details.
9. Follow these conventions in the table for other custom fields. Use the exact names, including upper/lowercase.
| | |
| --------------------------- | ----------------------------------------- |
| **Field Label** | **Default Value** |
| AgentAssist URL | Agent AI URL |
| Bot Id | `st-8cb94691-xxxx-xxxx-xxxx-xxxxxxxx` |
| Client Id | `cs-b60f544d-xxxx-xxxx-xxxx-xxxxxxxxxxxx` |
| Client Secret | \
8. Add the custom fields with bot details.
9. Follow these conventions in the table for other custom fields. Use the exact names, including upper/lowercase.
| | |
| --------------------------- | ----------------------------------------- |
| **Field Label** | **Default Value** |
| AgentAssist URL | Agent AI URL |
| Bot Id | `st-8cb94691-xxxx-xxxx-xxxx-xxxxxxxx` |
| Client Id | `cs-b60f544d-xxxx-xxxx-xxxx-xxxxxxxxxxxx` |
| Client Secret | \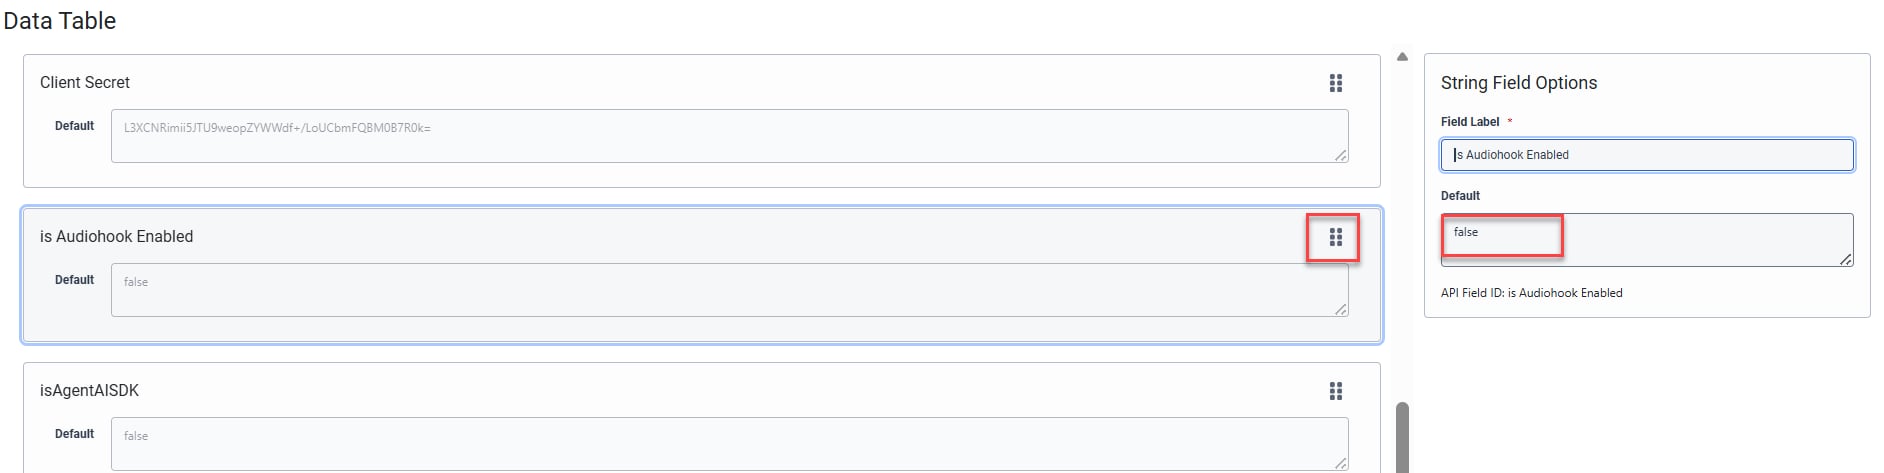 ### Third-Party Configuration
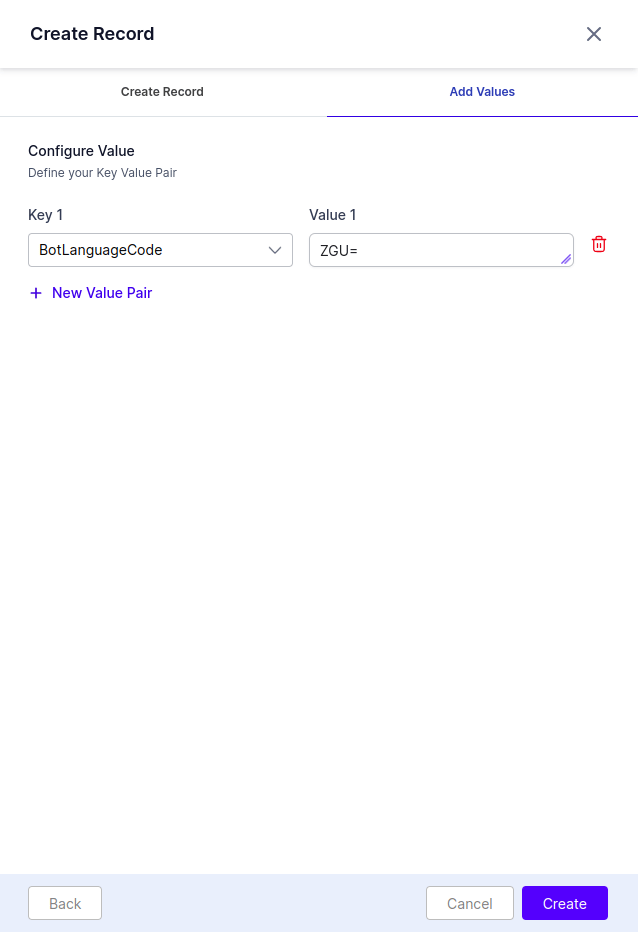
[Third-Party Configuration](/ai-for-service/agentai/configuration/third-party-configuration) maps Agent AI bots to specific queues. Within this configuration, you can define the bot's language, custom data configuration, or secure custom data configuration.
For example, if you want to associate Agent AI Bot1 with Queue1 and Agent AI Bot2 with Queue2, you need to:
* Create a record in Third Party Configuration for Agent AI Bot1, setting the Queue Identifier as Queue1.
* Create a record in Third Party Configuration for Agent AI Bot2, setting the Queue Identifier as Queue2.
This setup ensures the correct Agent AI widget renders for conversations in the defined queues.
### Third-Party Configuration
[Third-Party Configuration](/ai-for-service/agentai/configuration/third-party-configuration) maps Agent AI bots to specific queues. Within this configuration, you can define the bot's language, custom data configuration, or secure custom data configuration.
For example, if you want to associate Agent AI Bot1 with Queue1 and Agent AI Bot2 with Queue2, you need to:
* Create a record in Third Party Configuration for Agent AI Bot1, setting the Queue Identifier as Queue1.
* Create a record in Third Party Configuration for Agent AI Bot2, setting the Queue Identifier as Queue2.
This setup ensures the correct Agent AI widget renders for conversations in the defined queues.


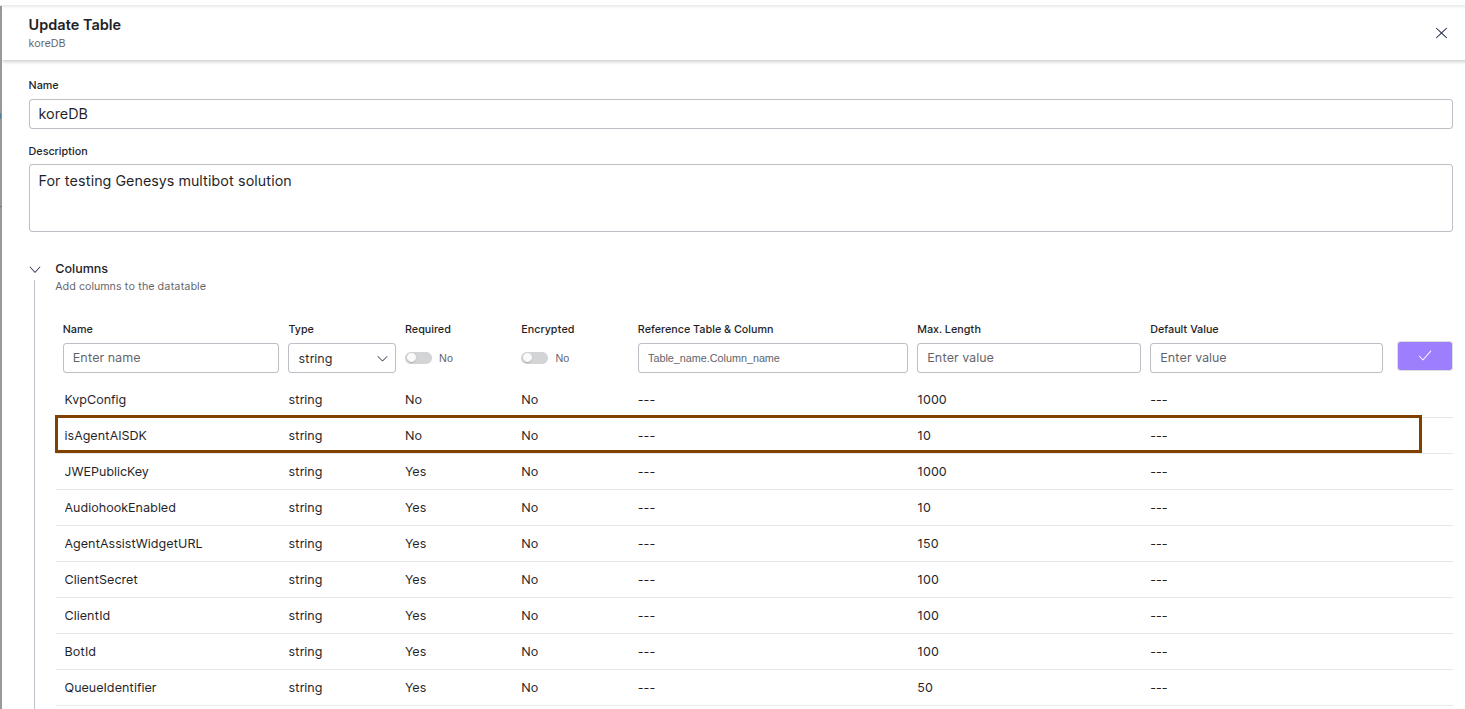
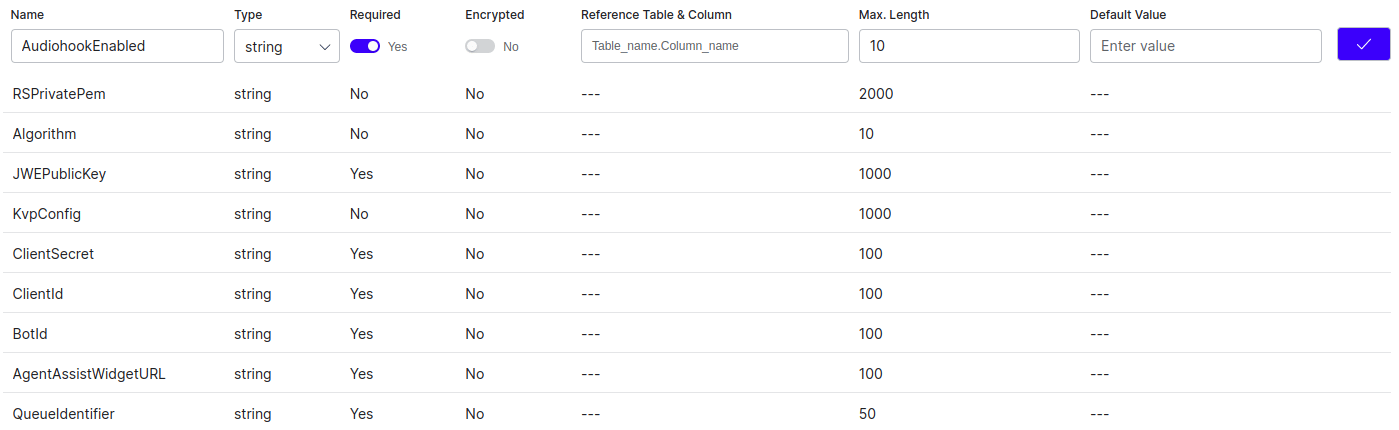 Add the following case-sensitive columns with type string:
**Mandatory Columns**:
* QueueIdentifier (unique identifier for the table)
* BotId
* ClientId
* ClientSecret
* AgentAssistWidgetURL
* AudiohookEnabled
* JWEPublicKey
**Optional Columns**:
* KvpConfig
* Algorithm (HS256)
* RSPrivatePem (Ignore/Not Supported)
* isAgentAISDK
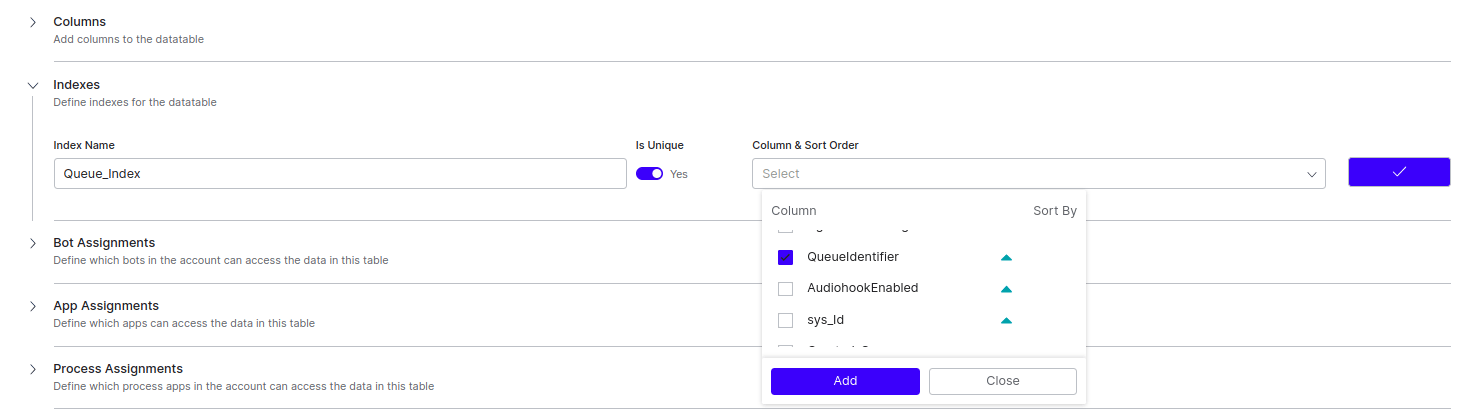
4. **Indexes** for the table.
* **Index Name** for reference.
* **Is Unique** flag to define if the index contains unique values. (Turn on **is Unique**.)
* **Column & Sort Order** - List of columns to include in the index; you can select multiple columns and specify the sorting order (ascending or descending) for each column. (Select QueueIdentifier with ascending order.)
Add the following case-sensitive columns with type string:
**Mandatory Columns**:
* QueueIdentifier (unique identifier for the table)
* BotId
* ClientId
* ClientSecret
* AgentAssistWidgetURL
* AudiohookEnabled
* JWEPublicKey
**Optional Columns**:
* KvpConfig
* Algorithm (HS256)
* RSPrivatePem (Ignore/Not Supported)
* isAgentAISDK
4. **Indexes** for the table.
* **Index Name** for reference.
* **Is Unique** flag to define if the index contains unique values. (Turn on **is Unique**.)
* **Column & Sort Order** - List of columns to include in the index; you can select multiple columns and specify the sorting order (ascending or descending) for each column. (Select QueueIdentifier with ascending order.)
 5. **AI Agent Assignments** (not applicable).
6. **App Assignments** to let apps access data in this table.
1. Select any app from the list, or select **Create New App** and enter your app name.
2. Select the **Read**, **Write**, and **Delete** permissions, based on your requirement.
5. **AI Agent Assignments** (not applicable).
6. **App Assignments** to let apps access data in this table.
1. Select any app from the list, or select **Create New App** and enter your app name.
2. Select the **Read**, **Write**, and **Delete** permissions, based on your requirement.
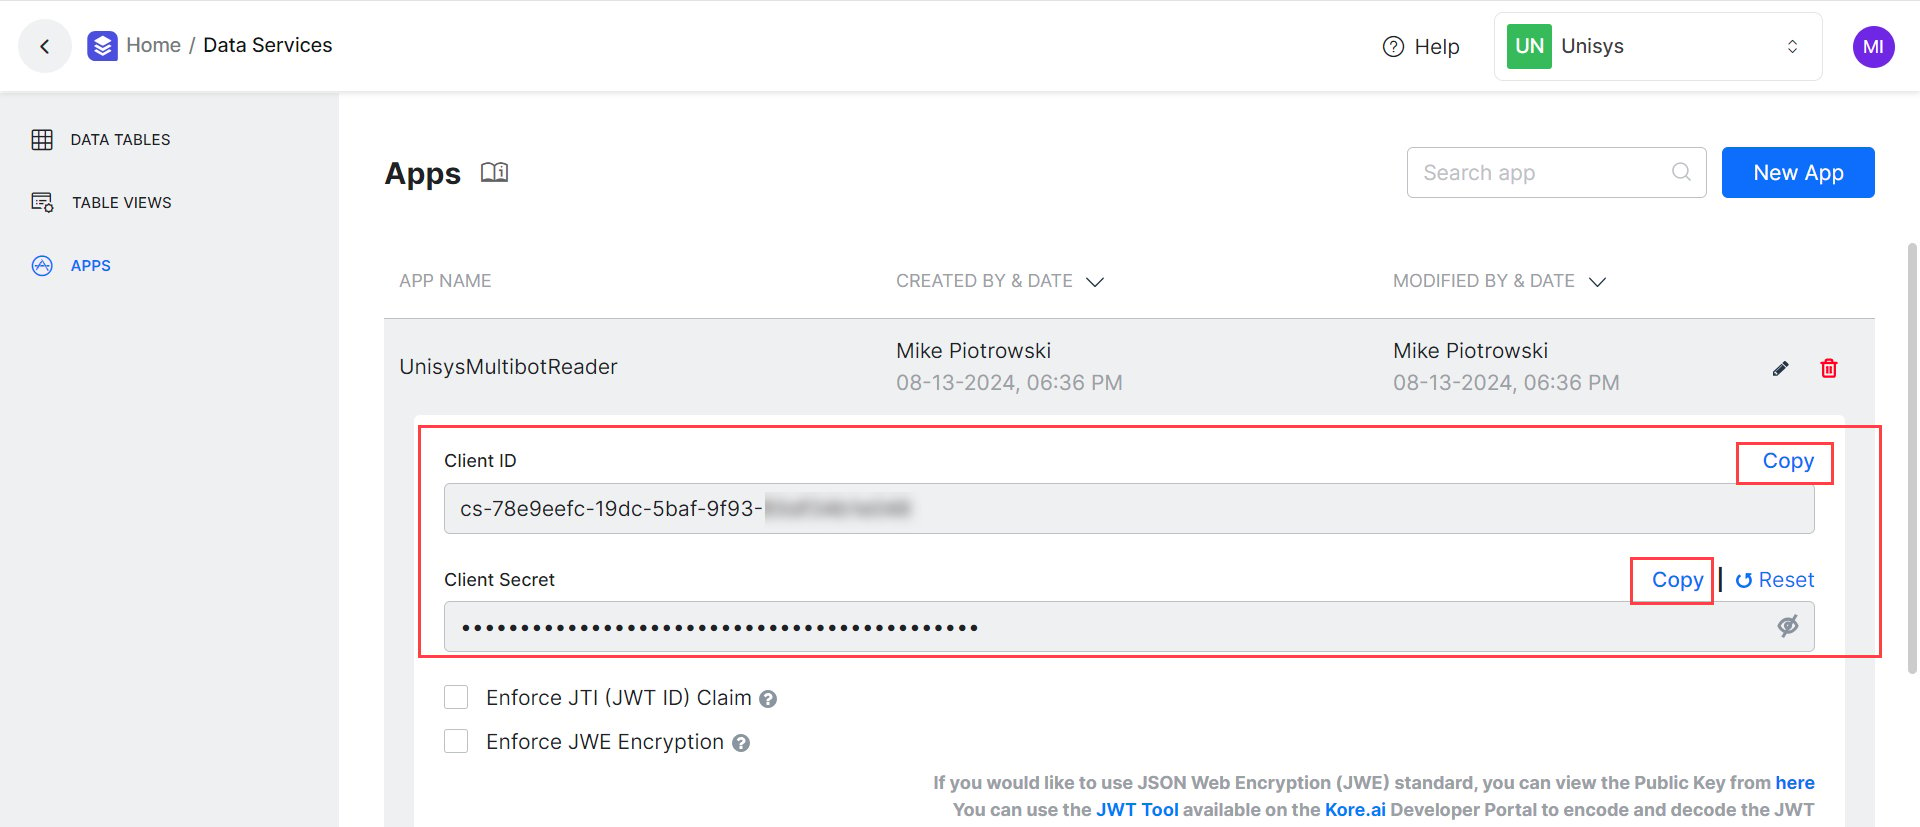 5. Create a JWT Token using the **Client ID** and **Client Secret** by following the [Generating the JWT Token](/ai-for-service/apis/automation/api-introduction#generating-the-jwt-token) doc.
6. Insert the following data into the Data Table by following the [Data Insert API](/ai-for-service/apis/automation/data-insert) doc. Use the JWT Token you created.
**API Body Payload Structure**:
```json theme={null}
{
"data": {
"QueueIdentifier":
5. Create a JWT Token using the **Client ID** and **Client Secret** by following the [Generating the JWT Token](/ai-for-service/apis/automation/api-introduction#generating-the-jwt-token) doc.
6. Insert the following data into the Data Table by following the [Data Insert API](/ai-for-service/apis/automation/data-insert) doc. Use the JWT Token you created.
**API Body Payload Structure**:
```json theme={null}
{
"data": {
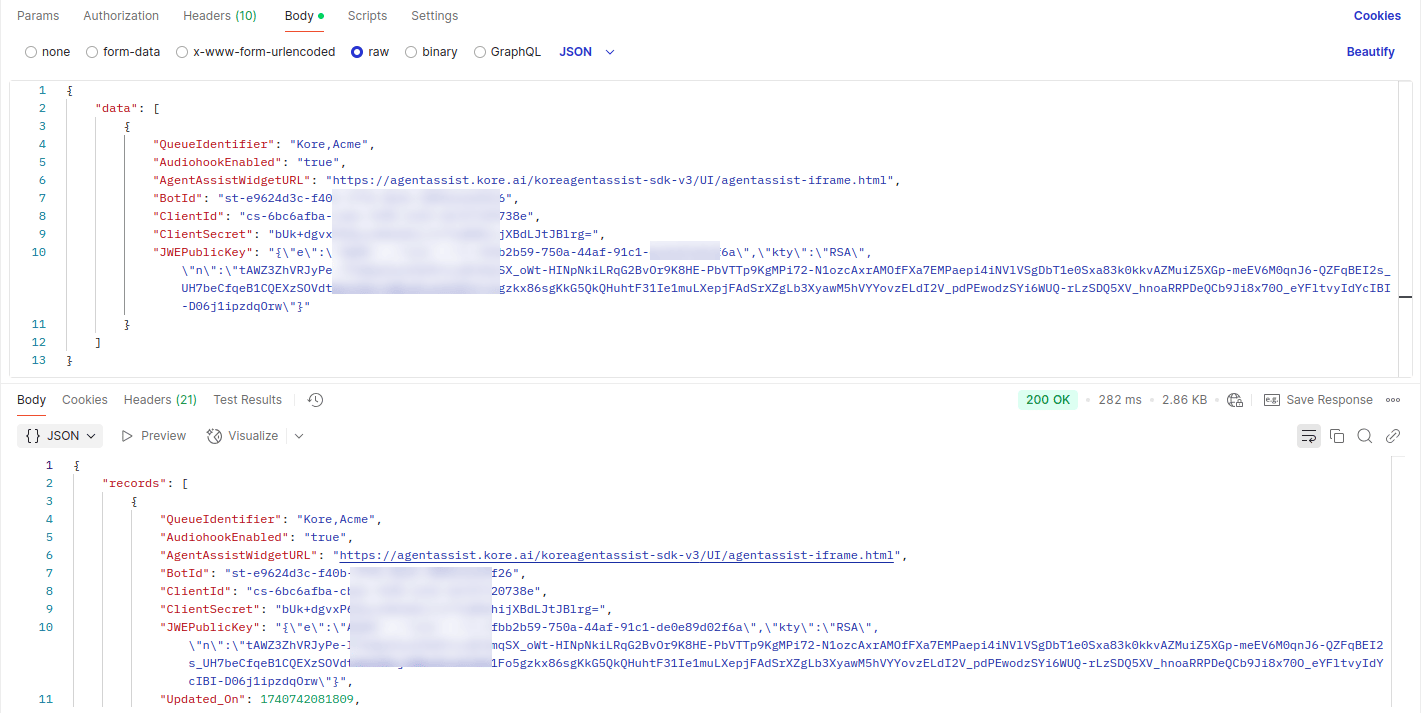
"QueueIdentifier": 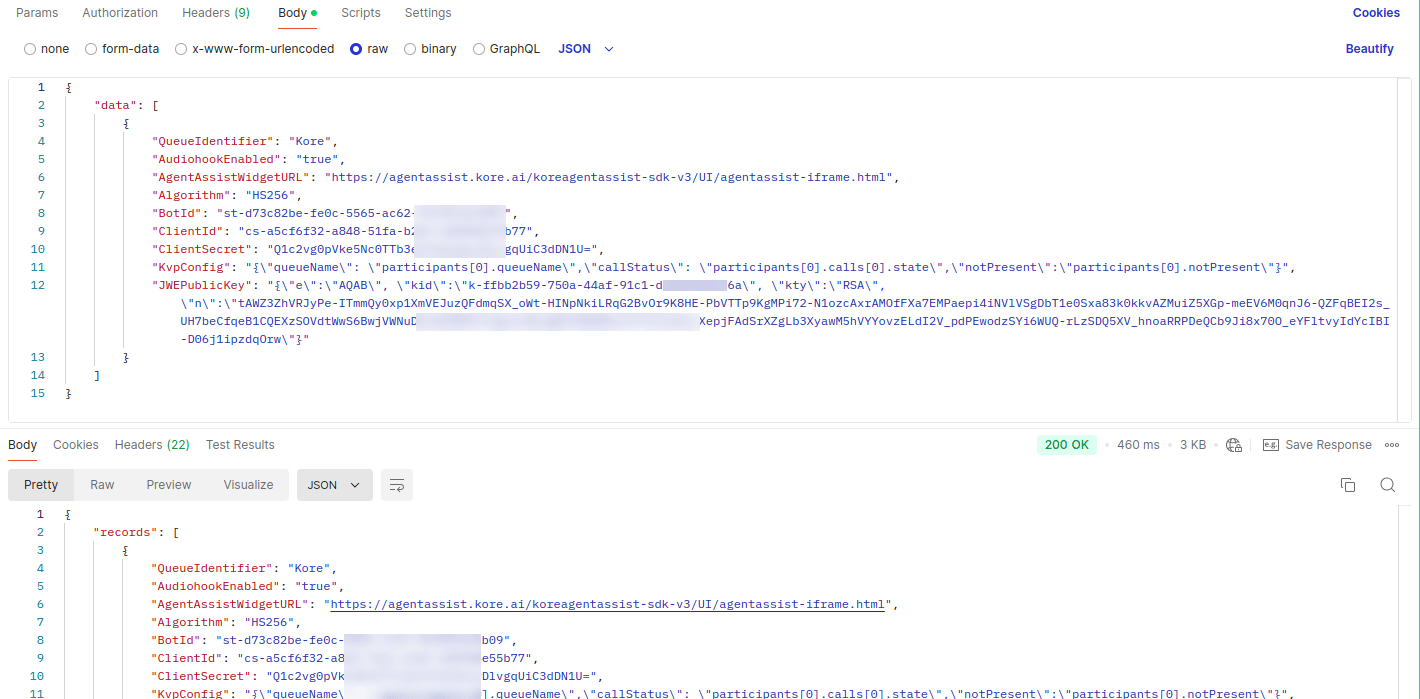 **Multiple Queues Example**
 ## Generate an Oauth ID to connect Kore Services with Genesys
1. Sign in to **Genesys Cloud**.
2. Select **Collaborate** / **Communicate**.
3. Search for **OAuth**.
## Generate an Oauth ID to connect Kore Services with Genesys
1. Sign in to **Genesys Cloud**.
2. Select **Collaborate** / **Communicate**.
3. Search for **OAuth**.
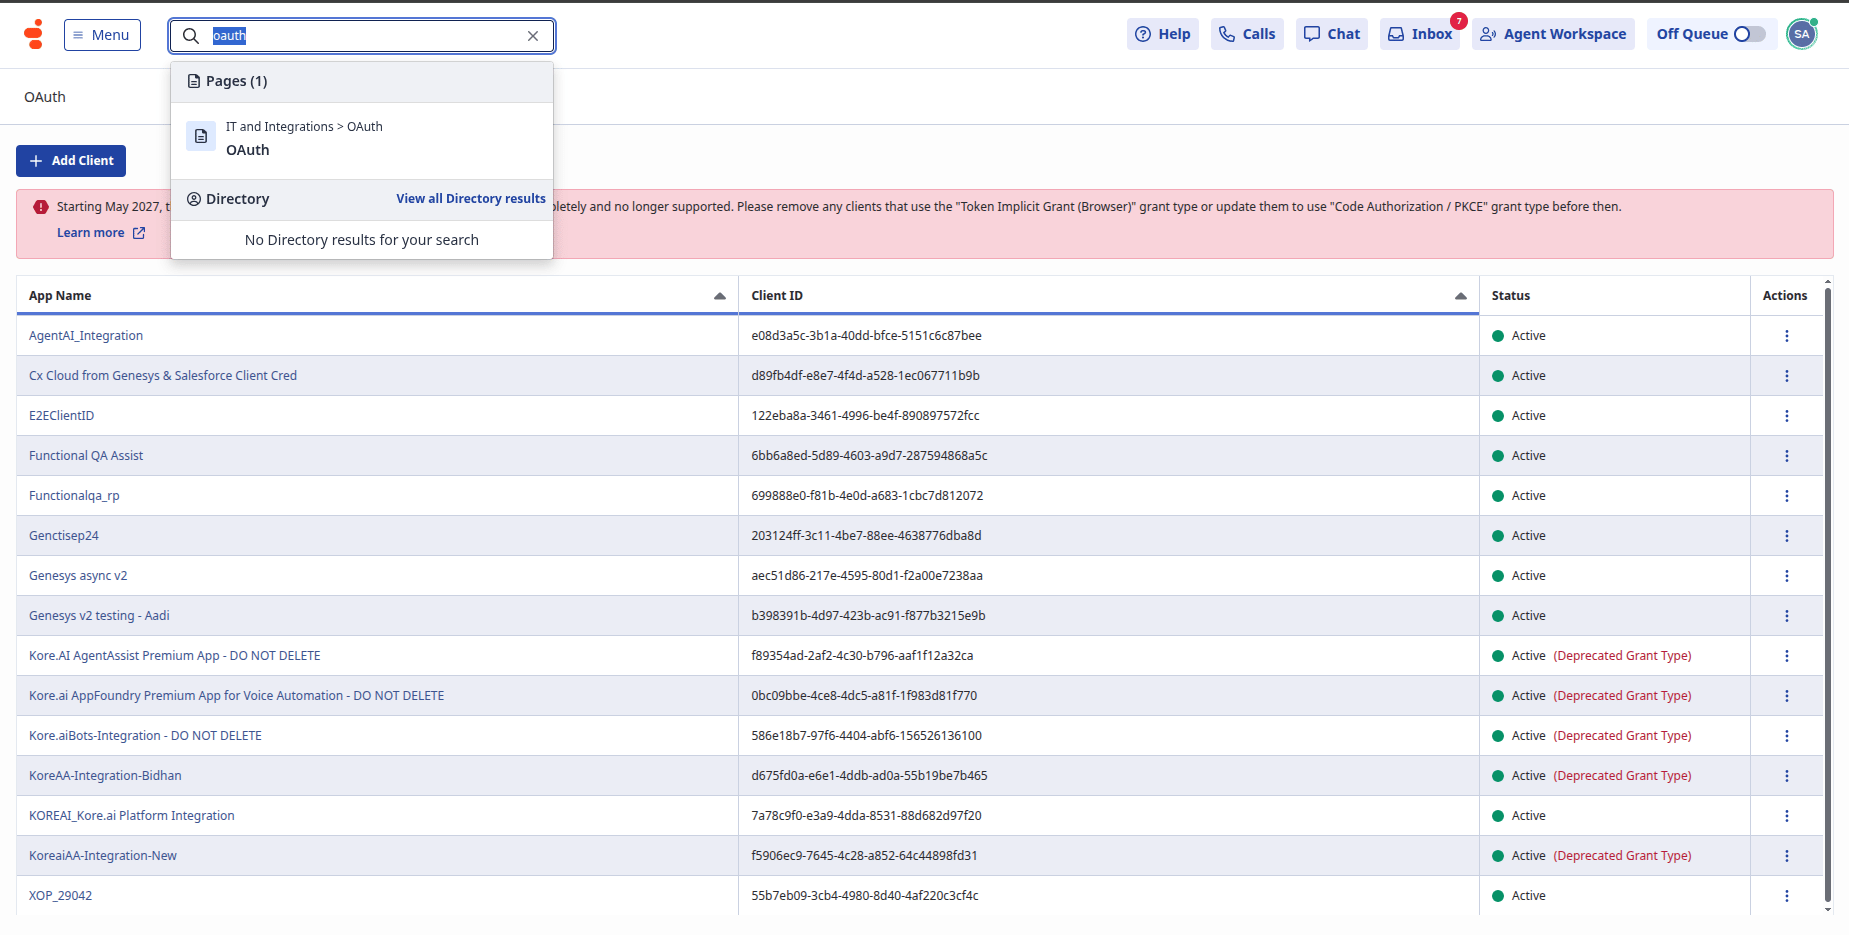 4. Select **Add Client**.
5. Enter the **app name** and **description**, and select **Code Authoriztion/PKCE** as the **Grant Type**.
6. Enter token duration and add `{Agent AI URL}/koreaiaa-genesys/` in the **Authorized redirect URIs** field.
7. Add the following list of scopes in the **Scope** section:
* architect:readonly
* conversations
* conversations:readonly
* integrations
* integrations:readonly
* messaging
* messaging-platform
* messaging-platform:readonly
* messaging:readonly
* notifications
* user-basic-info
* web-chat
* web-chat:readonly
4. Select **Add Client**.
5. Enter the **app name** and **description**, and select **Code Authoriztion/PKCE** as the **Grant Type**.
6. Enter token duration and add `{Agent AI URL}/koreaiaa-genesys/` in the **Authorized redirect URIs** field.
7. Add the following list of scopes in the **Scope** section:
* architect:readonly
* conversations
* conversations:readonly
* integrations
* integrations:readonly
* messaging
* messaging-platform
* messaging-platform:readonly
* messaging:readonly
* notifications
* user-basic-info
* web-chat
* web-chat:readonly
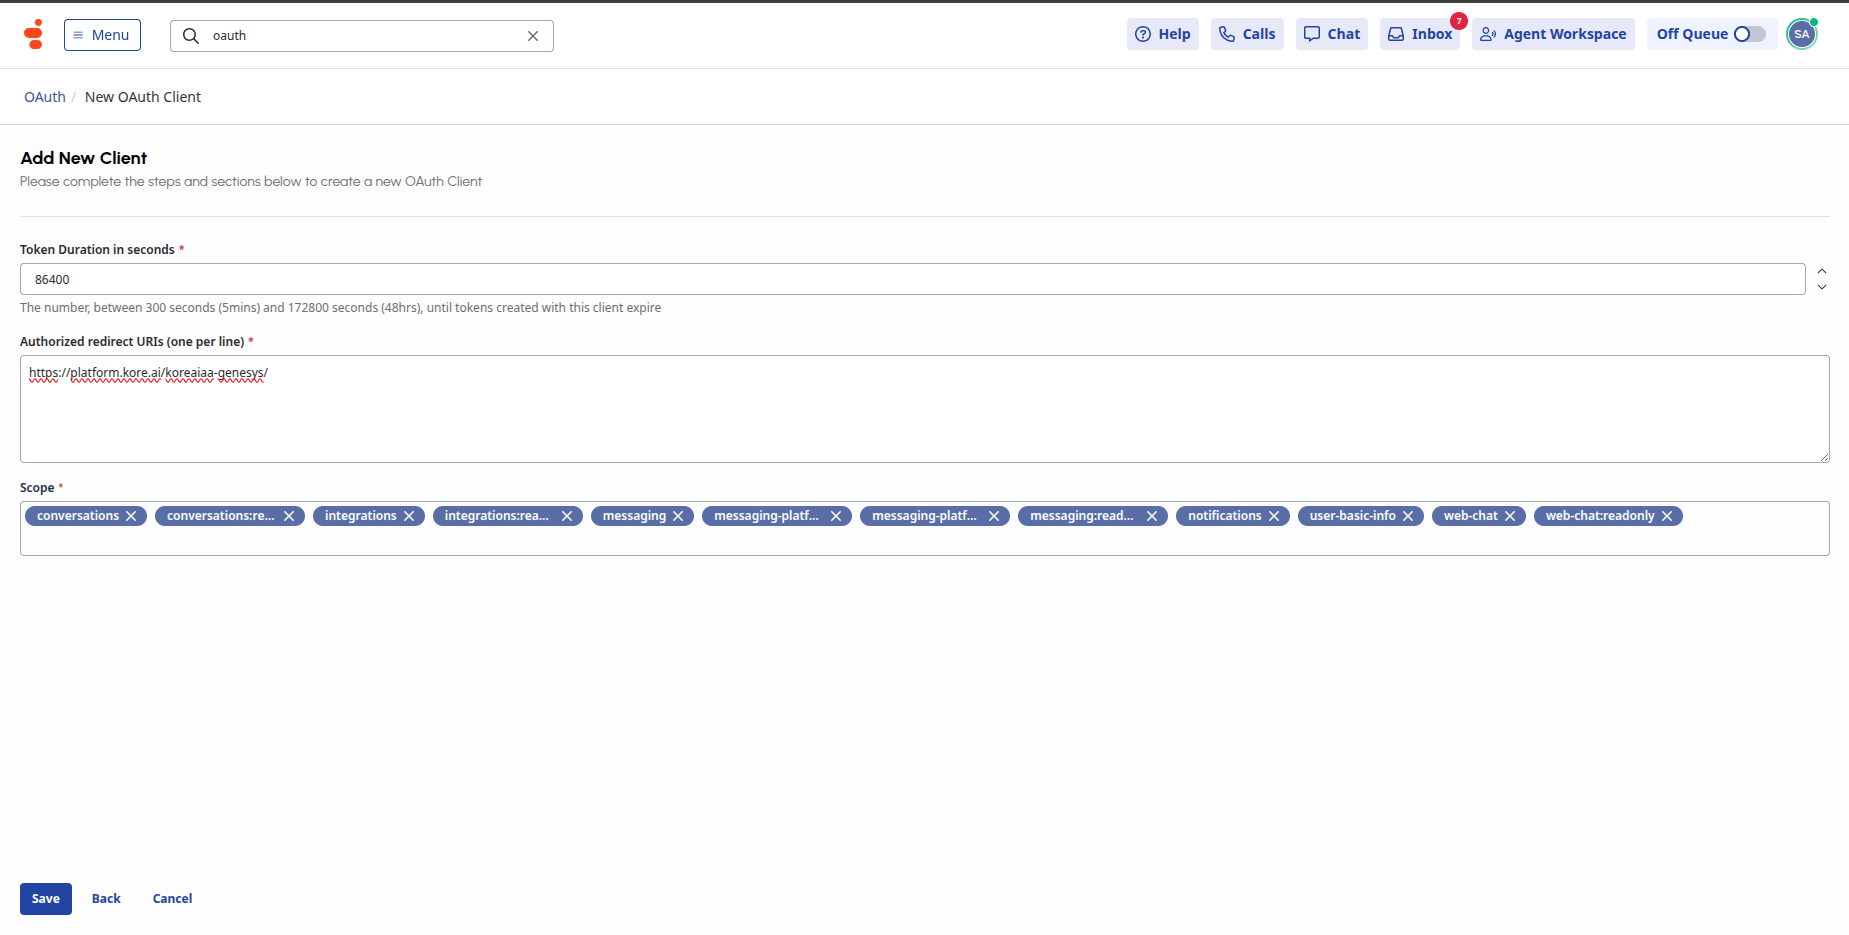 After saving the configuration, you get the **Client Id** of the OAuth client. Copy the ID and have it available for [the next step](#create-an-interaction-widget-in-genesys-for-agent-ai).
## Create an Interaction Widget in Genesys for Agent AI
Create a new Interaction Widget. The Genesys Agent Desktop hosts this widget, and it provides the Agent AI solution features to agents.
1. Sign in to **Genesys Cloud**.
2. Select **Collaborate** / **Communicate**.
3. Select **Menu** > **Integrations**.
4. If you haven't created an Interaction Widget for Agent AI, install a new **Interaction Widget** by selecting **Add integration**.
5. Enter a meaningful name for the Interaction Widget, such as KoreaiAA Interaction Widget.
6. Open the Interaction Widget by selecting the name.
7. Go to the **Configuration** tab of the Interaction Widget.
8. In the **Application URL** field, enter the following structure:
```
{Agent AI URL}/koreaiaa-genesys/?conversationid={{gcConversationId}}&lang={{gcLangTag}}&environment={{gcHostOrigin}}&genesysid=
After saving the configuration, you get the **Client Id** of the OAuth client. Copy the ID and have it available for [the next step](#create-an-interaction-widget-in-genesys-for-agent-ai).
## Create an Interaction Widget in Genesys for Agent AI
Create a new Interaction Widget. The Genesys Agent Desktop hosts this widget, and it provides the Agent AI solution features to agents.
1. Sign in to **Genesys Cloud**.
2. Select **Collaborate** / **Communicate**.
3. Select **Menu** > **Integrations**.
4. If you haven't created an Interaction Widget for Agent AI, install a new **Interaction Widget** by selecting **Add integration**.
5. Enter a meaningful name for the Interaction Widget, such as KoreaiAA Interaction Widget.
6. Open the Interaction Widget by selecting the name.
7. Go to the **Configuration** tab of the Interaction Widget.
8. In the **Application URL** field, enter the following structure:
```
{Agent AI URL}/koreaiaa-genesys/?conversationid={{gcConversationId}}&lang={{gcLangTag}}&environment={{gcHostOrigin}}&genesysid=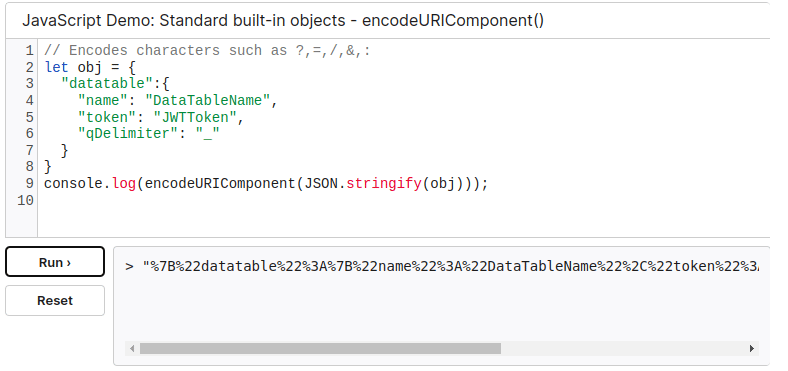 7. Copy the URL-encoded string and paste it as the `x_metadata` value.
3. Allow all permissions in **iFrame Sandbox Options** and **iFrame Feature/Permission Policy**:
**iFrame Sandbox Options**: allow-forms,allow-modals,allow-popups,allow-presentation,allow-same-origin,allow-scripts,allow-downloads.
**iFrame Feature/Permission Policy**: camera,microphone,geolocation,clipboard-write,display-capture,fullscreen.
**Communication Type Filtering**: chat and call.
## Provide Interaction Widget access to agents
To view the Interaction Widget, agents must have the following accesses:
### Group Membership
An Interaction Widget uses Group Membership to determine who can view it on the agent desktop.
1. Use an existing group, if your agents are already part of it. Otherwise, create a new group for Agent AI permission.
2. Name the group as **KoreAA-Agents** or a similar name to distinguish it.
3. Add any agent to allow them to use the Agent AI functionality. You can use multiple groups.
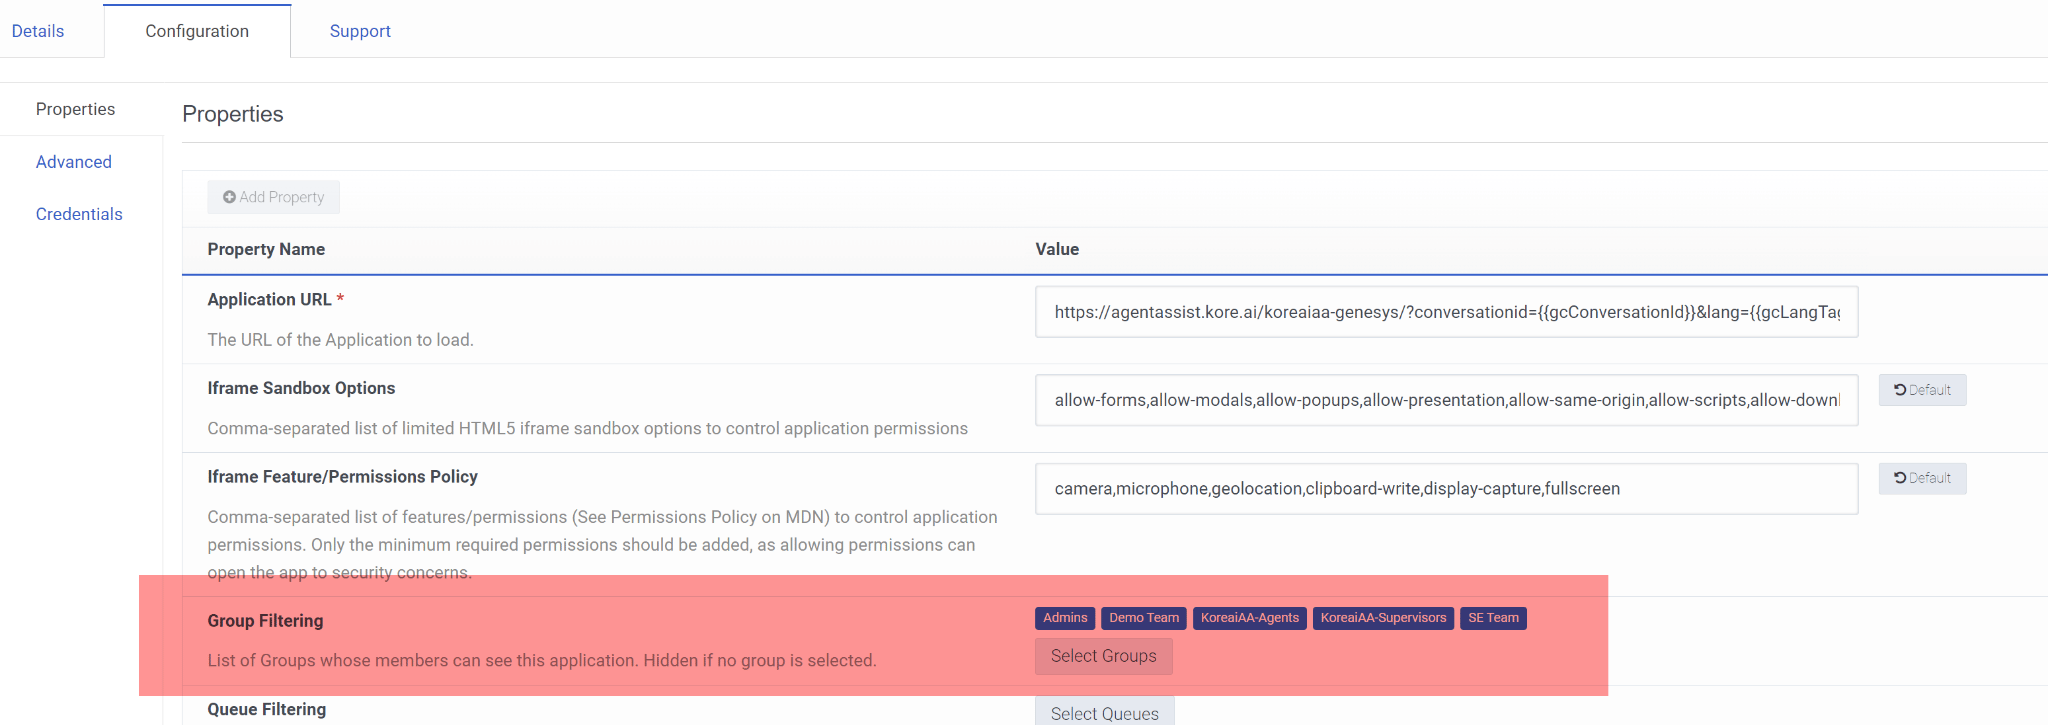
4. Go back to the **Integrations** section and open the **Interaction Widget** you created in the [Create an interaction widget](#create-an-interaction-widget-in-genesys-for-agent-ai) section.
5. On the **Configuration** tab, add access using the group you identified or created for Agent AI in the Group Filtering option.
You may also use Queue Filtering (optional).
7. Copy the URL-encoded string and paste it as the `x_metadata` value.
3. Allow all permissions in **iFrame Sandbox Options** and **iFrame Feature/Permission Policy**:
**iFrame Sandbox Options**: allow-forms,allow-modals,allow-popups,allow-presentation,allow-same-origin,allow-scripts,allow-downloads.
**iFrame Feature/Permission Policy**: camera,microphone,geolocation,clipboard-write,display-capture,fullscreen.
**Communication Type Filtering**: chat and call.
## Provide Interaction Widget access to agents
To view the Interaction Widget, agents must have the following accesses:
### Group Membership
An Interaction Widget uses Group Membership to determine who can view it on the agent desktop.
1. Use an existing group, if your agents are already part of it. Otherwise, create a new group for Agent AI permission.
2. Name the group as **KoreAA-Agents** or a similar name to distinguish it.
3. Add any agent to allow them to use the Agent AI functionality. You can use multiple groups.
4. Go back to the **Integrations** section and open the **Interaction Widget** you created in the [Create an interaction widget](#create-an-interaction-widget-in-genesys-for-agent-ai) section.
5. On the **Configuration** tab, add access using the group you identified or created for Agent AI in the Group Filtering option.
You may also use Queue Filtering (optional).
 ### Custom Role/Permission
along with the basic agent role, add the following role:
1. Sign in to **Genesys Cloud**.
2. Select **Collaborate** / **Communicate**.
3. Select **Menu** > **User Management** > **Roles and Permissions**.
4. Select **Add Role** to create a new role.
5. Enter a distinctive name to the role; for example, KoreaiAA Agent.
6. On the **Permission** tab, search for **Conversation** > **Transcription - View**, and add it (select the box):
### Custom Role/Permission
along with the basic agent role, add the following role:
1. Sign in to **Genesys Cloud**.
2. Select **Collaborate** / **Communicate**.
3. Select **Menu** > **User Management** > **Roles and Permissions**.
4. Select **Add Role** to create a new role.
5. Enter a distinctive name to the role; for example, KoreaiAA Agent.
6. On the **Permission** tab, search for **Conversation** > **Transcription - View**, and add it (select the box):
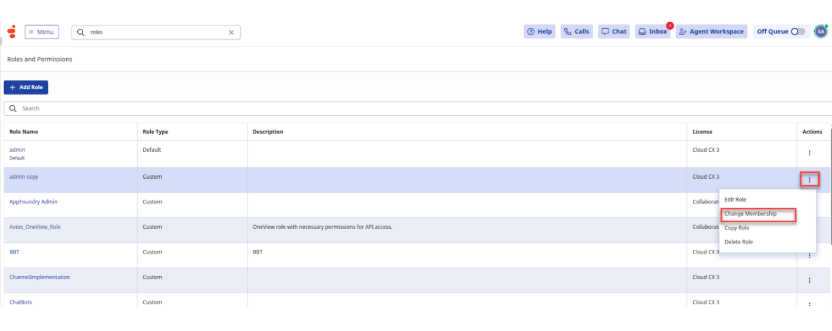
 7. On the **Roles and Permissions** page, select the three dots at the right end of a role, and select **Change Membership**. Add the appropriate agents to the role.
 ## Create a Queue in Genesys
1. Sign in to [Genesys Pure Cloud](https://apps.mypurecloud.com/).
2. Select **Collaborate** / **Communicate**.
3. Select **Menu** > **User Management** > **Queues**, or enter `queues` in the search bar under the **Collaborate** / **Communicate** section and press the **Enter** key.
4. Select **Create Queue**.
5. Enter/select the following details in the **Create Queue** page:
* **Name**: Enter a unique name for the new queue.
* **Division**: Select a division in which you want to place this queue.
* **Copy settings and members from (optional)**: Select an existing queue name, if you want to copy the settings and members from it.
* **Peer Id** (optional): Enter a unique ID the system can use to identify the queue from an external platform.
6. Select **Save**.
### Enabling the Audio Monitoring toggle
To stream audio to third-party services, follow these steps:
1. Sign in to [Genesys Cloud](https://apps.mypurecloud.com/).
2. Select **Menu** > **User Management** > **Queues**, or enter `queues` in the search bar under the **Collaborate** / **Communicate** section and press the Enter key.
3. Select a queue name.
4. Select the **Voice** tab.
5. Turn on the **Audio Monitoring** toggle.
## Create a Queue in Genesys
1. Sign in to [Genesys Pure Cloud](https://apps.mypurecloud.com/).
2. Select **Collaborate** / **Communicate**.
3. Select **Menu** > **User Management** > **Queues**, or enter `queues` in the search bar under the **Collaborate** / **Communicate** section and press the **Enter** key.
4. Select **Create Queue**.
5. Enter/select the following details in the **Create Queue** page:
* **Name**: Enter a unique name for the new queue.
* **Division**: Select a division in which you want to place this queue.
* **Copy settings and members from (optional)**: Select an existing queue name, if you want to copy the settings and members from it.
* **Peer Id** (optional): Enter a unique ID the system can use to identify the queue from an external platform.
6. Select **Save**.
### Enabling the Audio Monitoring toggle
To stream audio to third-party services, follow these steps:
1. Sign in to [Genesys Cloud](https://apps.mypurecloud.com/).
2. Select **Menu** > **User Management** > **Queues**, or enter `queues` in the search bar under the **Collaborate** / **Communicate** section and press the Enter key.
3. Select a queue name.
4. Select the **Voice** tab.
5. Turn on the **Audio Monitoring** toggle.
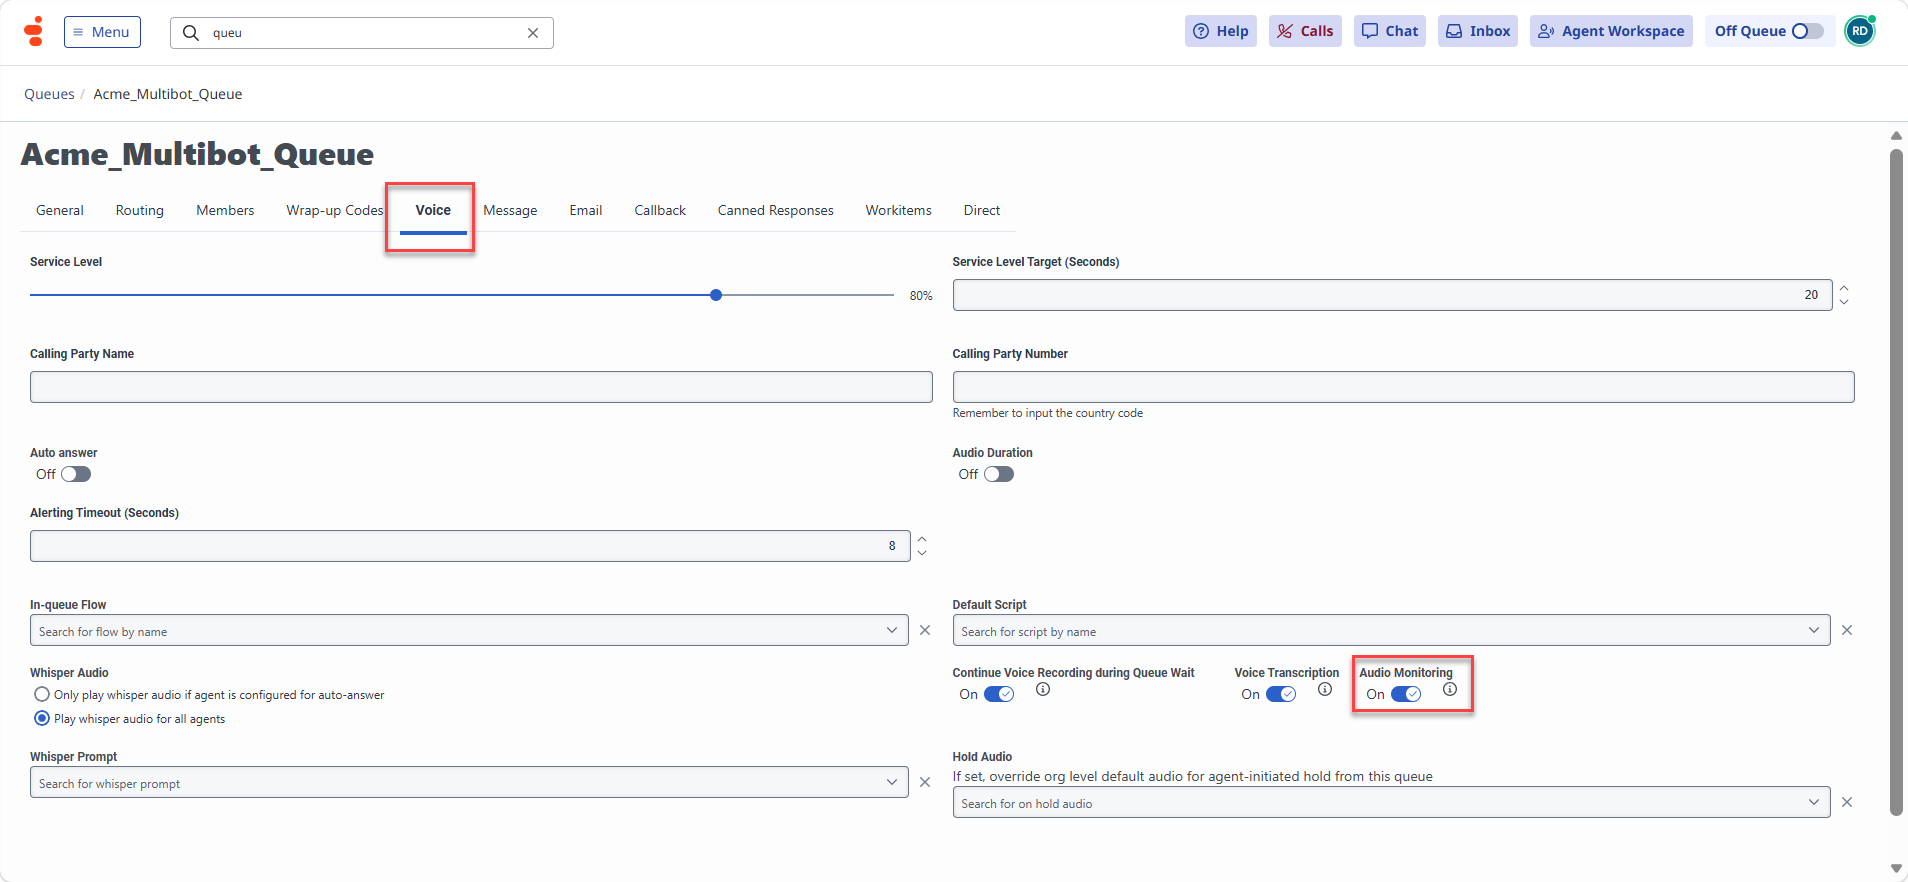 **Audio Monitoring**: Voice settings on a Queue have an additional **Audio Monitoring** option, separate from **Voice Transcription**. This gives you control over which features you turn on. Audio Monitoring activates in the queue only if your organization activates Audiohook Monitor.
## Chat Setup
### Create or Update Architect Inbound Message Flow in Genesys for the Agent Queue
This step manages incoming messages to the Genesys platform. When you initiate a chat from the [web chat messenger](https://developer.genesys.cloud/devapps/web-chat-messenger), Genesys routes it to this inbound message flow first.
1. Sign in to [Genesys Cloud](https://apps.mypurecloud.com/directory/#/login-oauth).
2. Go to **Menu** > **Orchestration** > **Architect**.
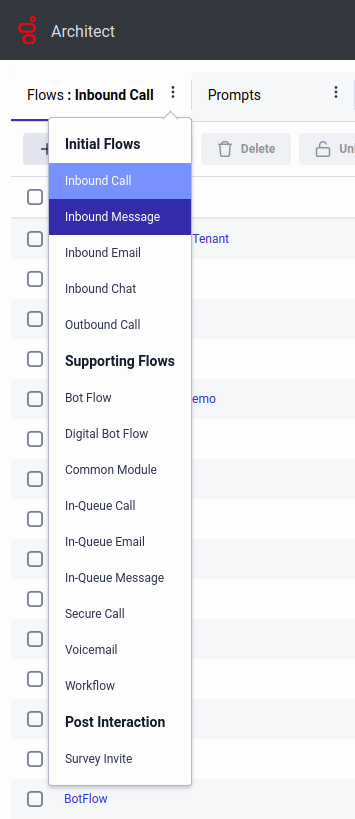
3. Select the three dots next to **Flows: Inbound Call**, and select **Inbound Message**.
**Audio Monitoring**: Voice settings on a Queue have an additional **Audio Monitoring** option, separate from **Voice Transcription**. This gives you control over which features you turn on. Audio Monitoring activates in the queue only if your organization activates Audiohook Monitor.
## Chat Setup
### Create or Update Architect Inbound Message Flow in Genesys for the Agent Queue
This step manages incoming messages to the Genesys platform. When you initiate a chat from the [web chat messenger](https://developer.genesys.cloud/devapps/web-chat-messenger), Genesys routes it to this inbound message flow first.
1. Sign in to [Genesys Cloud](https://apps.mypurecloud.com/directory/#/login-oauth).
2. Go to **Menu** > **Orchestration** > **Architect**.
3. Select the three dots next to **Flows: Inbound Call**, and select **Inbound Message**.
 4. Select **+Add** to create an **Inbound Message Flow**.
5. Enter the name and description of the inbound message flow.
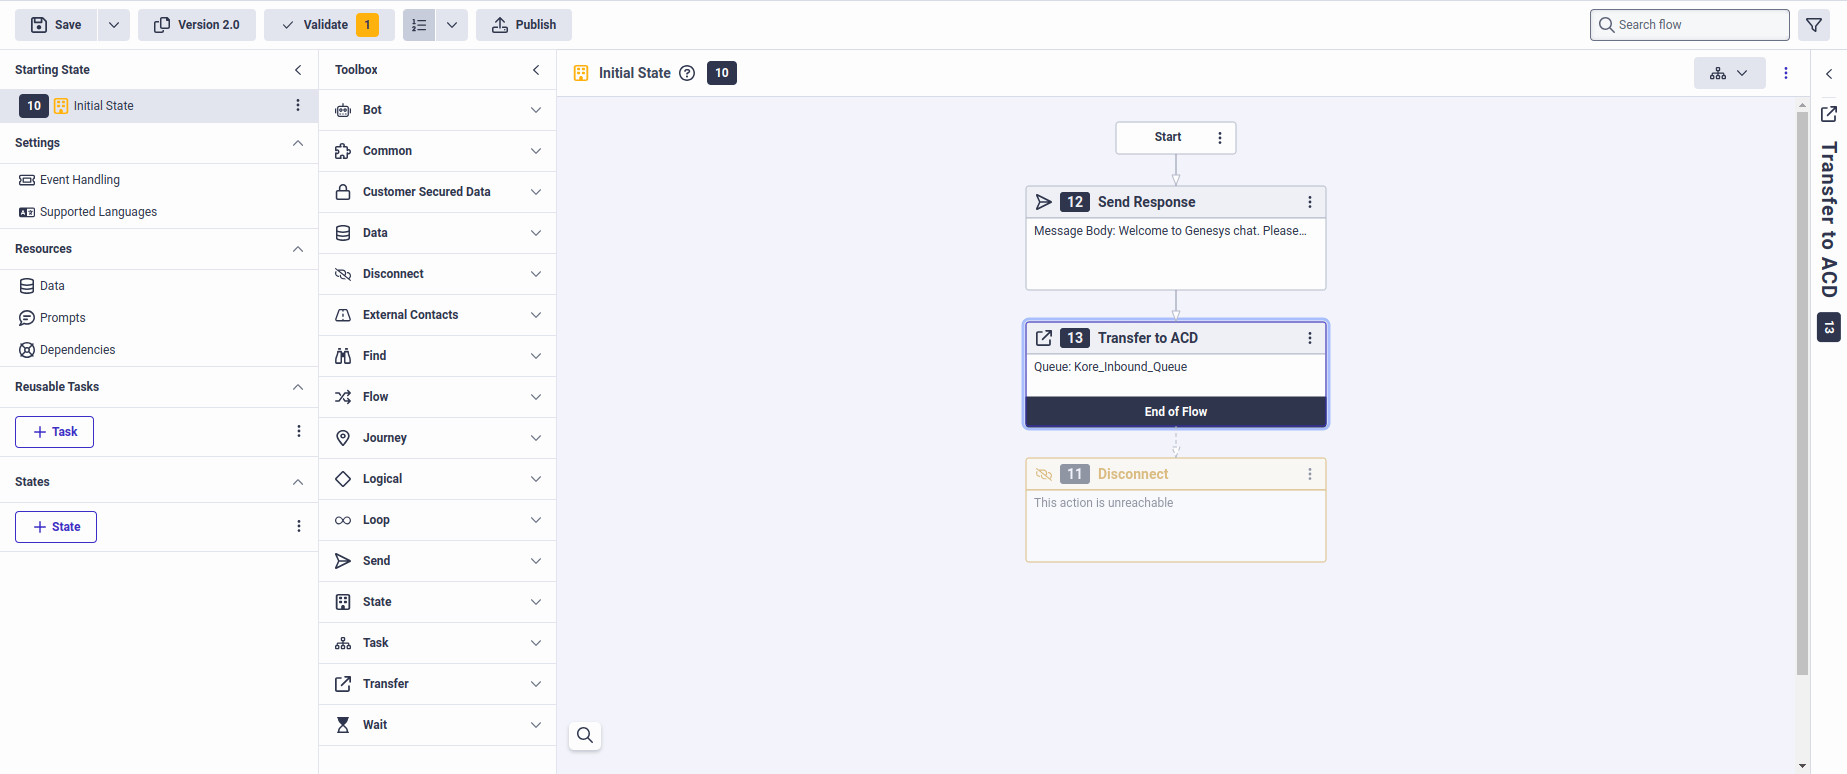
6. Select **Create Flow**. The final architect flow looks like the following screenshot:
4. Select **+Add** to create an **Inbound Message Flow**.
5. Enter the name and description of the inbound message flow.
6. Select **Create Flow**. The final architect flow looks like the following screenshot:
 7. Select **Publish**.
### Create Messenger Configuration
Before using web messaging, you must configure it in Genesys Cloud. To configure Web or Mobile Messaging in your organization, follow these steps:
1. In [Genesys Cloud](https://apps.mypurecloud.com/), go to **Menu** > **Digital and Telephony** > **Message** > **Messenger Configurations**.
2. Select **New Setup**.
3. Enter a name and description.
4. Select a digital channel: **Messaging**, **Knowledge**, or **Knowledge Portal**.
5. Select **Next**.
6. In the **Appearance** tab, complete the following information:
* Under **Select your Supported Languages**, select the **Select language(s)** list and choose the languages that you want to support in the Messenger interface.
7. Select **Publish**.
### Create Messenger Configuration
Before using web messaging, you must configure it in Genesys Cloud. To configure Web or Mobile Messaging in your organization, follow these steps:
1. In [Genesys Cloud](https://apps.mypurecloud.com/), go to **Menu** > **Digital and Telephony** > **Message** > **Messenger Configurations**.
2. Select **New Setup**.
3. Enter a name and description.
4. Select a digital channel: **Messaging**, **Knowledge**, or **Knowledge Portal**.
5. Select **Next**.
6. In the **Appearance** tab, complete the following information:
* Under **Select your Supported Languages**, select the **Select language(s)** list and choose the languages that you want to support in the Messenger interface.
 * Adjust the other settings according to your preferences.
7. Select the **Apps** tab and complete the following steps:
* Under **Clear Conversation**, turn the toggle on. You need this for the **Agent AI Conversation Summary** feature to work.
* Adjust the other settings according to your preferences.
7. Select the **Apps** tab and complete the following steps:
* Under **Clear Conversation**, turn the toggle on. You need this for the **Agent AI Conversation Summary** feature to work.
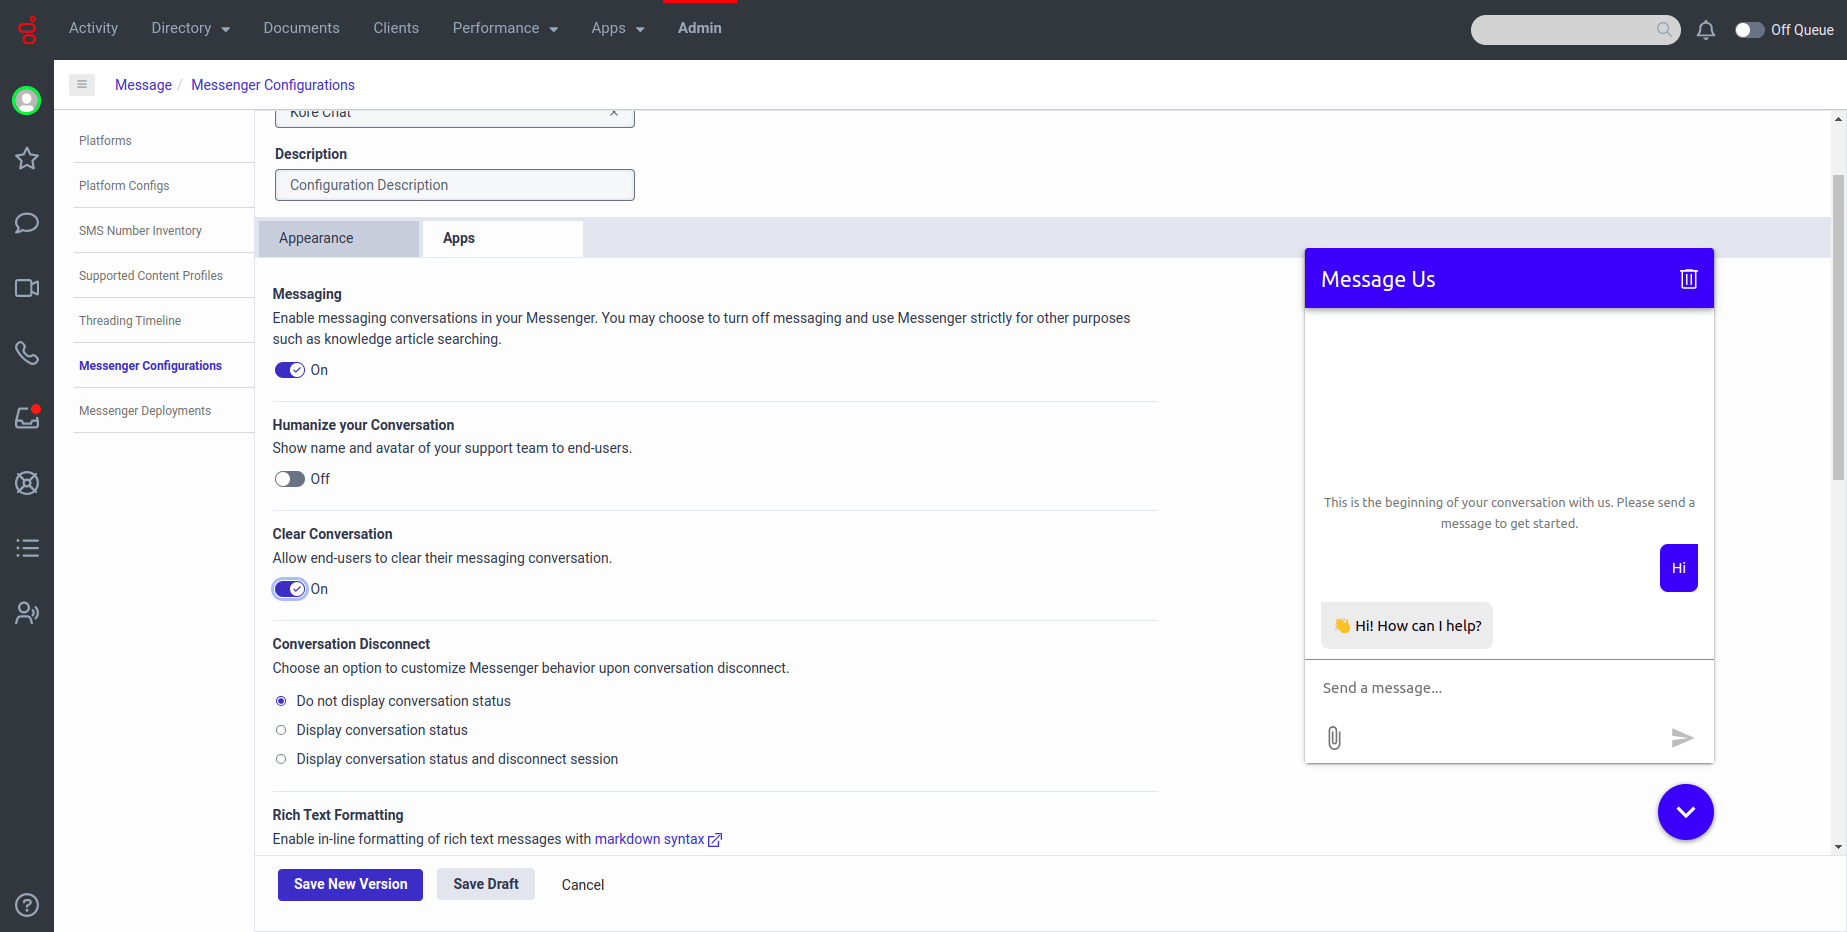 * Adjust the other settings according to your preferences.
8. Select **Save New Version** to create a new version.
### Create Messenger Deployments
To deploy the Messenger snippet to your website, follow these steps:
1. In [Genesys Cloud](https://apps.mypurecloud.com/), go to **Menu** > **Digital and Telephony** > **Message** > **Messenger Deployments**.
2. Select **New Deployment**.
3. Enter a name and description.
4. Under **Select your Configuration**, select the **Select Configuration** option to select a version of a messenger configuration you created in the previous step to assign to this deployment.
* In the **Assignment** pane, navigate to the Messenger configuration you want to assign to the configuration, and select the name of the Messenger configuration.
* Select the version you want to assign.
* Select **Save**.
5. Under **Restrict domain access**, determine whether to allow all domains or restrict the domains on which you want to deploy the snippet.
* To allow all domains, select **Allow all domains**. (Use this option for testing and development purposes.)
* To restrict domains, enter a domain and select **Add Domain**. You can add multiple domains to the list. Restrict domains to prevent unauthorized usage of your snippet from unknown domains. If you restrict a domain, Messenger doesn't run on that website and rejects API requests from that domain.
6. Under **Select your Architect Flow**, select the inbound message flow you created in the previous steps.
7. Select **Save**. The Messenger Deployments page now displays the snippet and the deployment key.
8. Copy the Messenger snippet and deploy the Messenger snippet to your website.
If you are building a custom Messenger, copy the deployment key.
* Adjust the other settings according to your preferences.
8. Select **Save New Version** to create a new version.
### Create Messenger Deployments
To deploy the Messenger snippet to your website, follow these steps:
1. In [Genesys Cloud](https://apps.mypurecloud.com/), go to **Menu** > **Digital and Telephony** > **Message** > **Messenger Deployments**.
2. Select **New Deployment**.
3. Enter a name and description.
4. Under **Select your Configuration**, select the **Select Configuration** option to select a version of a messenger configuration you created in the previous step to assign to this deployment.
* In the **Assignment** pane, navigate to the Messenger configuration you want to assign to the configuration, and select the name of the Messenger configuration.
* Select the version you want to assign.
* Select **Save**.
5. Under **Restrict domain access**, determine whether to allow all domains or restrict the domains on which you want to deploy the snippet.
* To allow all domains, select **Allow all domains**. (Use this option for testing and development purposes.)
* To restrict domains, enter a domain and select **Add Domain**. You can add multiple domains to the list. Restrict domains to prevent unauthorized usage of your snippet from unknown domains. If you restrict a domain, Messenger doesn't run on that website and rejects API requests from that domain.
6. Under **Select your Architect Flow**, select the inbound message flow you created in the previous steps.
7. Select **Save**. The Messenger Deployments page now displays the snippet and the deployment key.
8. Copy the Messenger snippet and deploy the Messenger snippet to your website.
If you are building a custom Messenger, copy the deployment key.
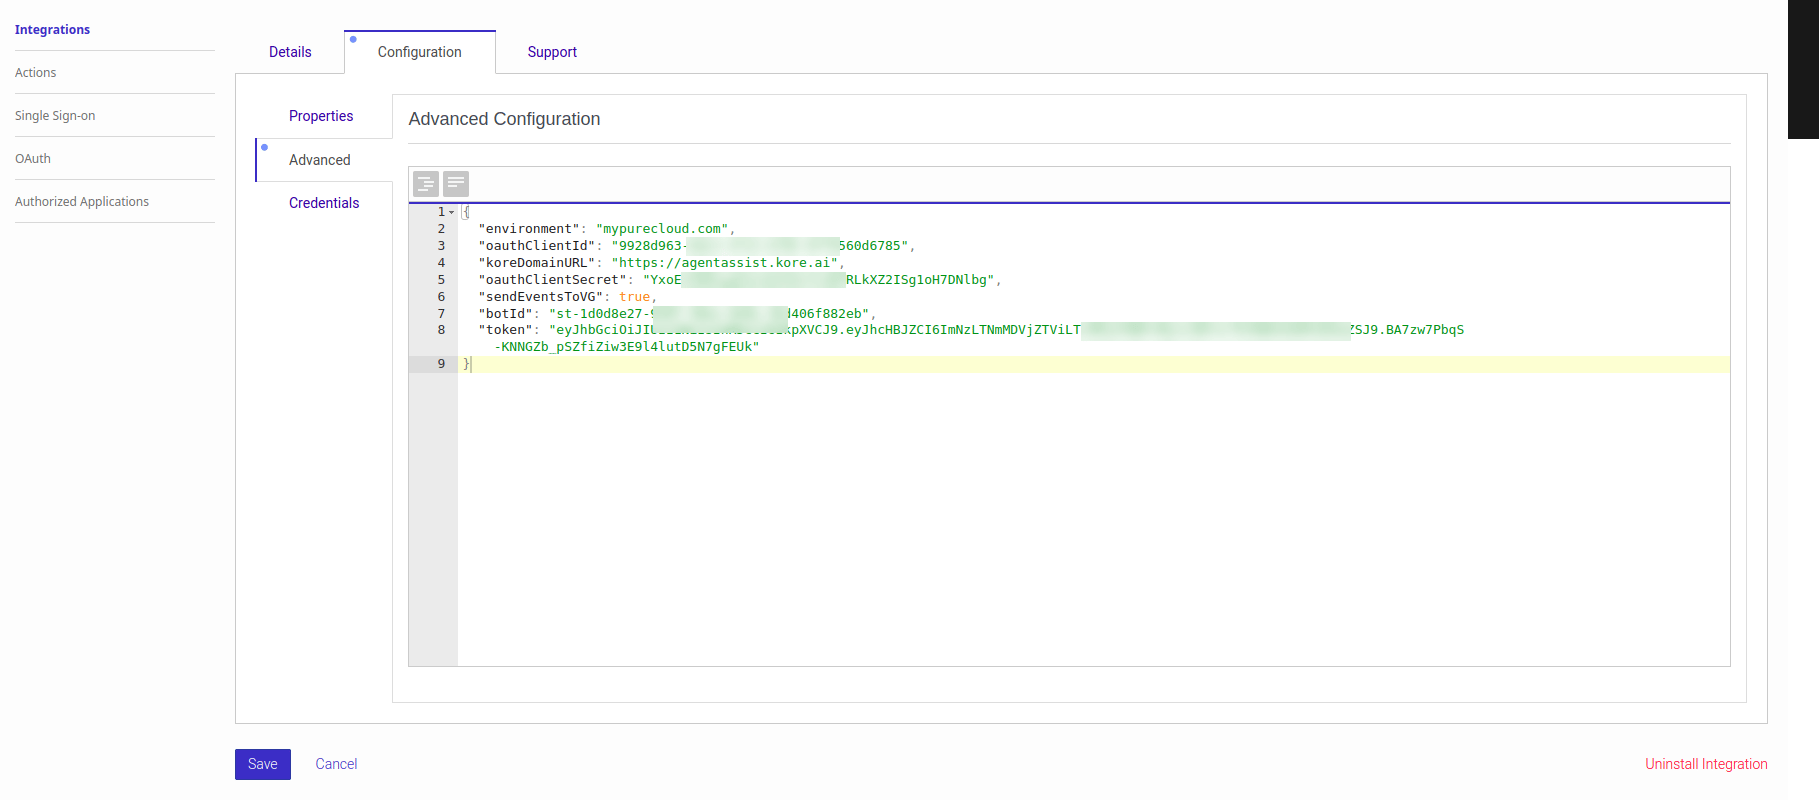 7. Add credentials in the **Credentials** tab.
8. Use the **ClientID** and **ClientSecret** of the AI Agent you used while configuring the Audiohook. The system uses these credentials to validate the audio stream signature.
9. Select **Save**.
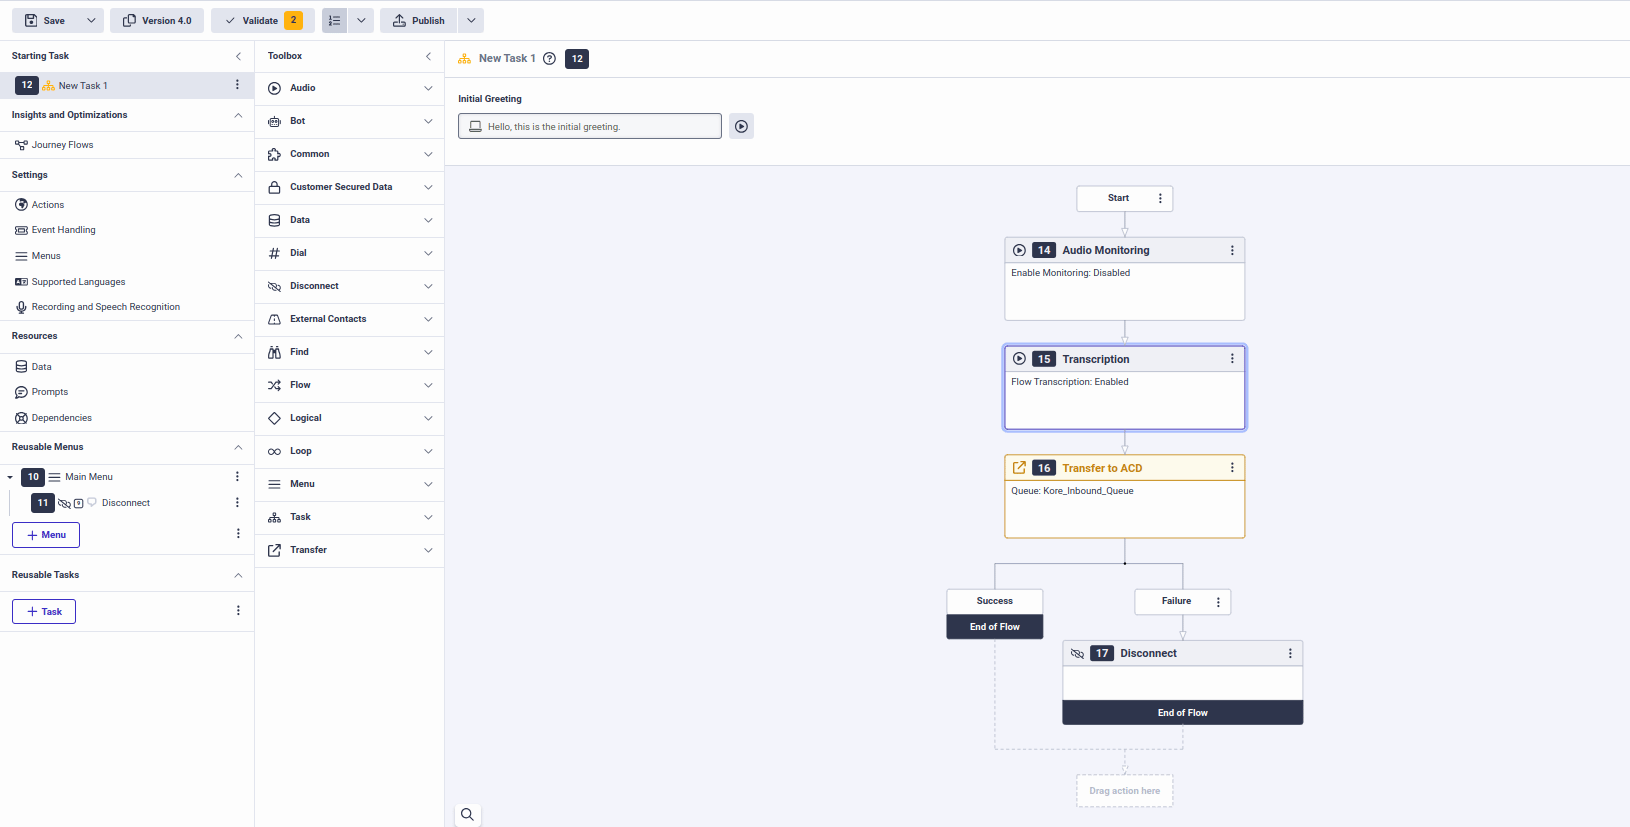
## Create or Update Architect Inbound Call Flow in Genesys for the Agent Queue
Calls coming to a Genesys number pass through an architect flow. If you don't have an Automatic Call Distribution (ACD) architect flow for the queue, create one by following this section.
1. In [Genesys Cloud](https://apps.mypurecloud.com/), go to **Menu** > **Orchestration** > **Architect**.
2. Select **+Add** to create an **Inbound Call Flow**.
3. Select **Create Flow**. The final architect flow looks like the following screenshot:
7. Add credentials in the **Credentials** tab.
8. Use the **ClientID** and **ClientSecret** of the AI Agent you used while configuring the Audiohook. The system uses these credentials to validate the audio stream signature.
9. Select **Save**.
## Create or Update Architect Inbound Call Flow in Genesys for the Agent Queue
Calls coming to a Genesys number pass through an architect flow. If you don't have an Automatic Call Distribution (ACD) architect flow for the queue, create one by following this section.
1. In [Genesys Cloud](https://apps.mypurecloud.com/), go to **Menu** > **Orchestration** > **Architect**.
2. Select **+Add** to create an **Inbound Call Flow**.
3. Select **Create Flow**. The final architect flow looks like the following screenshot:
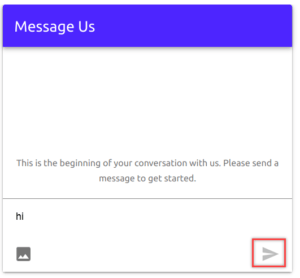
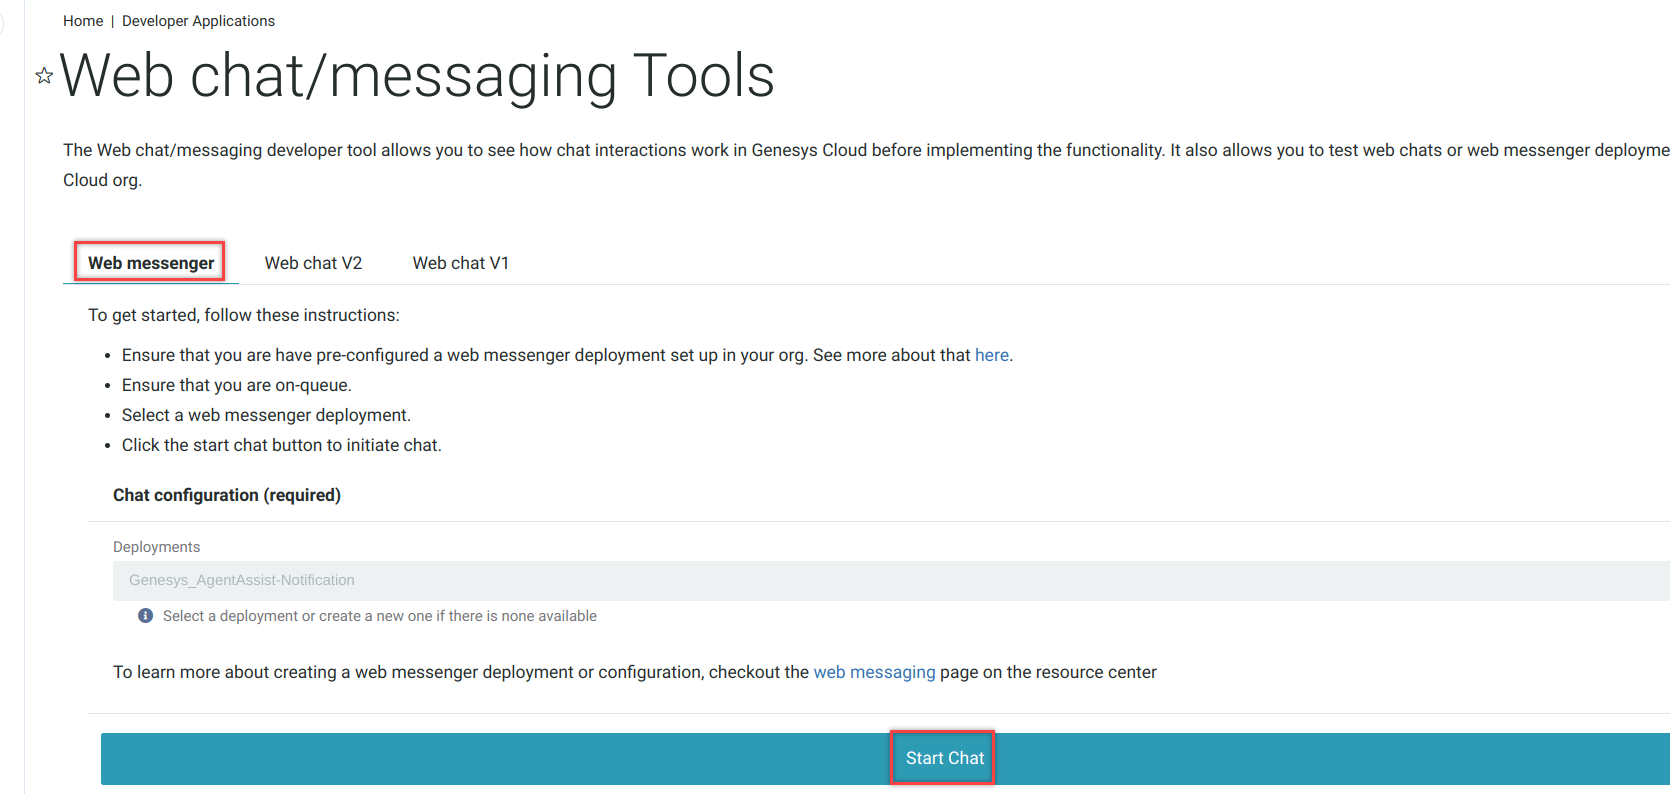 3. Enter a message on the **Message Us** window, and then select the **Send** icon.
 4. Turn on the **On Queue** toggle on the upper-right corner of the page. A new chat notification appears on the **Genesys Agent Desktop**.
5. Accept the conversation by selecting **Answer** on the left panel.
6. Select the Interaction Widget icon to view the Agent AI widget.
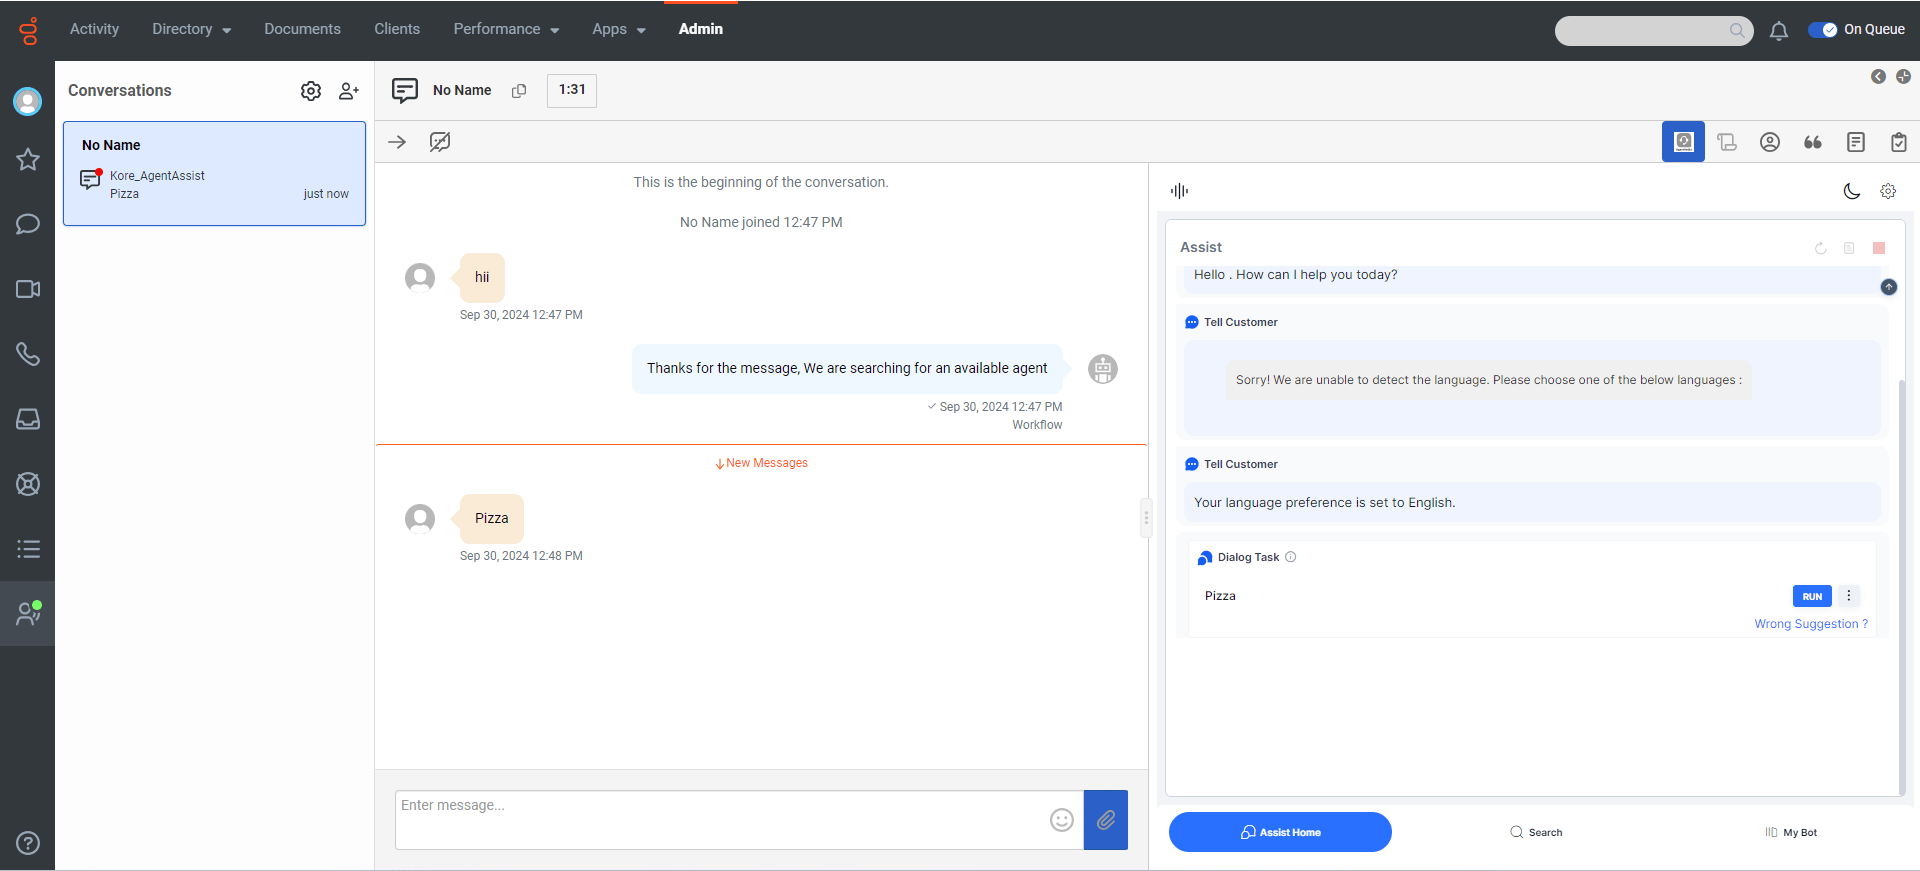
4. Turn on the **On Queue** toggle on the upper-right corner of the page. A new chat notification appears on the **Genesys Agent Desktop**.
5. Accept the conversation by selecting **Answer** on the left panel.
6. Select the Interaction Widget icon to view the Agent AI widget.
 **Start a Voice Request Simulation**:
1. In **Call Routing**, assign the **Architect flow** you created in a [previous step](#steps-to-create-a-call-architect-flow) to a Genesys phone number.
2. Initiate a call using this Genesys phone number. A new call notification appears on the Genesys Agent Desktop.
3. Accept the conversation by clicking **Answer** on the left panel.
4. Select the Interaction Widget icon to view the Agent AI widget.
**Start a Voice Request Simulation**:
1. In **Call Routing**, assign the **Architect flow** you created in a [previous step](#steps-to-create-a-call-architect-flow) to a Genesys phone number.
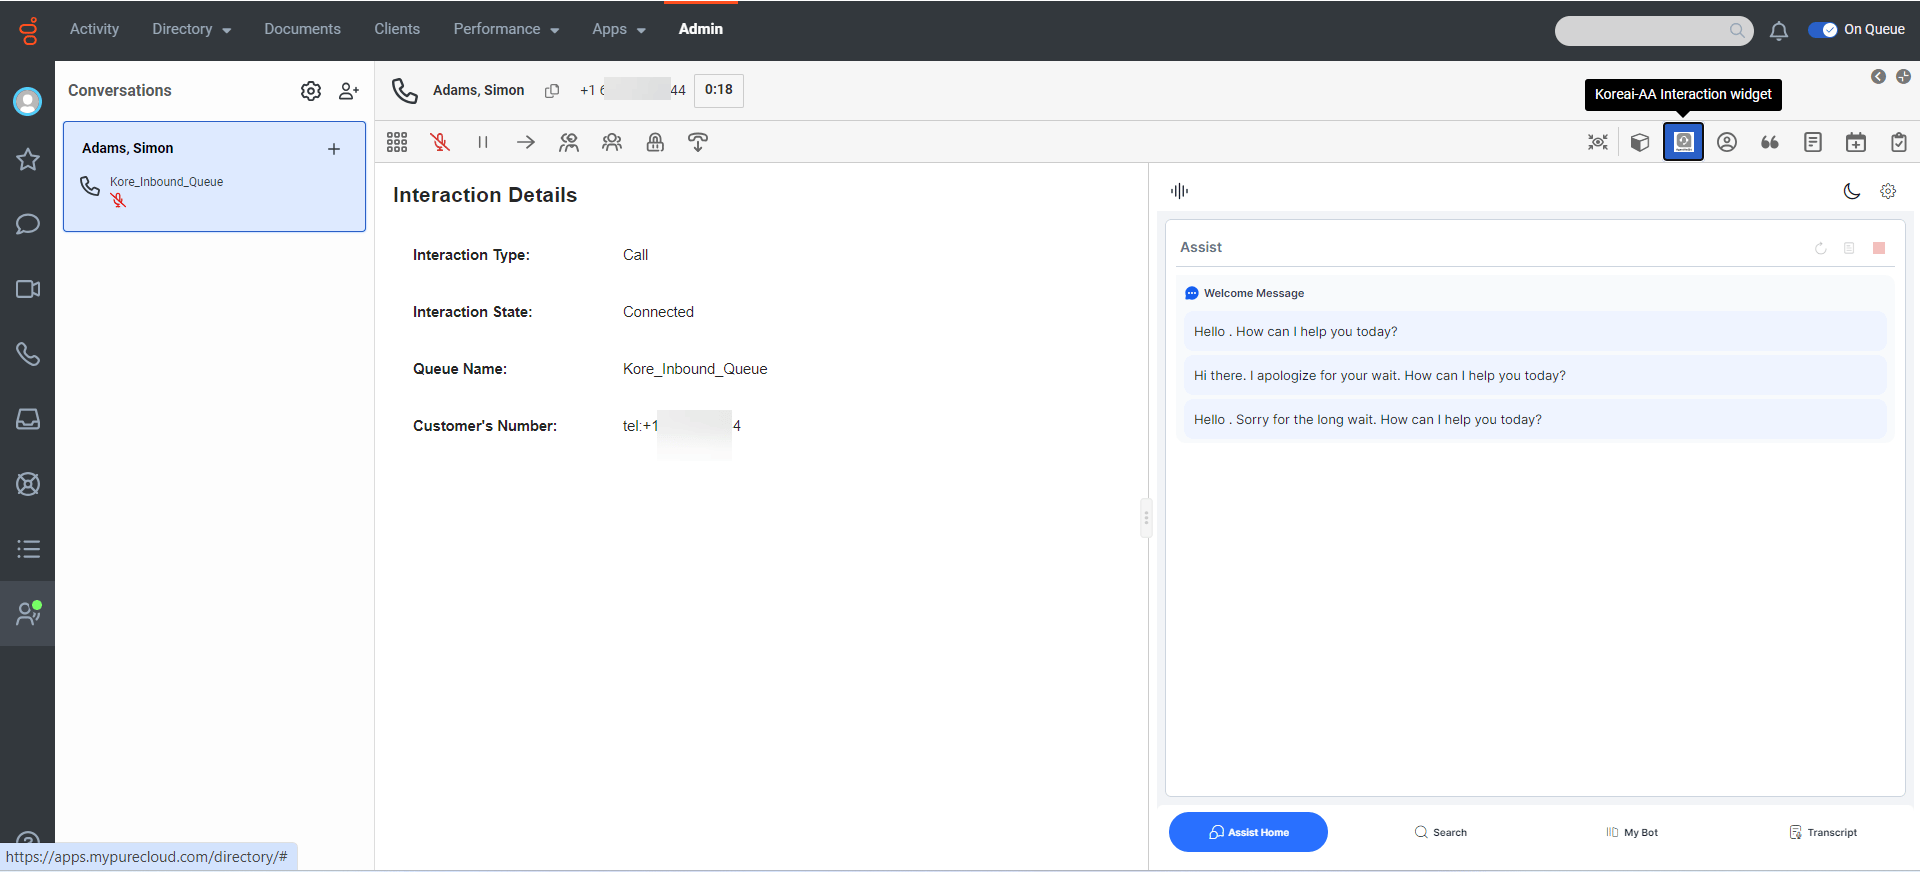
2. Initiate a call using this Genesys phone number. A new call notification appears on the Genesys Agent Desktop.
3. Accept the conversation by clicking **Answer** on the left panel.
4. Select the Interaction Widget icon to view the Agent AI widget.
 ## Set the default contextual panel to Kore Agent AI Interaction Widget
To streamline call handling and improve efficiency, you can embed the Agent AI widget as the primary contextual panel interaction widget.
To set this up:
1. In [Genesys Cloud](https://apps.mypurecloud.com/), select **Menu** > **Digital and Telephony** > **Interaction Assets** > **Panel Manager**. This opens the **Default Contextual Panel**.
2. Select the interaction widget name in both **Voice** and **Web Messaging** field dropdown lists (refer to step-4 of [Create an Interaction Widget in Genesys for Agent AI](#create-an-interaction-widget-in-genesys-for-agent-ai)).
3. Select **Save**.
## Set the default contextual panel to Kore Agent AI Interaction Widget
To streamline call handling and improve efficiency, you can embed the Agent AI widget as the primary contextual panel interaction widget.
To set this up:
1. In [Genesys Cloud](https://apps.mypurecloud.com/), select **Menu** > **Digital and Telephony** > **Interaction Assets** > **Panel Manager**. This opens the **Default Contextual Panel**.
2. Select the interaction widget name in both **Voice** and **Web Messaging** field dropdown lists (refer to step-4 of [Create an Interaction Widget in Genesys for Agent AI](#create-an-interaction-widget-in-genesys-for-agent-ai)).
3. Select **Save**.
 4. Select **Create**/**Update** (for existing table configuration).
### Insert or update data into Data Table
For first-time users, use the POST API and for existing users, use the PUT API to insert this new field into the Kore Data Table.
**API Body Payload Structure**:
```json theme={null}
{
"data": {
"QueueIdentifier":
4. Select **Create**/**Update** (for existing table configuration).
### Insert or update data into Data Table
For first-time users, use the POST API and for existing users, use the PUT API to insert this new field into the Kore Data Table.
**API Body Payload Structure**:
```json theme={null}
{
"data": {
"QueueIdentifier":