> ## Documentation Index
> Fetch the complete documentation index at: https://koreai-apis.mintlify.site/llms.txt
> Use this file to discover all available pages before exploring further.
# Voice Automation and Agent AI Integration with Genesys Cloud CX via SIP INVITE
[Back to Integrations List](/ai-for-service/contact-center/integrations/overview)
Step-by-step guide to hand over a call via SIP INVITE from Contact Center AI to Genesys Cloud CX, with Agent AI running on the Genesys Desktop.
***
## Prerequisites
* Contact Center AI, Automation AI, and Agent AI accounts with administrator access.
* Genesys Cloud CX account with admin role.
* Familiarity with creating Architect flows and External Trunks in Genesys.
***
## Contact Center AI Configuration
1. Sign in to Platform.
2. Go to **Contact Center AI > Flows & Channels**.
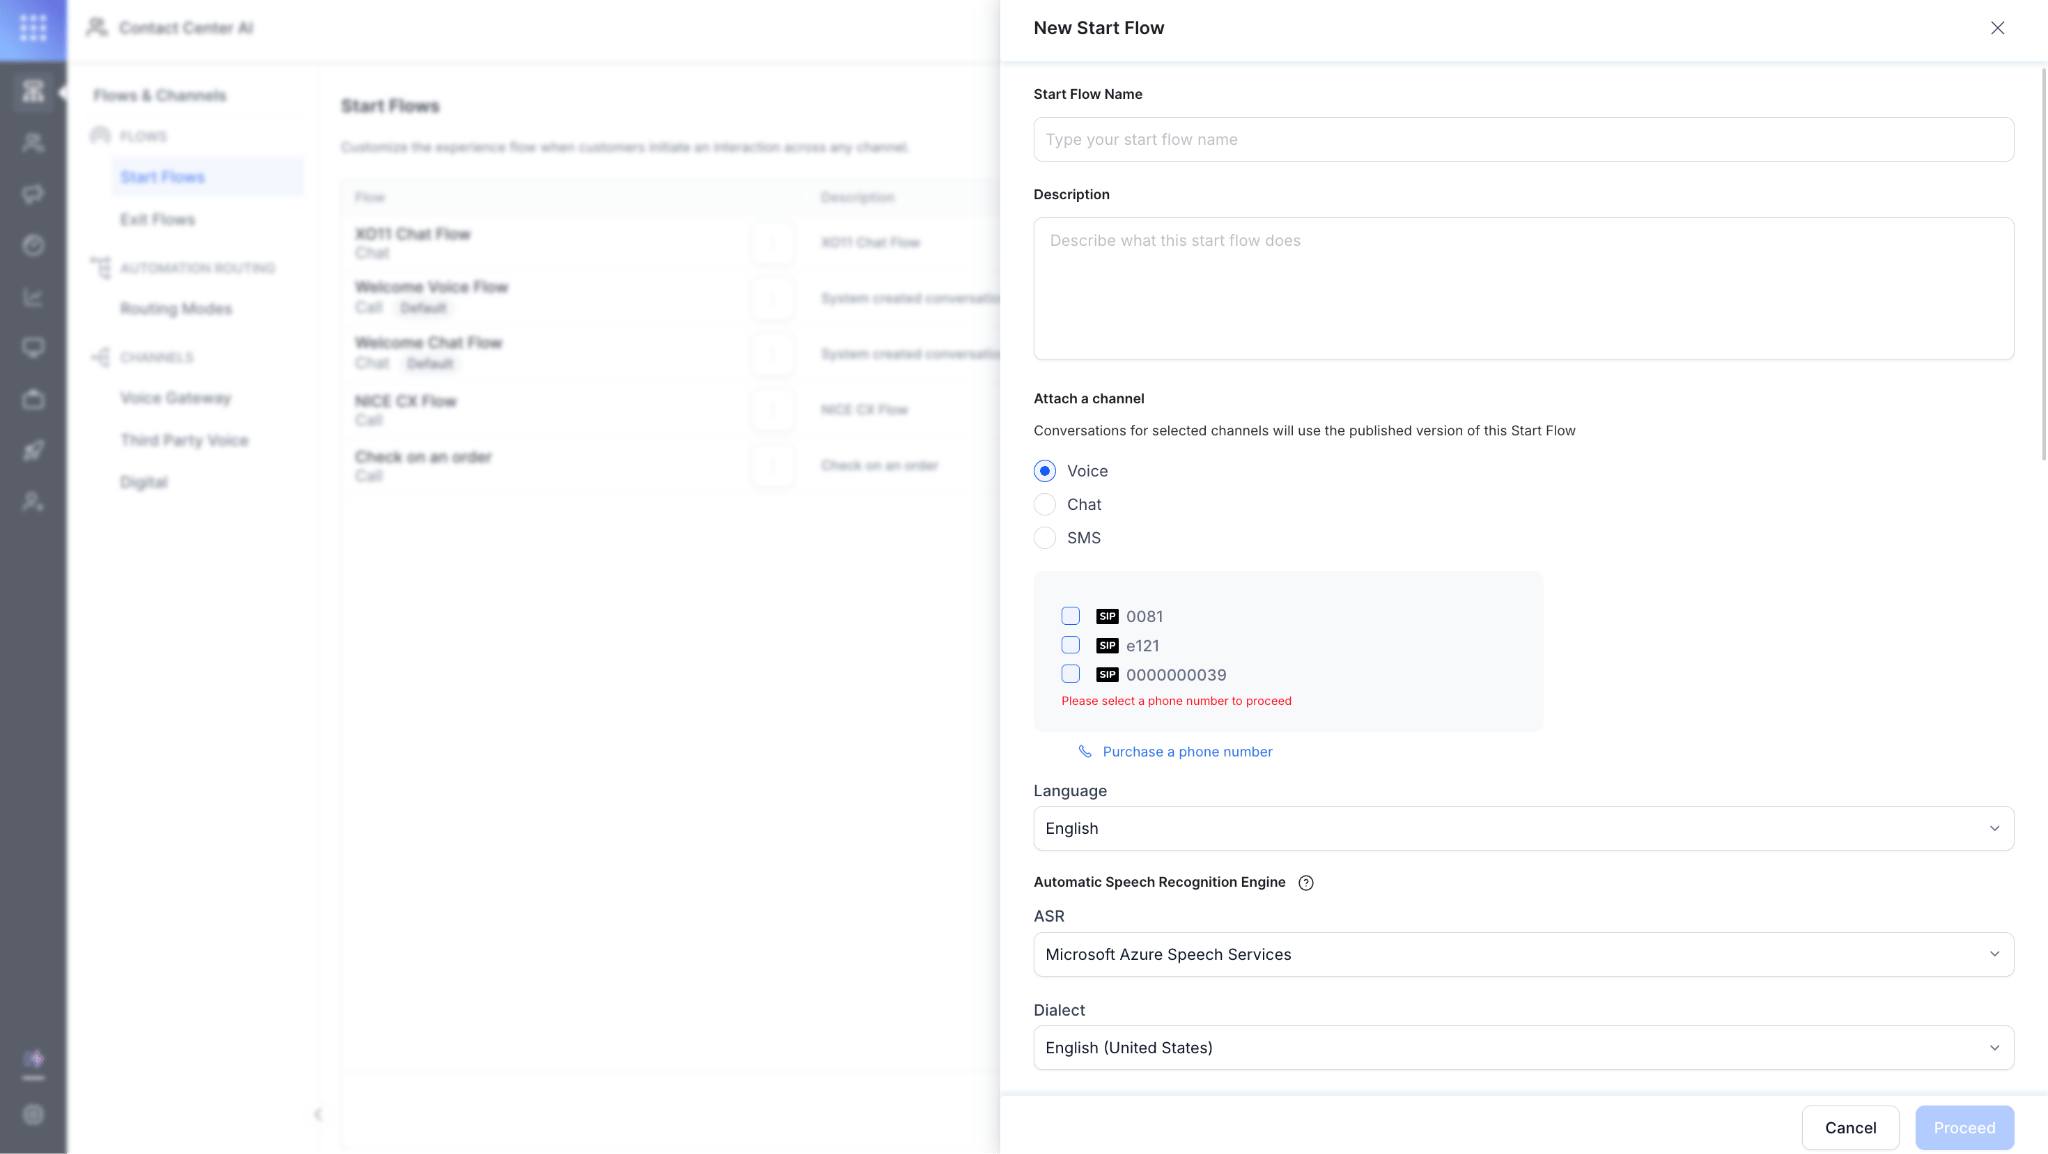
3. Click **Start Flows > + New Start Flow**. See [Create Flows](/ai-for-service/flows/create-and-manage-flows#create-a-start-flow).
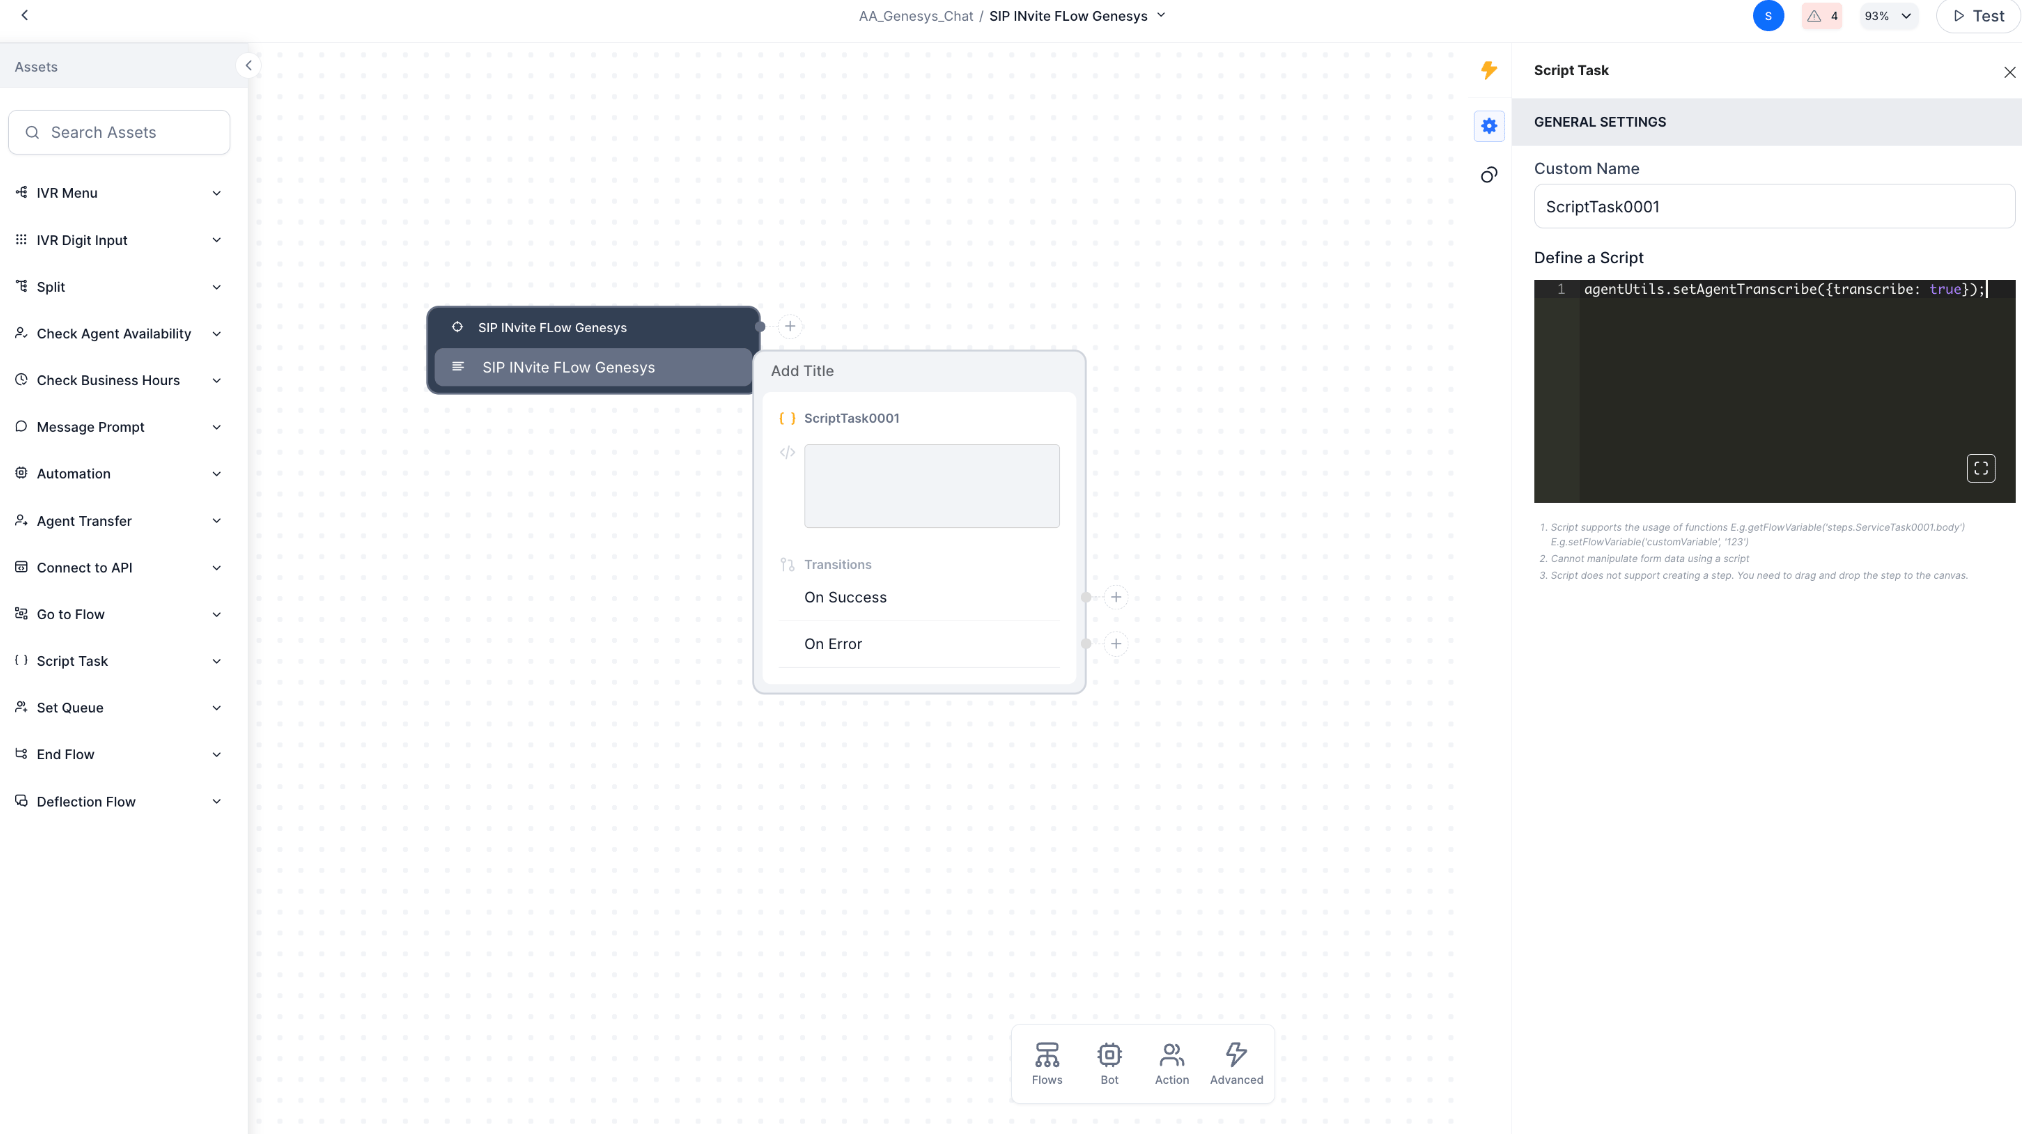
 4. In the Experience Flow, add a **Script Node** with the following code:
```js theme={null}
agentUtils.setAgentTranscribe({ transcribe: true });
```
4. In the Experience Flow, add a **Script Node** with the following code:
```js theme={null}
agentUtils.setAgentTranscribe({ transcribe: true });
```
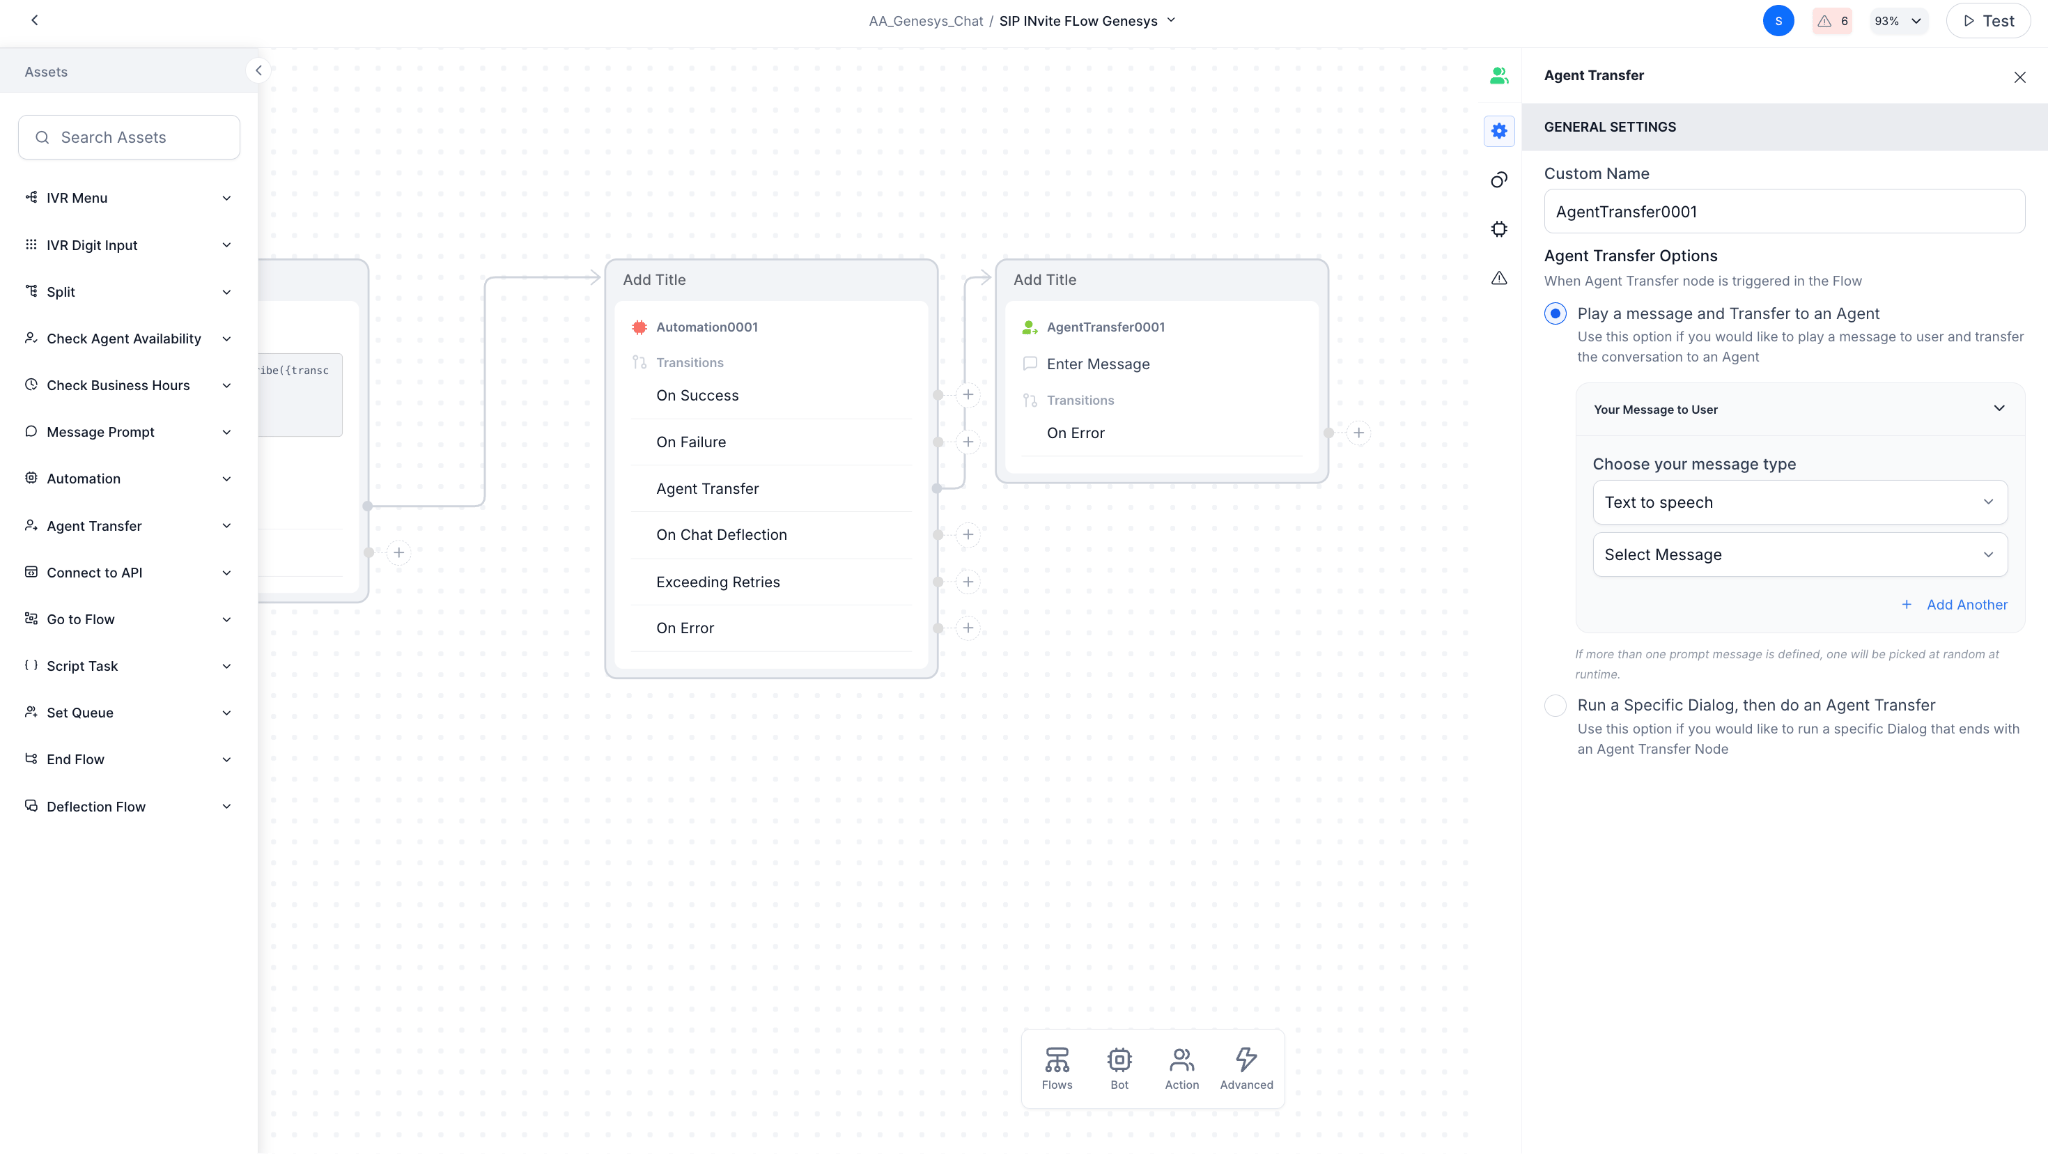
 5. Add an **Automation** node or other flow nodes for the conversation.
6. Add an **Agent Transfer** node to hand over the call to Genesys agents.
5. Add an **Automation** node or other flow nodes for the conversation.
6. Add an **Agent Transfer** node to hand over the call to Genesys agents.
 7. Publish the flow. Use **Test Flow** to verify the call connects to the correct flow.
***
## Configure Agent Transfer
1. Go to **App Settings > Integrations > Agent Transfer**.
7. Publish the flow. Use **Test Flow** to verify the call connects to the correct flow.
***
## Configure Agent Transfer
1. Go to **App Settings > Integrations > Agent Transfer**.
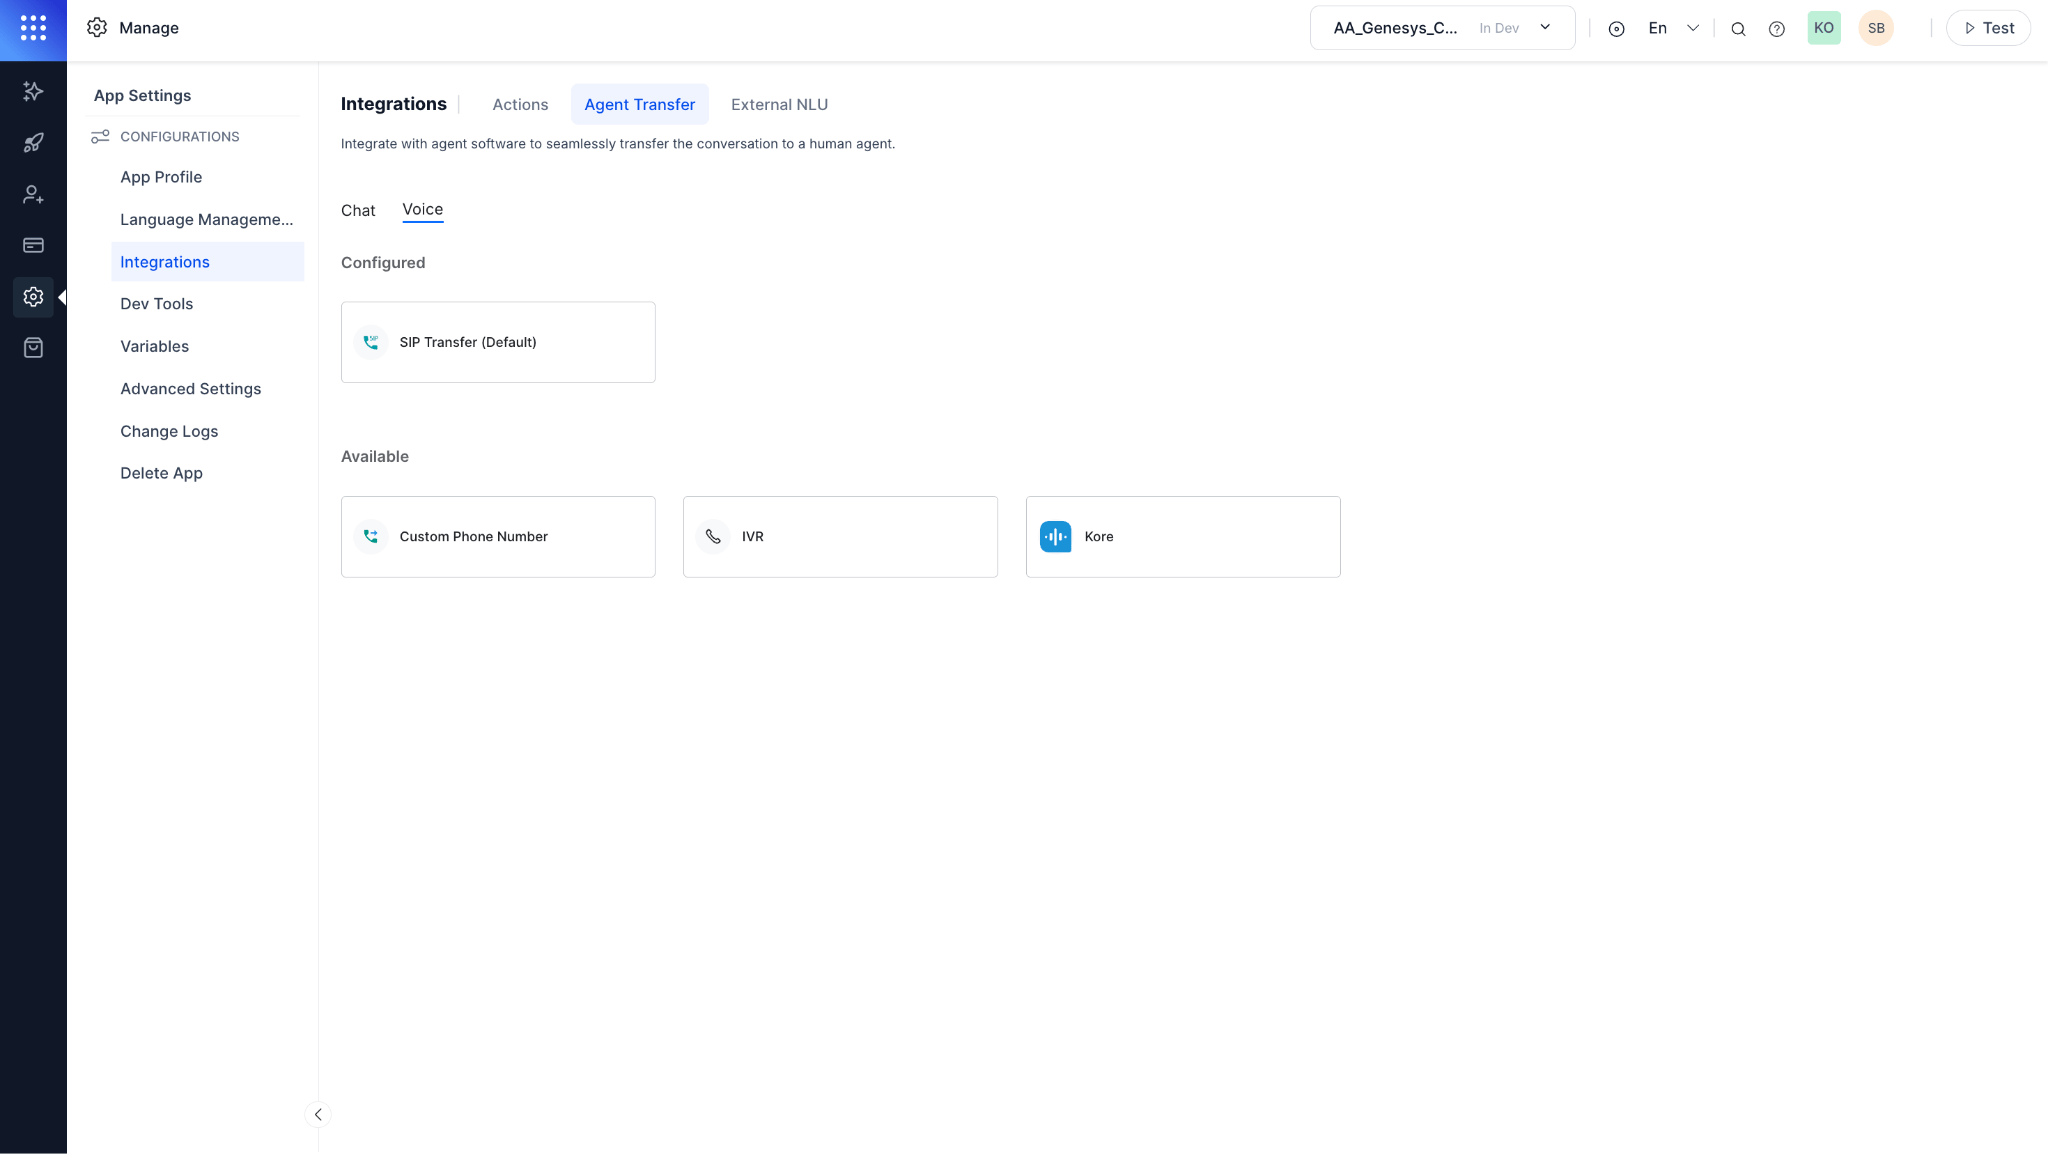 2. Click **Voice > SIP Transfer** and configure:
| Setting | Value |
| ------------------- | -------------------------------------------------------------------------------------------------------------------------------------------------------------- |
| SIP Transfer Method | SIP INVITE |
| SIP Transfer URI | `sip:+@koreSmartassist.byoc.mypurecloud.com` where `` is a DID number created in Genesys and the domain is the FQDN from the Genesys external trunk. |
2. Click **Voice > SIP Transfer** and configure:
| Setting | Value |
| ------------------- | -------------------------------------------------------------------------------------------------------------------------------------------------------------- |
| SIP Transfer Method | SIP INVITE |
| SIP Transfer URI | `sip:+@koreSmartassist.byoc.mypurecloud.com` where `` is a DID number created in Genesys and the domain is the FQDN from the Genesys external trunk. |
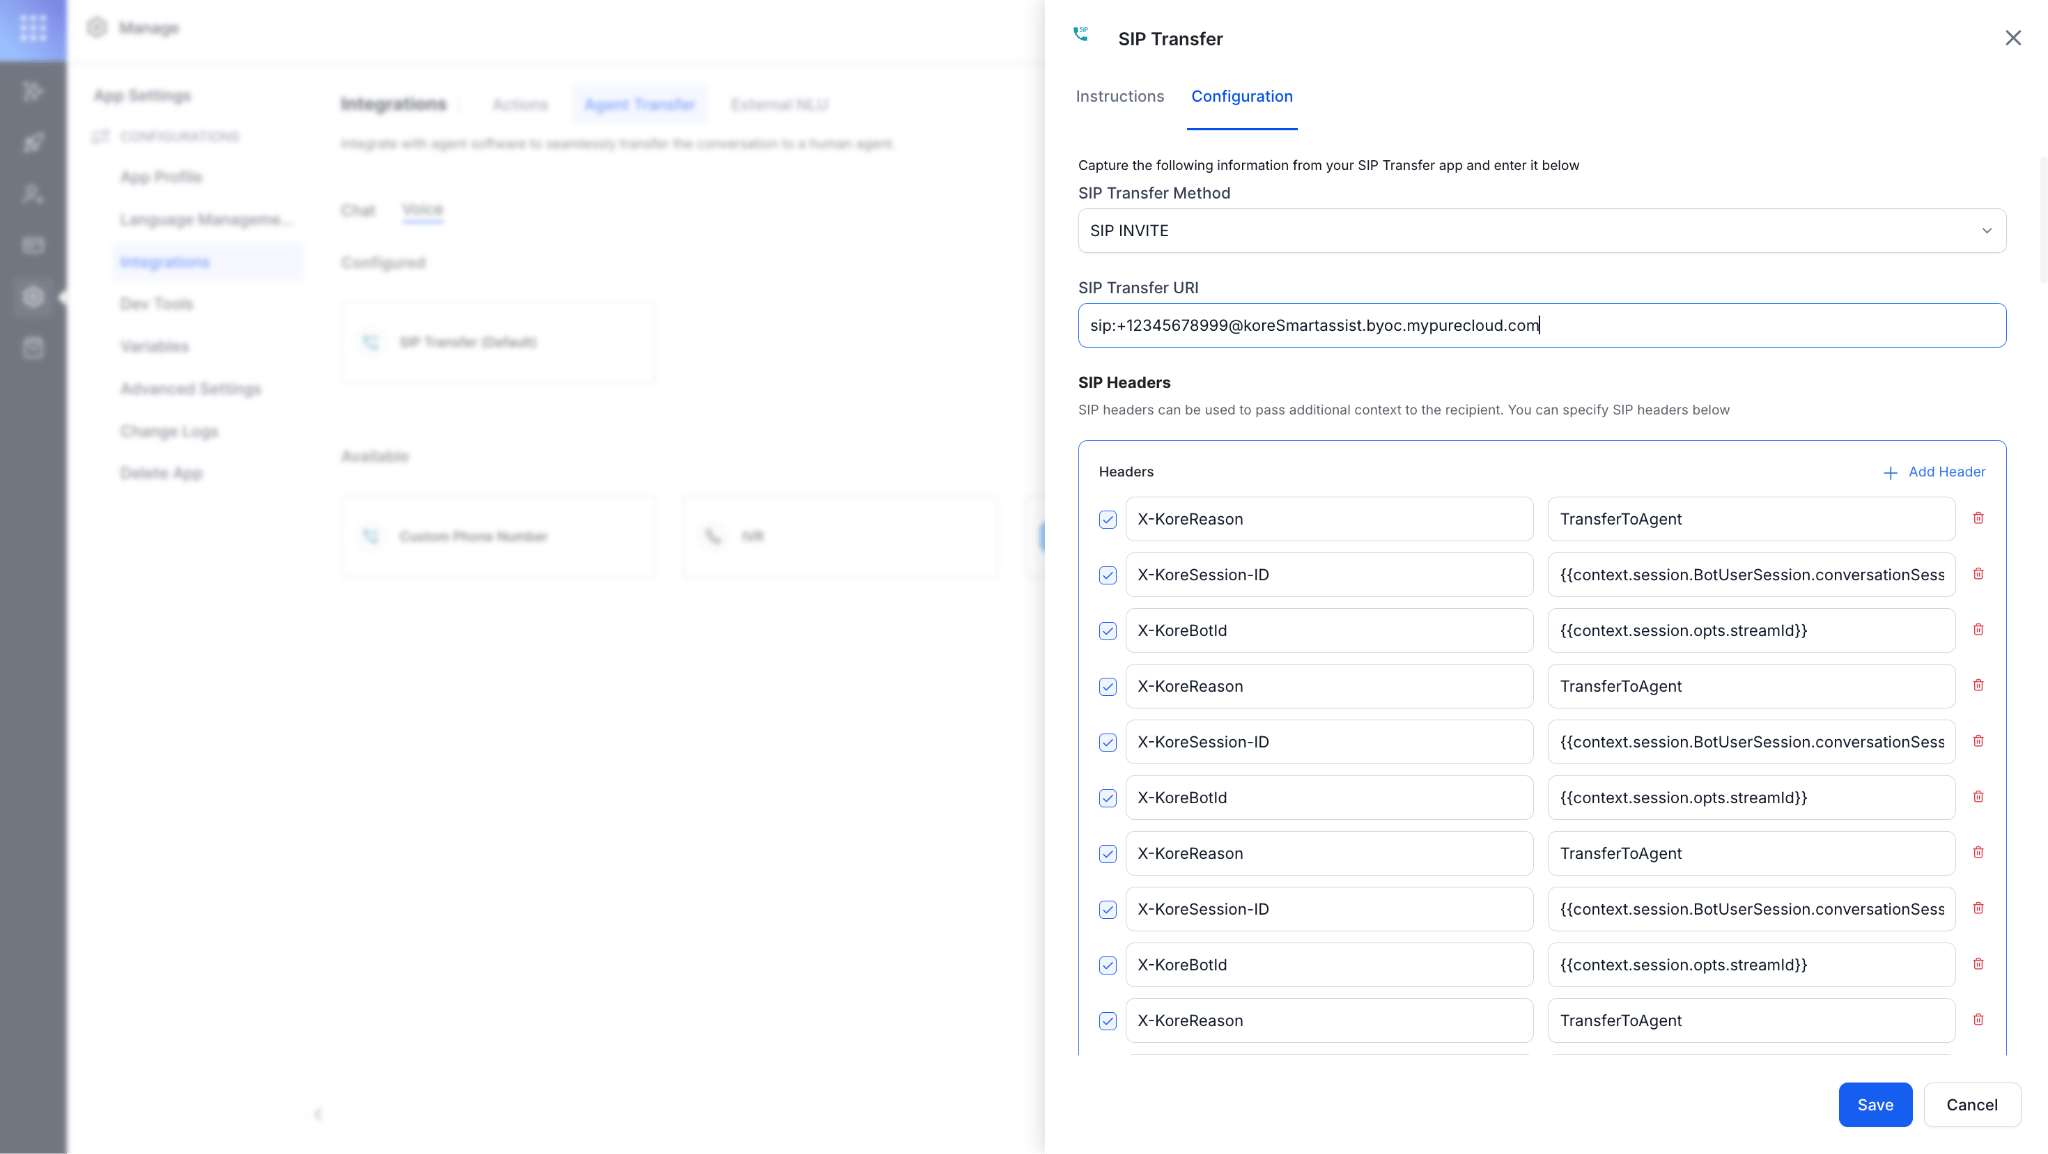 Using SIP INVITE, you can pass SIP headers to Genesys. Header keys must not contain spaces. Genesys supports reading up to 10 SIP headers via the **Get SIP Header** node in Architect. See the [Genesys configuration](#step-5-trunk) section for trunk FQDN details.
***
## Genesys Configuration
### Step 1 - Queue
Create an agent queue and add the necessary members for routing live agent transfers.
### Step 2 - Architect Flow
Create an Inbound Call Flow to handle calls transferred from CCAI.
1. Sign in to [Genesys Cloud](https://login.mypurecloud.com/).
2. Go to **Admin > Architect**.
Using SIP INVITE, you can pass SIP headers to Genesys. Header keys must not contain spaces. Genesys supports reading up to 10 SIP headers via the **Get SIP Header** node in Architect. See the [Genesys configuration](#step-5-trunk) section for trunk FQDN details.
***
## Genesys Configuration
### Step 1 - Queue
Create an agent queue and add the necessary members for routing live agent transfers.
### Step 2 - Architect Flow
Create an Inbound Call Flow to handle calls transferred from CCAI.
1. Sign in to [Genesys Cloud](https://login.mypurecloud.com/).
2. Go to **Admin > Architect**.
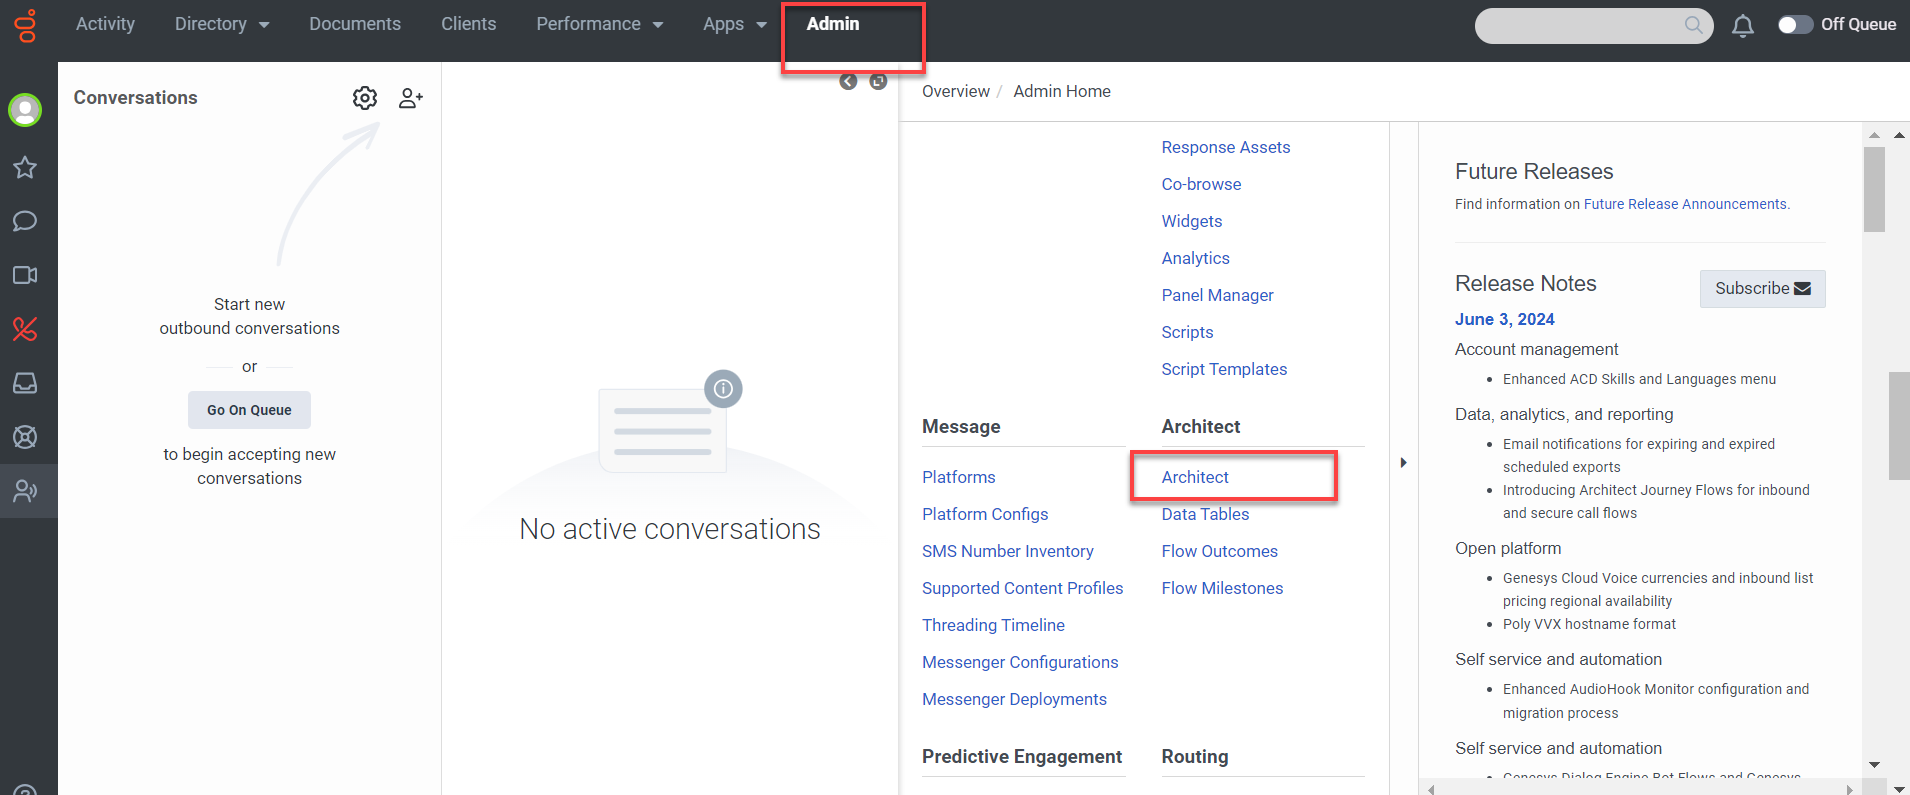 3. Click **+ Add** to create a new call flow.
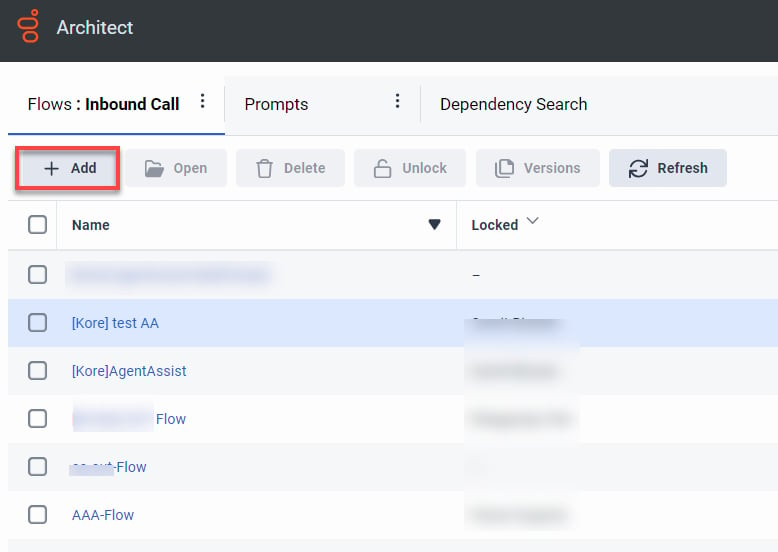 4. Enter a **Name** and **Description**, then click **Create Flow**.
5. Create tasks in the **Main Menu** or create a **Reusable Task** (mark as starting task from the three-dot menu).
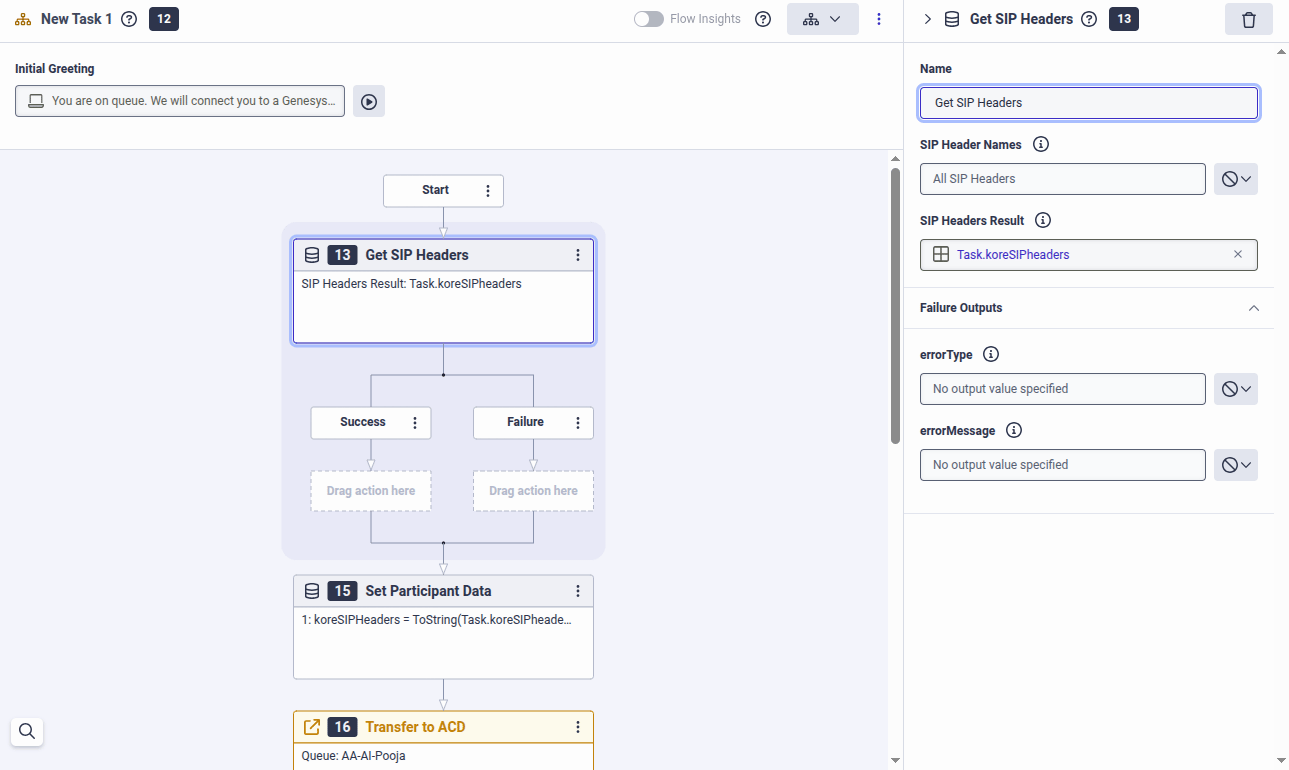
6. After the **Start** node, add a **Get SIP Headers** node:
* **SIP Header Names** (Literal): `x-conversationid`, `x-koresession-id`
* **SIP Headers Result**: `Task.koreSIPheaders`
4. Enter a **Name** and **Description**, then click **Create Flow**.
5. Create tasks in the **Main Menu** or create a **Reusable Task** (mark as starting task from the three-dot menu).
6. After the **Start** node, add a **Get SIP Headers** node:
* **SIP Header Names** (Literal): `x-conversationid`, `x-koresession-id`
* **SIP Headers Result**: `Task.koreSIPheaders`
 To find any node in Architect, click the three vertical dots on that node and select **Search Toolbox**.
7. Add a **Set Participant Data** node:
* **Attribute name**: `koreSIPHeaders` (must be exact)
* **Value** (Expression): `ToString(Task.koreSIPheaders)`
To find any node in Architect, click the three vertical dots on that node and select **Search Toolbox**.
7. Add a **Set Participant Data** node:
* **Attribute name**: `koreSIPHeaders` (must be exact)
* **Value** (Expression): `ToString(Task.koreSIPheaders)`
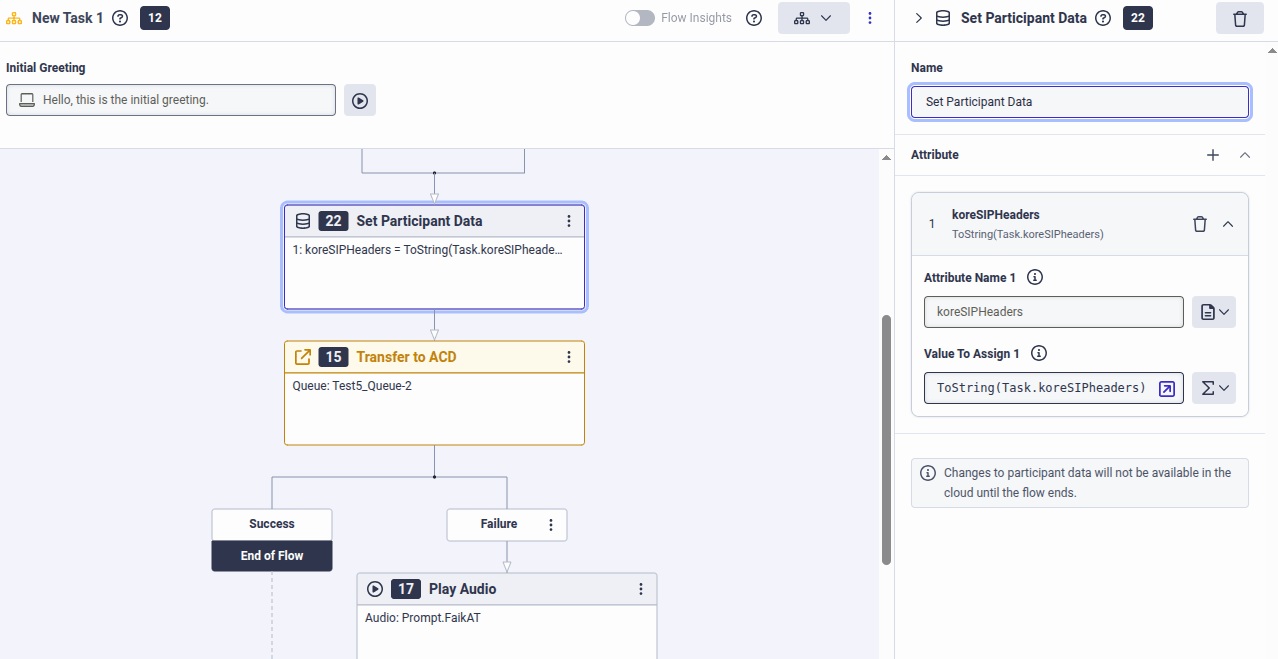 8. Add at least one **Transfer to ACD** node pointing to the agent queue.
9. Add a **Disconnect** node on the **Failure** path.
10. Save and publish the flow.
You can also extract and inspect all available SIP headers.
8. Add at least one **Transfer to ACD** node pointing to the agent queue.
9. Add a **Disconnect** node on the **Failure** path.
10. Save and publish the flow.
You can also extract and inspect all available SIP headers.
 ### Step 3 - DID Numbers
Create a single-number **DID Range** (start and end set to the same number, for example `+12223334444`) for internal routing inside Genesys.
This DID, combined with the trunk domain, forms the SIP Address used to INVITE the call from Kore Contact Center to Genesys.
### Step 3 - DID Numbers
Create a single-number **DID Range** (start and end set to the same number, for example `+12223334444`) for internal routing inside Genesys.
This DID, combined with the trunk domain, forms the SIP Address used to INVITE the call from Kore Contact Center to Genesys.
 * **Service Provider**: Internal
* Add a comment describing the range's purpose.
**DID Assignment**: Assign the number to the Call Route in Step 4.
* Assignee Type: Call Flow
* DID Number: Your number
### Step 4 - Call Route
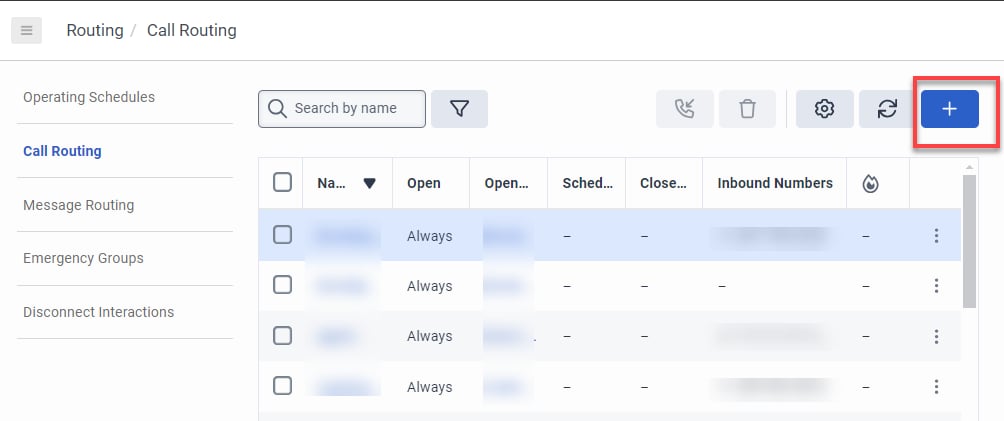
1. Go to **Admin > Call Routing**.
2. Click **Add** to create a new call route.
* **Service Provider**: Internal
* Add a comment describing the range's purpose.
**DID Assignment**: Assign the number to the Call Route in Step 4.
* Assignee Type: Call Flow
* DID Number: Your number
### Step 4 - Call Route
1. Go to **Admin > Call Routing**.
2. Click **Add** to create a new call route.
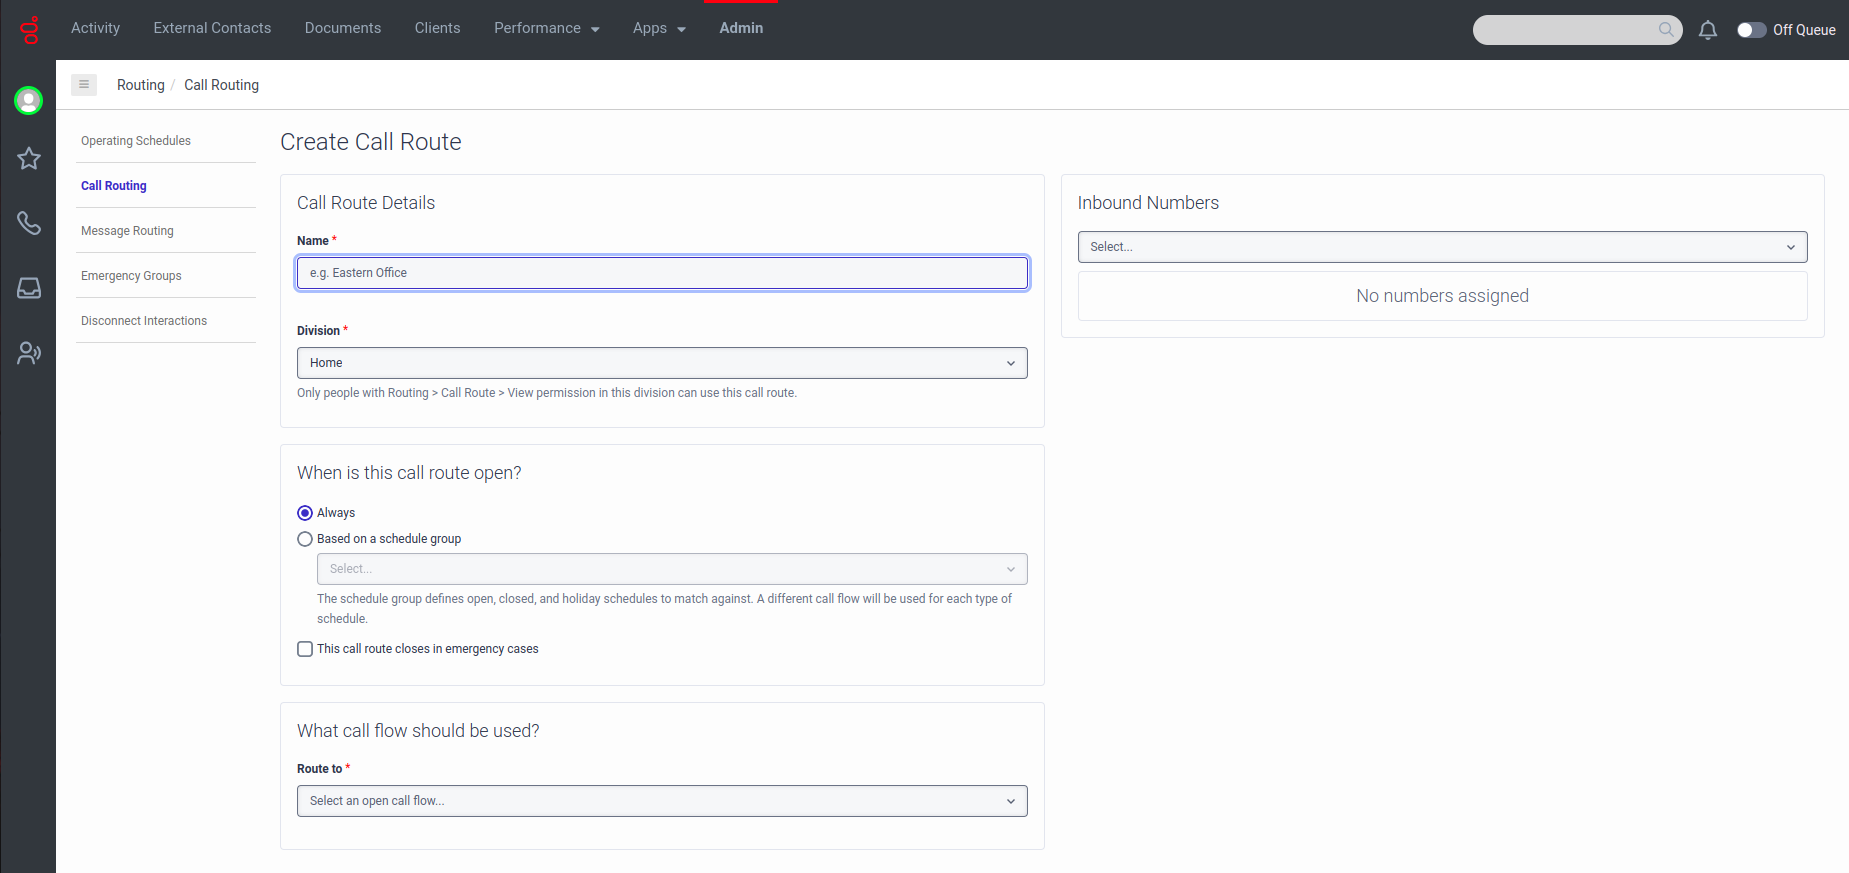 3. Map the DID number (Step 3) to the call flow (Step 2).
### Step 5 - Trunk
Configure an external trunk connecting to the session border controller (SBC) for your region.
1. Sign in to [Genesys Cloud](https://login.mypurecloud.com/).
2. Go to **Admin > Telephony > External Trunks** (or search "External Trunks").
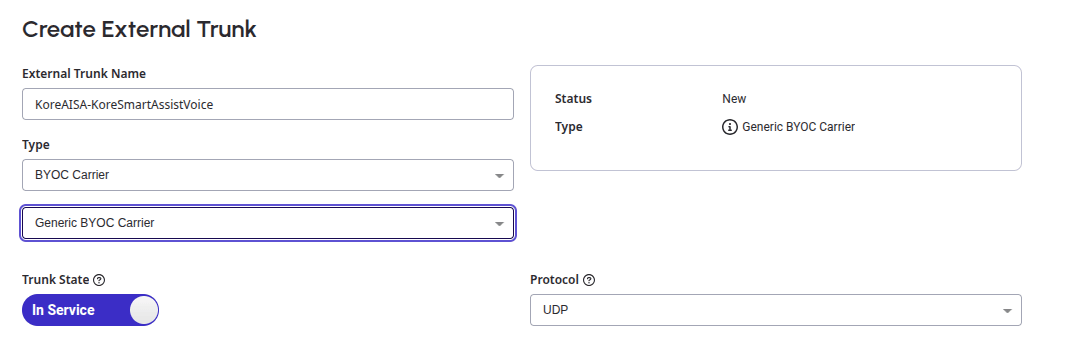
3. Click **+ Create New** and configure:
| Setting | Value |
| ------------------- | -------------------- |
| External Trunk Name | Your name |
| Type | BYOC Carrier |
| Subtype | Generic BYOC Carrier |
3. Map the DID number (Step 3) to the call flow (Step 2).
### Step 5 - Trunk
Configure an external trunk connecting to the session border controller (SBC) for your region.
1. Sign in to [Genesys Cloud](https://login.mypurecloud.com/).
2. Go to **Admin > Telephony > External Trunks** (or search "External Trunks").
3. Click **+ Create New** and configure:
| Setting | Value |
| ------------------- | -------------------- |
| External Trunk Name | Your name |
| Type | BYOC Carrier |
| Subtype | Generic BYOC Carrier |
 4. Select **Kore Site** in the **Number Plan Site** dropdown.
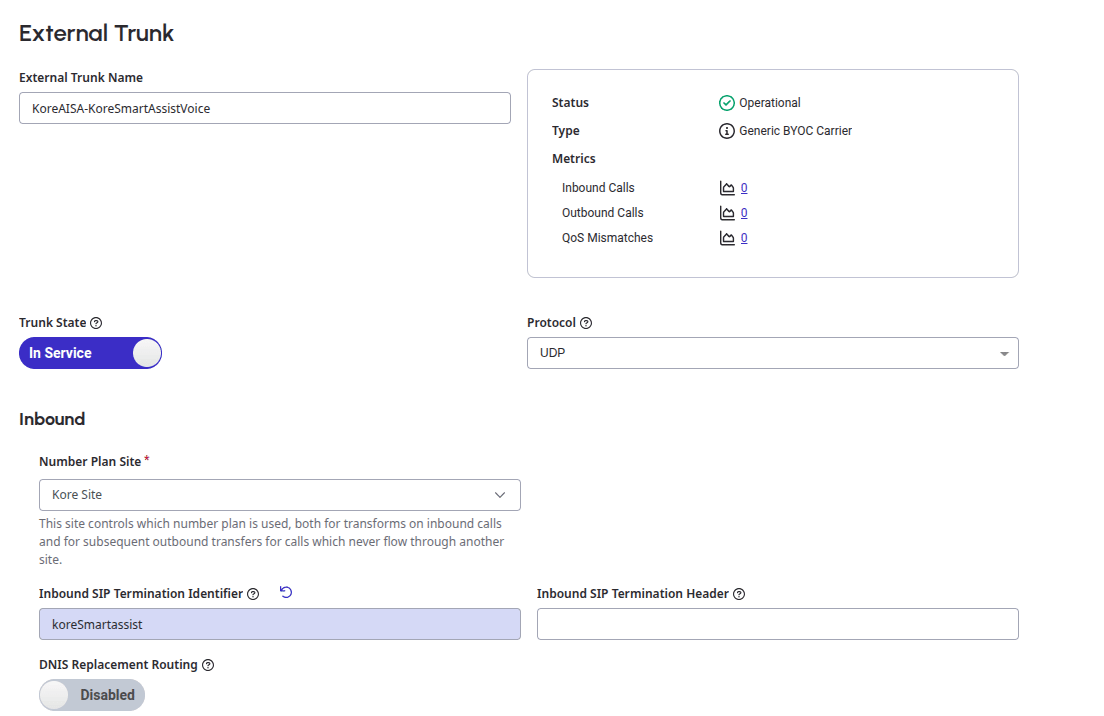 5. Enter a unique name for **Inbound SIP Termination Identifier**.
6. The **Inbound Request-URI Reference** is auto generated:
5. Enter a unique name for **Inbound SIP Termination Identifier**.
6. The **Inbound Request-URI Reference** is auto generated:
 Add this FQDN Method URL (for example, `sip:+xxxxxxxxxxx@koreSmartassist.byoc.mypurecloud.com`) to the **SIP Transfer URI** field in the [Agent Transfer configuration](#configure-agent-transfer) on the Contact Center AI side.
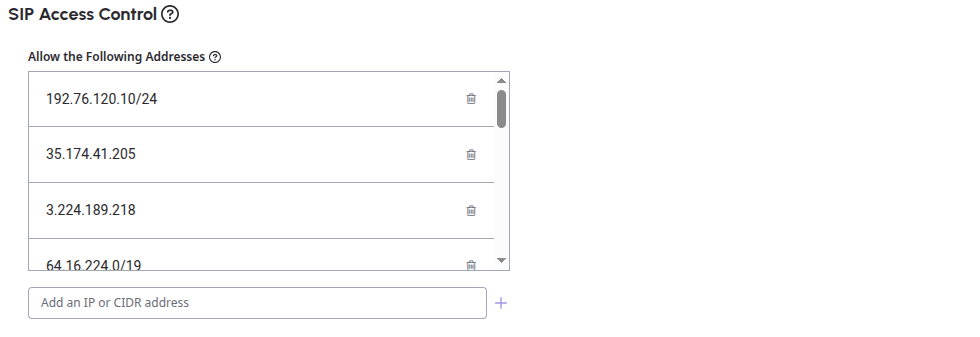
7. In **SIP Access Control**, add the AI for Service voice gateway IPs:
| Region | IP Addresses |
| ------- | ---------------------------- |
| US Prod | 3.224.189.218, 35.174.41.205 |
| AU Prod | 54.153.137.7, 13.237.170.233 |
Add this FQDN Method URL (for example, `sip:+xxxxxxxxxxx@koreSmartassist.byoc.mypurecloud.com`) to the **SIP Transfer URI** field in the [Agent Transfer configuration](#configure-agent-transfer) on the Contact Center AI side.
7. In **SIP Access Control**, add the AI for Service voice gateway IPs:
| Region | IP Addresses |
| ------- | ---------------------------- |
| US Prod | 3.224.189.218, 35.174.41.205 |
| AU Prod | 54.153.137.7, 13.237.170.233 |
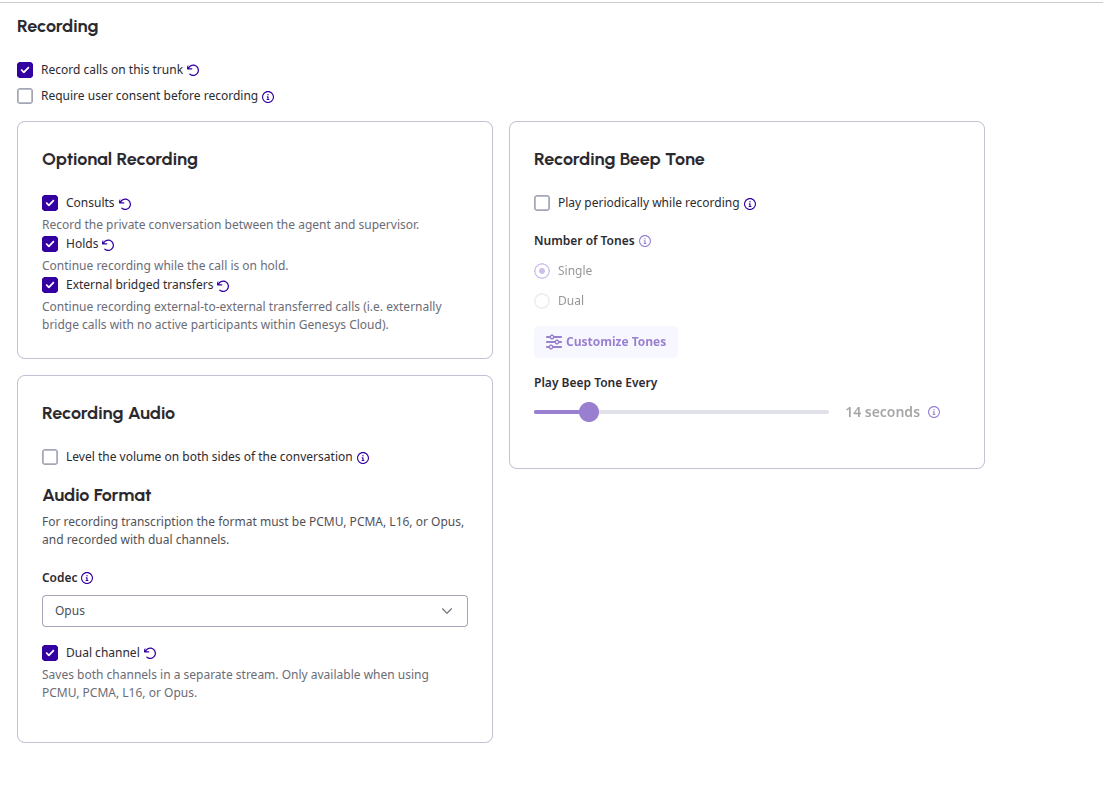
 8. Expand **Media** and enable **Recording**. Enable all **Optional Recording** options.
9. Set **Codec** to **Opus** and select **Dual channel**.
8. Expand **Media** and enable **Recording**. Enable all **Optional Recording** options.
9. Set **Codec** to **Opus** and select **Dual channel**.
 10. Expand **Protocol** and enable **Conversation Headers**.
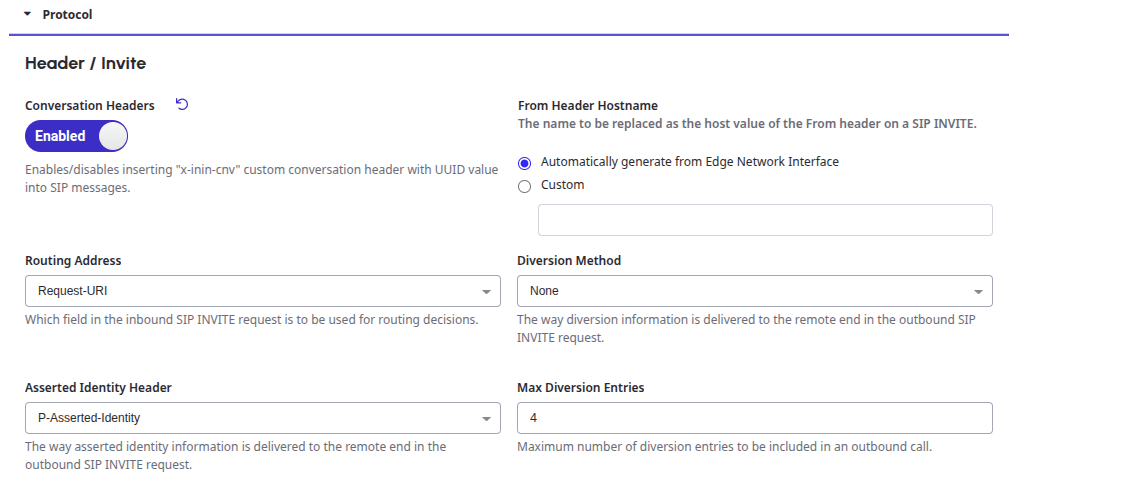 11. Click **Save External Trunk**.
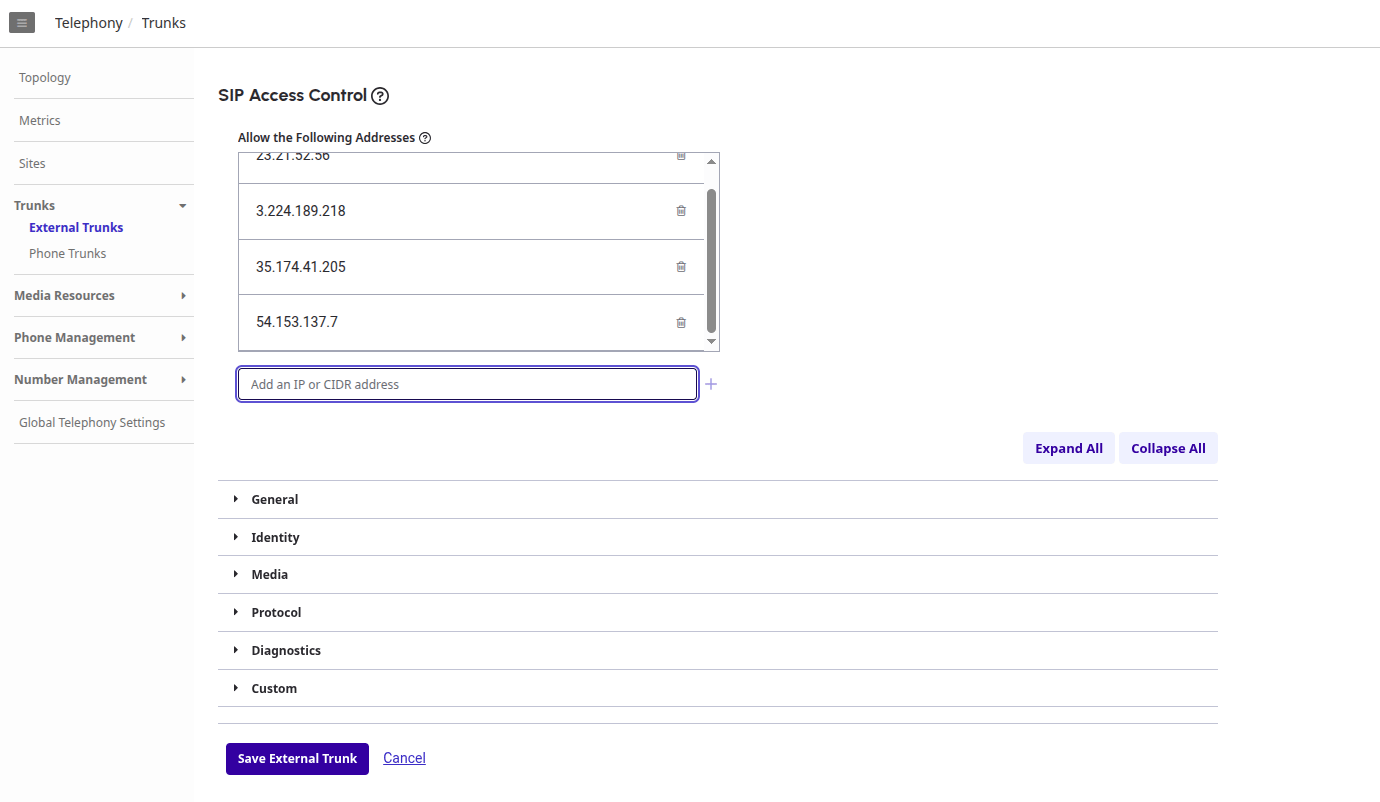 * If **Media > Recording** isn't enabled, the end call summary in the Agent AI widget is unavailable. The middleware requires this setting to receive the session end event from Genesys.
* If **Protocol > Conversation Headers** isn't enabled, the landing summary and real-time transcription in the Agent AI widget are unavailable.
***
## Agent AI Integration
### Add the Bot
Use the same automation bot used in the CCAI Automation Flow.
* If **Media > Recording** isn't enabled, the end call summary in the Agent AI widget is unavailable. The middleware requires this setting to receive the session end event from Genesys.
* If **Protocol > Conversation Headers** isn't enabled, the landing summary and real-time transcription in the Agent AI widget are unavailable.
***
## Agent AI Integration
### Add the Bot
Use the same automation bot used in the CCAI Automation Flow.
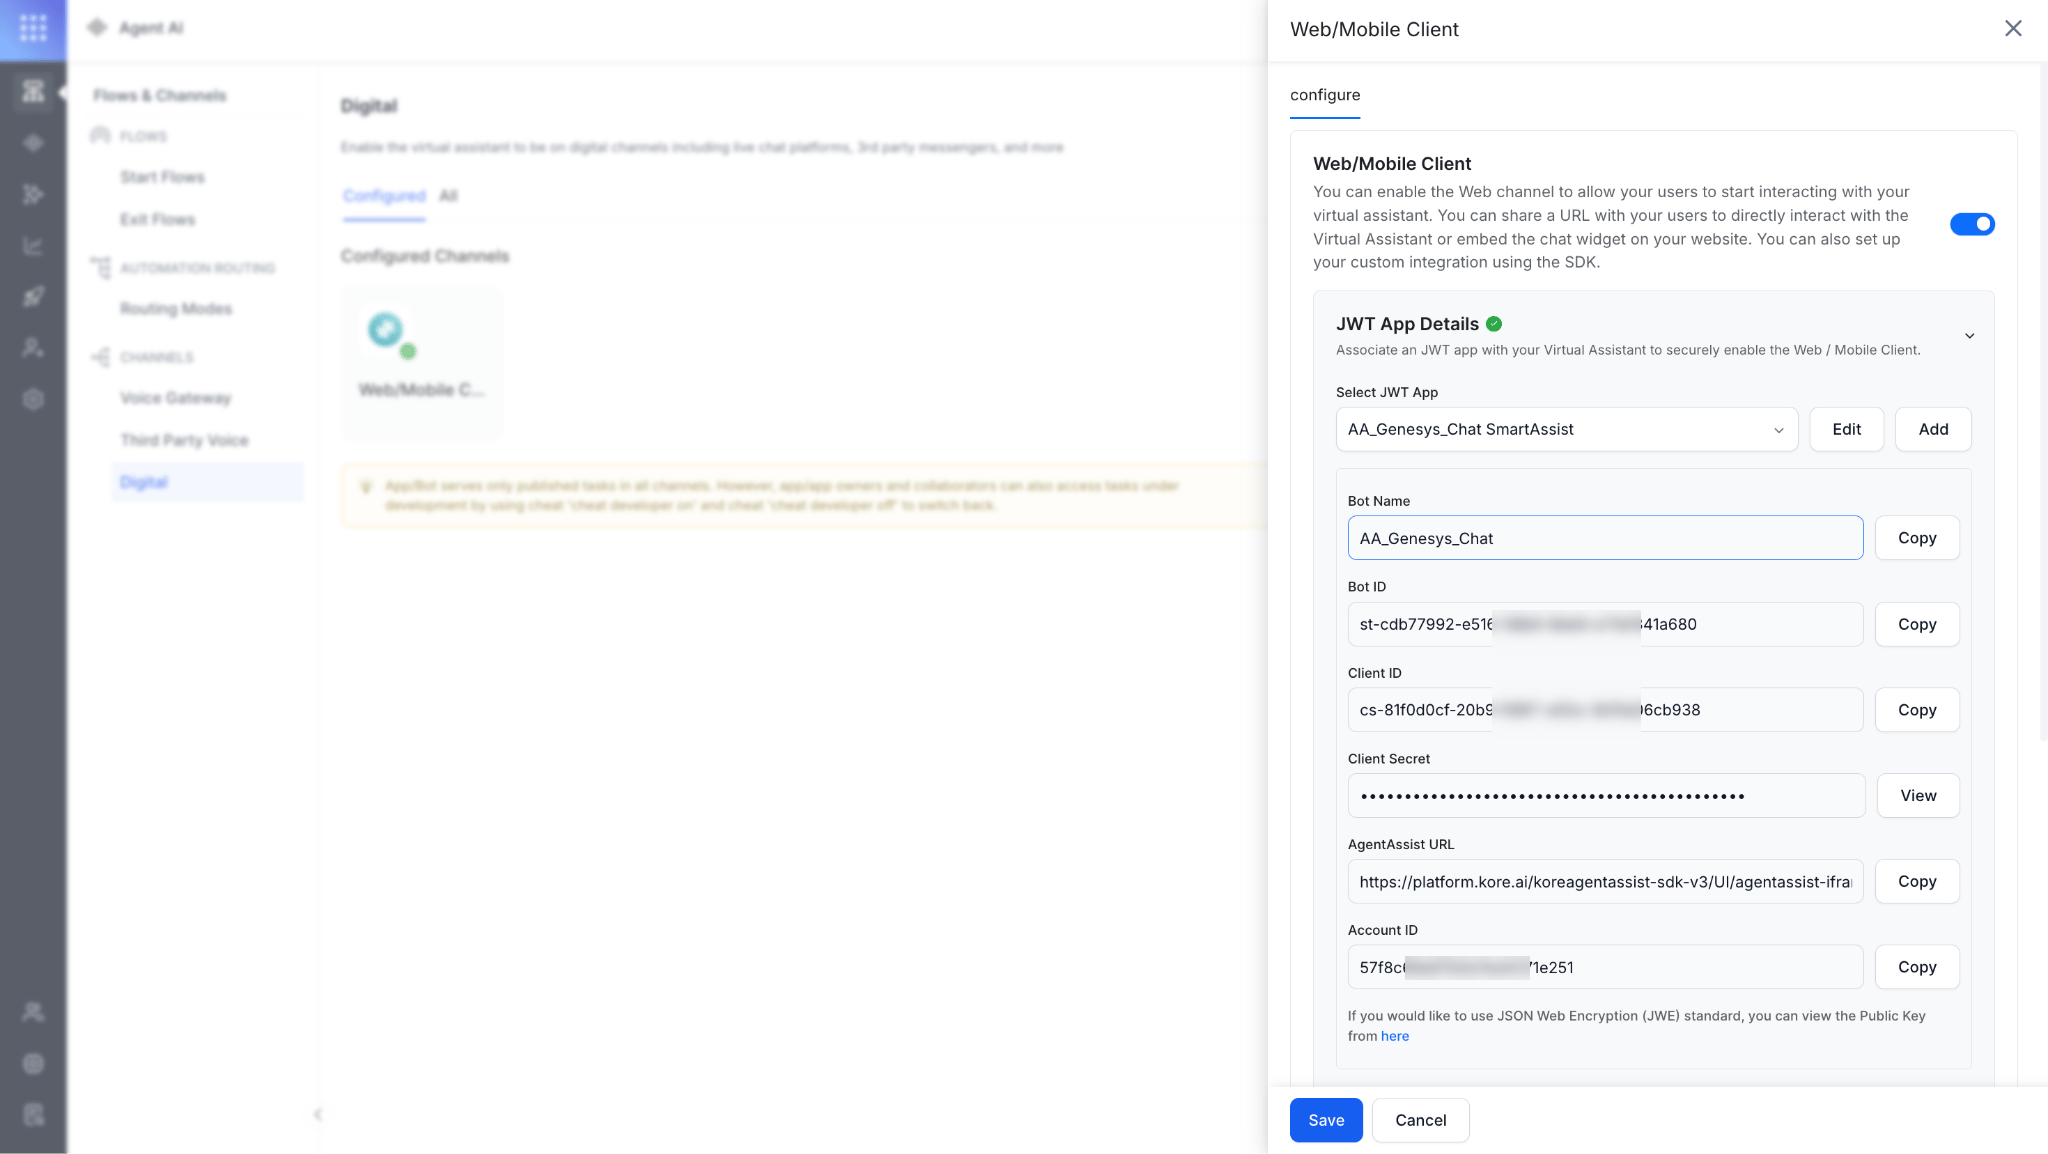 ### Integrate Agent AI with Genesys
Follow [Agent AI Integration with Genesys Cloud CX](/ai-for-service/agentai/integration/genesys/agent-ai-integration-with-genesys-cloud-cx).
**Configuration notes:**
1. When adding Agent AI bot credentials, use the bot added in the step above.
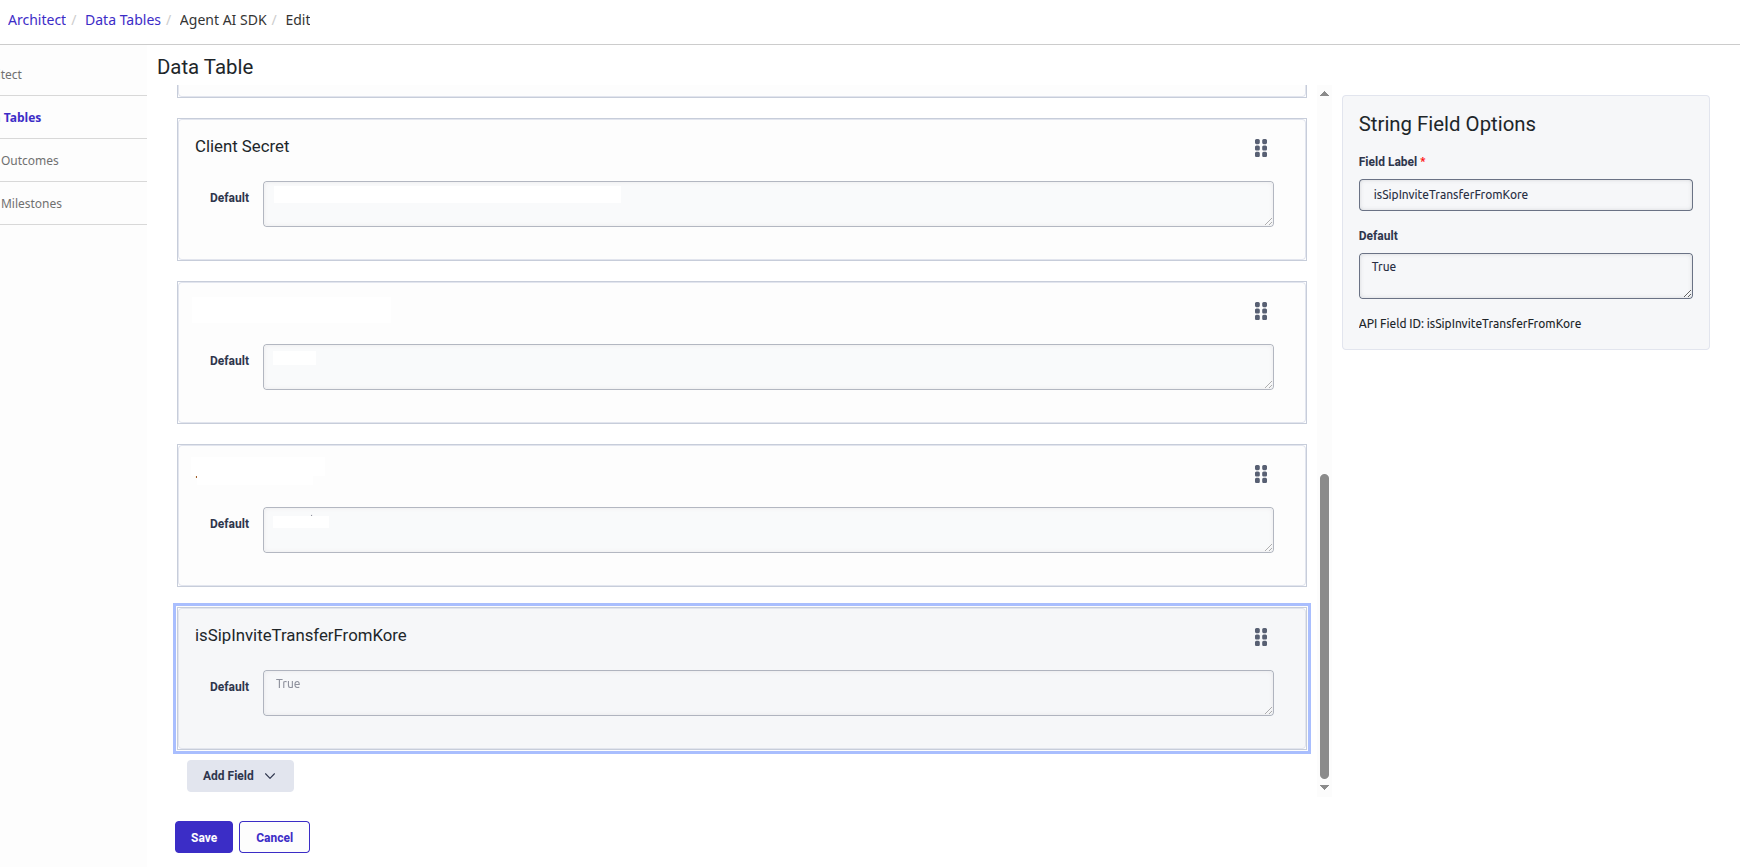
2. Add a new field in the Genesys data table:
| Field | Value |
| --------- | ----------------------------- |
| Name | `isSipInviteTransferFromKore` |
| Data Type | String |
| Value | True |
### Integrate Agent AI with Genesys
Follow [Agent AI Integration with Genesys Cloud CX](/ai-for-service/agentai/integration/genesys/agent-ai-integration-with-genesys-cloud-cx).
**Configuration notes:**
1. When adding Agent AI bot credentials, use the bot added in the step above.
2. Add a new field in the Genesys data table:
| Field | Value |
| --------- | ----------------------------- |
| Name | `isSipInviteTransferFromKore` |
| Data Type | String |
| Value | True |
 3. Do **not** configure **audiohook** or enable **audiohook monitor** at the queue level.
4. Do **not** add the `isAudiohookEnabled` field in the data table.
***
## Test the Integration
Call the CCAI number purchased during setup. After a successful agent transfer, the signed-in Genesys agent can accept the incoming call.
1. Click **Answer** in Genesys.
3. Do **not** configure **audiohook** or enable **audiohook monitor** at the queue level.
4. Do **not** add the `isAudiohookEnabled` field in the data table.
***
## Test the Integration
Call the CCAI number purchased during setup. After a successful agent transfer, the signed-in Genesys agent can accept the incoming call.
1. Click **Answer** in Genesys.
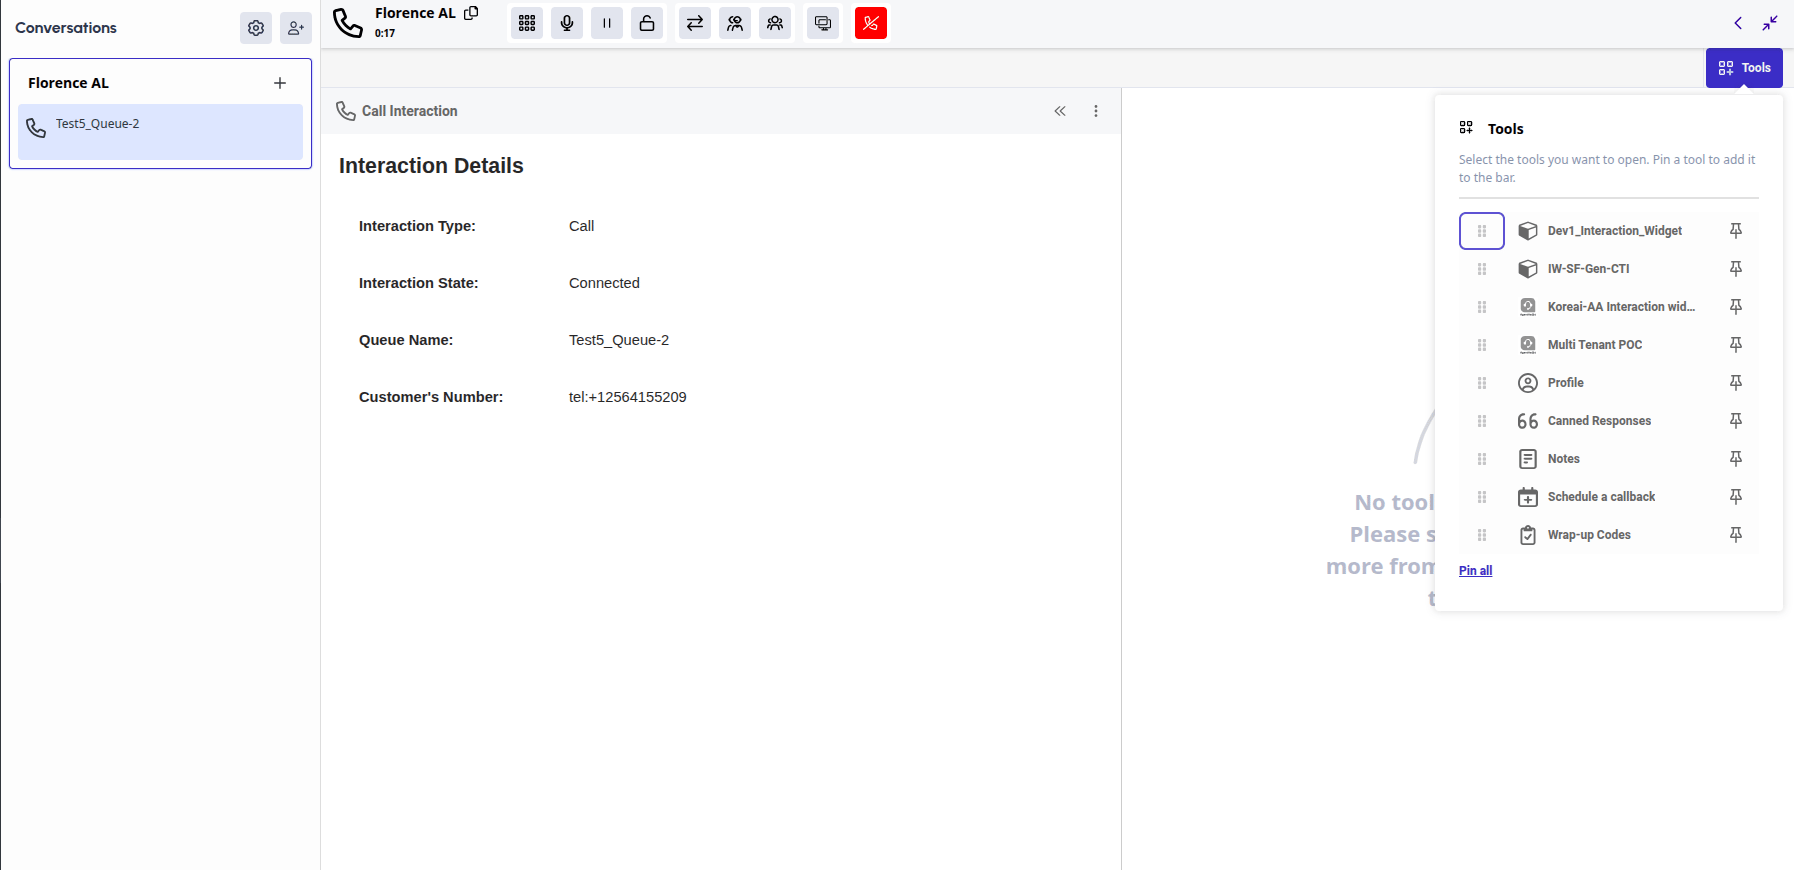
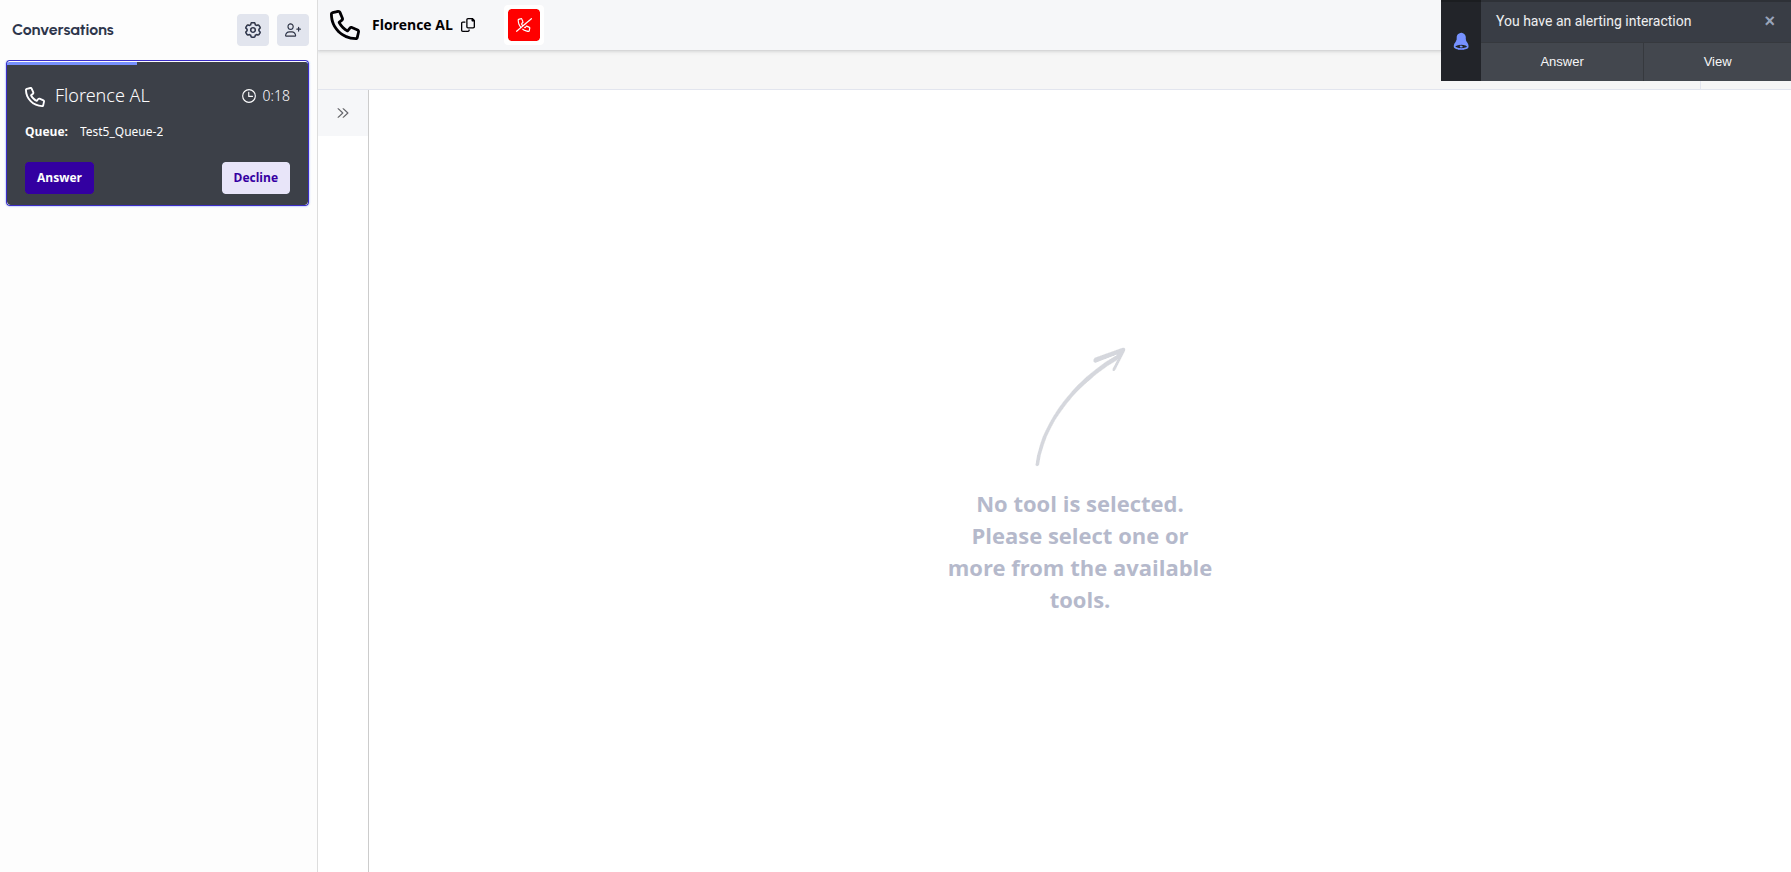 2. Open the **Tools** section and select the interaction widget configured during setup.
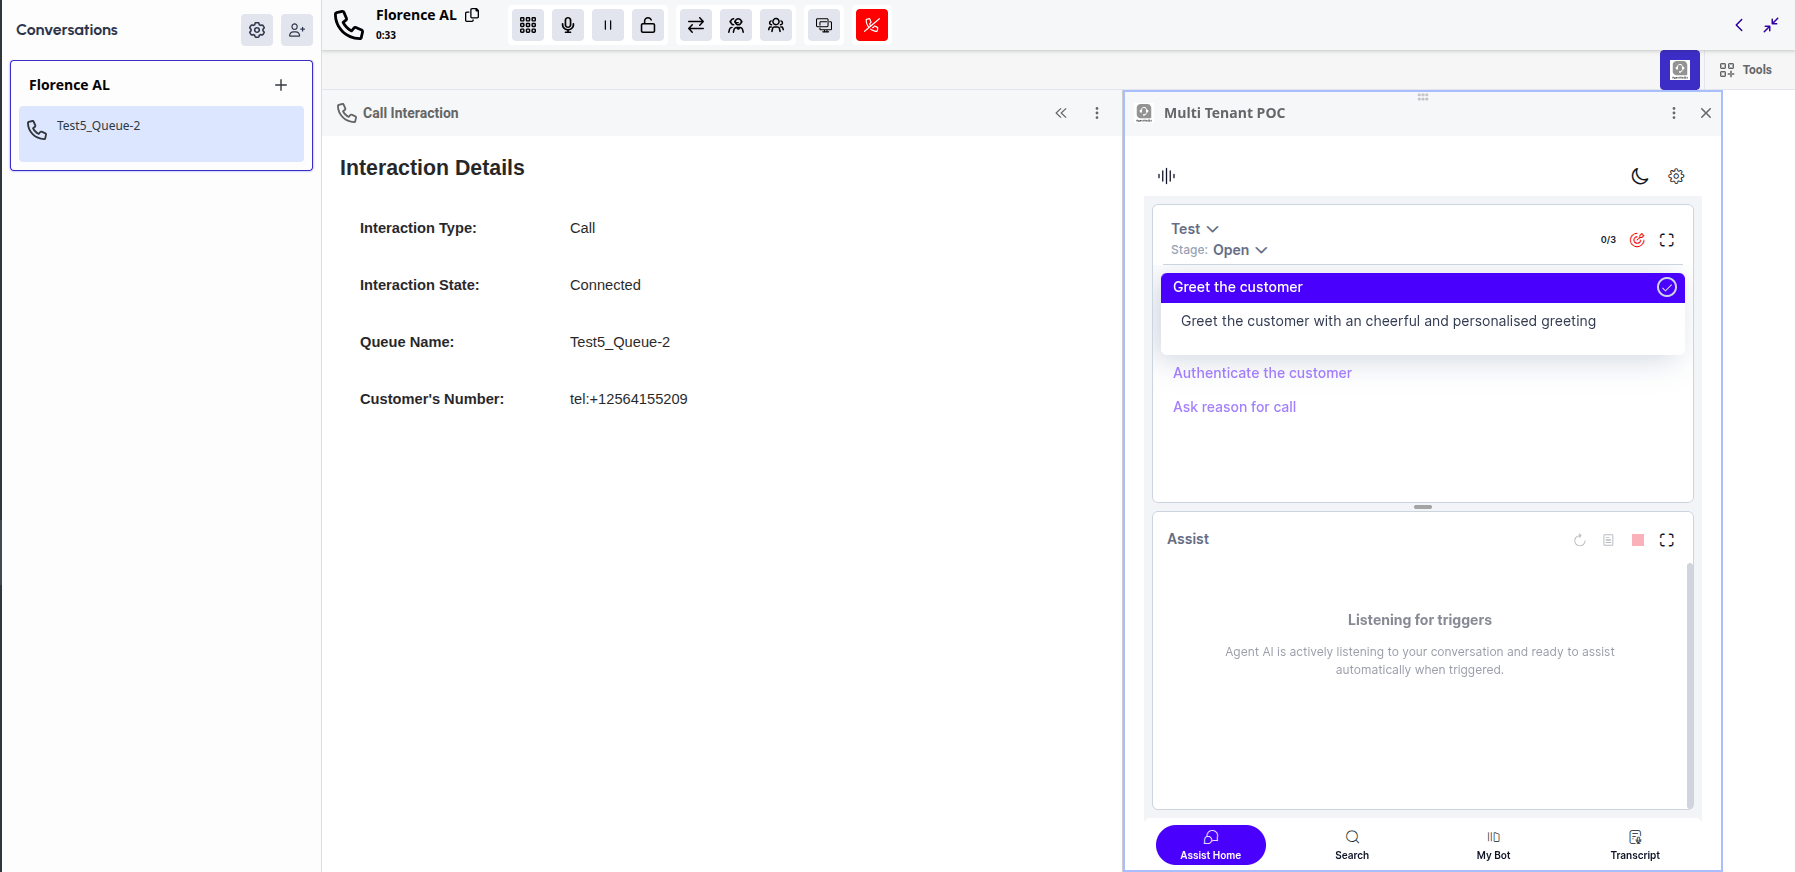
 3. The Agent AI widget appears on the right side of the Genesys Agent Desktop.
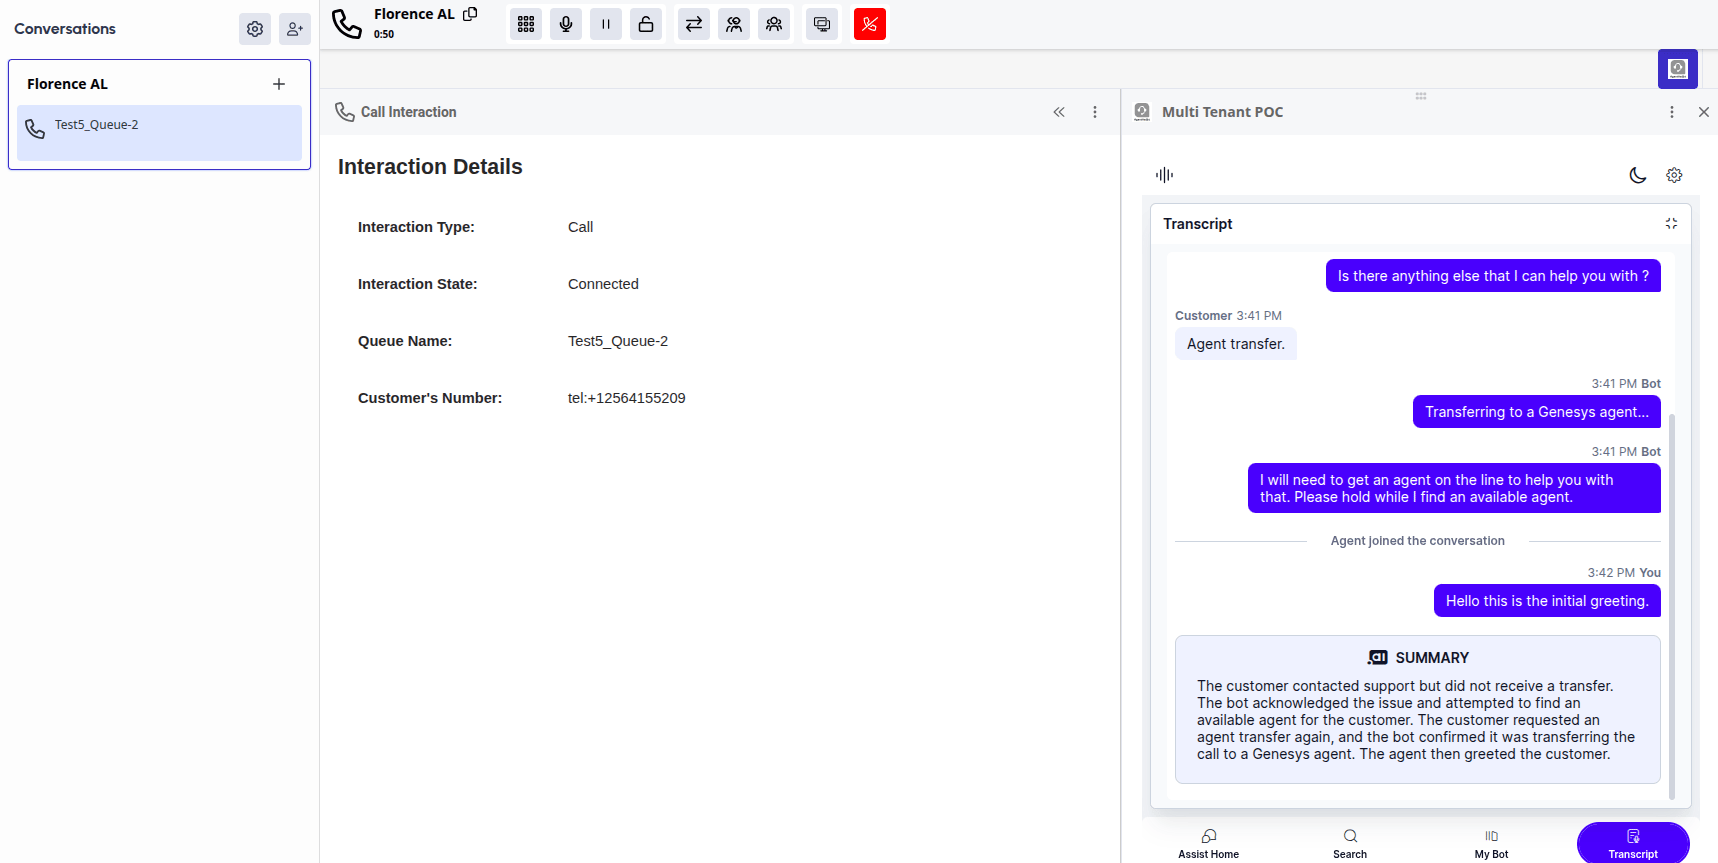
 4. Click the **Transcript** tab to view user-bot conversation history, a summary, and real-time transcripts.
 ***
## View Interaction Details in CCAI
1. Go to **CCAI > Analytics > Contact Center > Interactions**.
2. Click the interaction to view.
***
## View Interaction Details in CCAI
1. Go to **CCAI > Analytics > Contact Center > Interactions**.
2. Click the interaction to view.
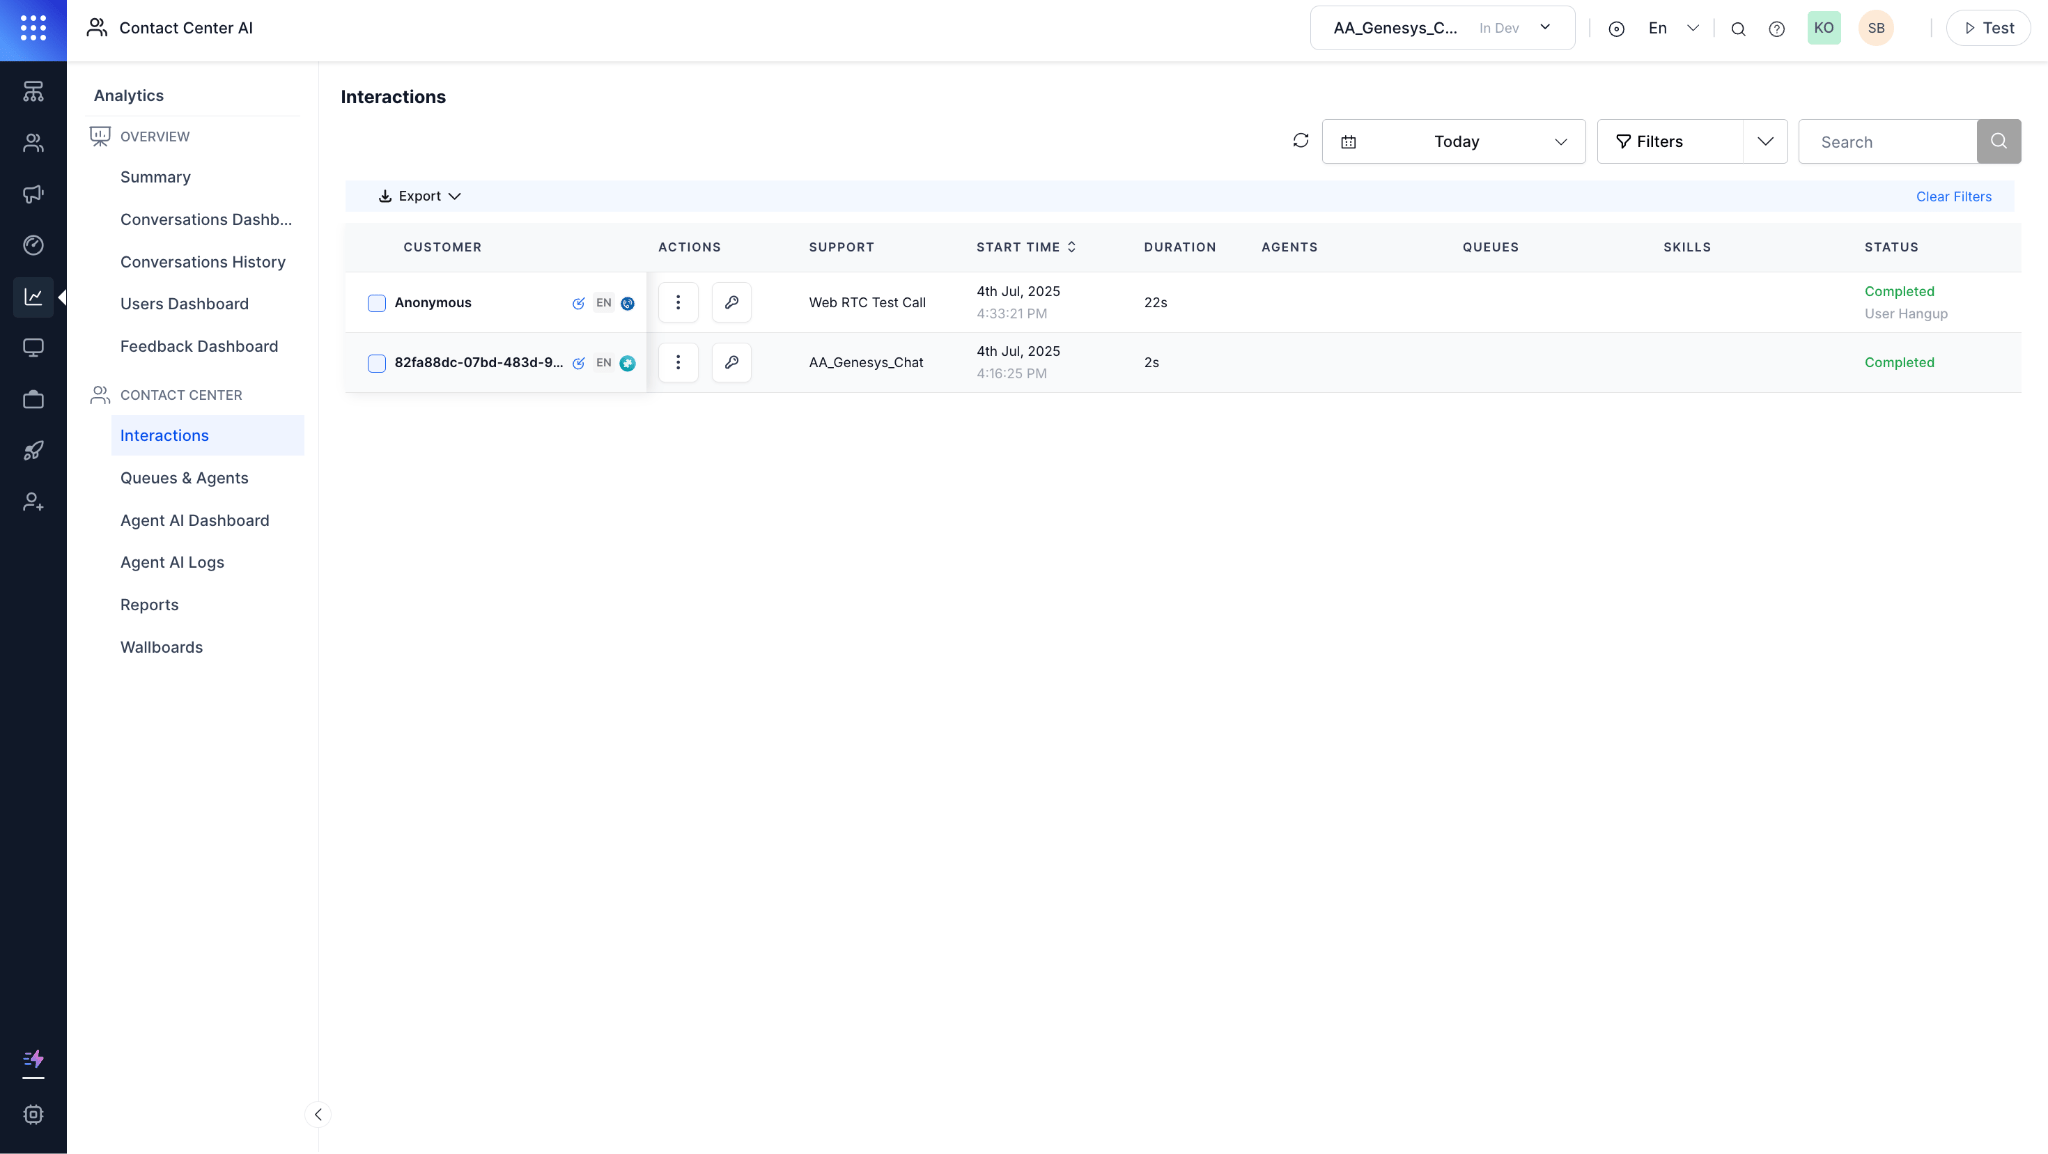 The dashboard shows all interaction details between the user and the bot, plus the conversation between the user and the live agent after the agent transfer.