> ## Documentation Index
> Fetch the complete documentation index at: https://koreai-apis.mintlify.site/llms.txt
> Use this file to discover all available pages before exploring further.
# Configuring the ServiceNow Agent - Utah and Higher Versions
The ServiceNow Agent integration allows you to hand off AI Agent conversations to live agents on ServiceNow. This guide covers configuration for **Utah**, **Vancouver**, and higher versions.
***
## Configuration Steps
* [Step 1: Retrieve the ServiceNow Instance URL](#step-1-retrieve-the-servicenow-instance-url)
* [Step 2: Enable the ServiceNow Agent](#step-2-enable-the-servicenow-agent)
* [Step 3: Install Required Plugins](#step-3-install-the-required-plugins)
* [Step 4: Assign Agent Roles to the Consumer Service Support Group](#step-4-assign-agent-roles-to-the-consumer-service-support-group)
* [Step 5: Update the Webhook Endpoint and Enable the Integration](#step-5-update-the-webhook-endpoint-and-enable-the-integration)
* [Step 6: Testing Configuration](#step-6-testing-configuration)
***
### Step 1: Retrieve the ServiceNow Instance URL
1. Log in to your ServiceNow account with admin credentials. The URL follows the format: `https://devXXX67.service-now.com`.
2. Copy the Instance URL for use in Step 2.
### Step 2: Enable the ServiceNow Agent
1. Log in to the Platform.
2. Select the AI Agent to configure.
3. Navigate to **App Settings > Integrations > Agent Transfer** and click **ServiceNow**.
4. On the **Configurations** tab, choose an authentication method:
**Option 1: Basic Auth**
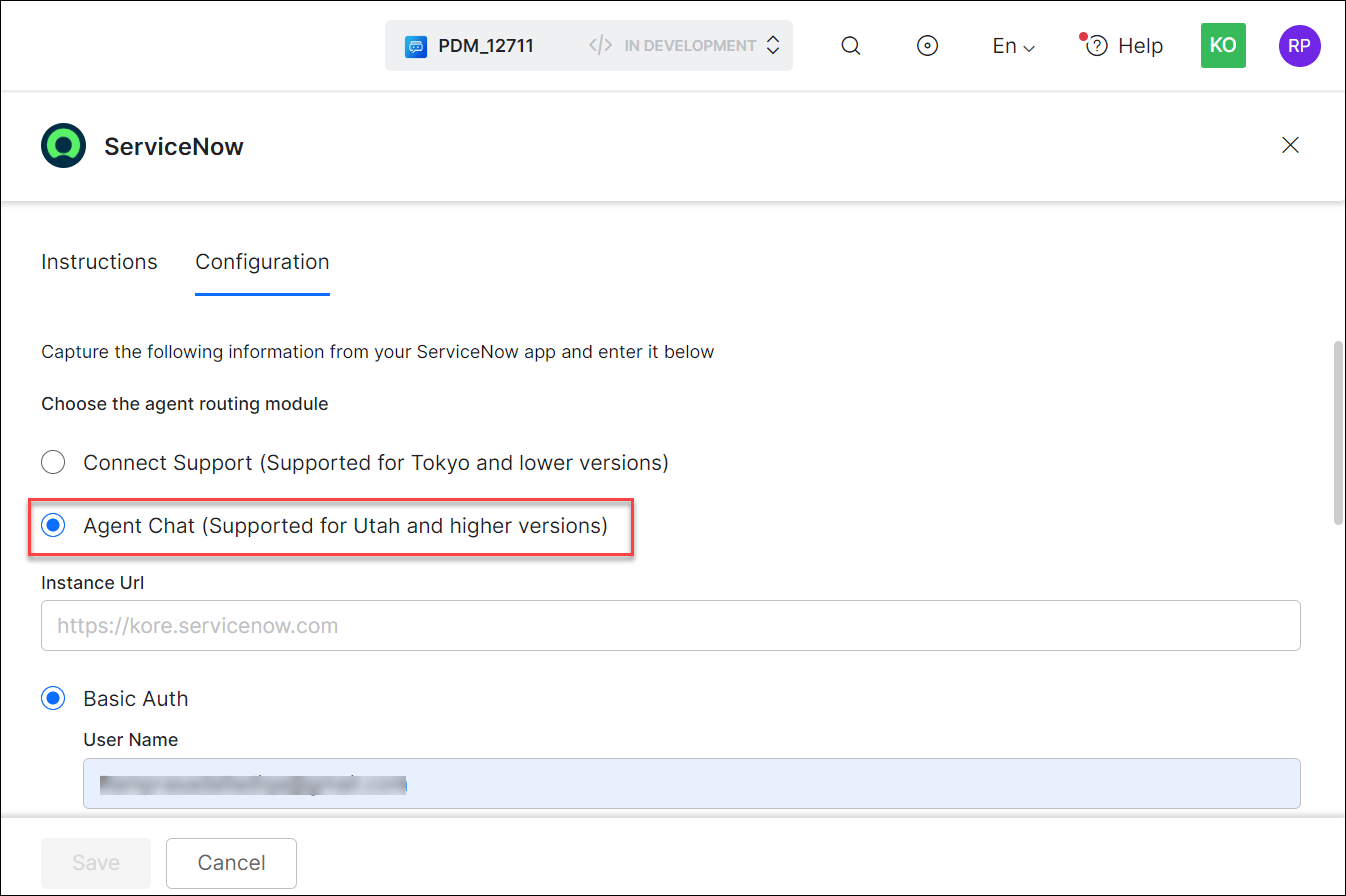 1. Select **Agent Chat (Supported for Utah and higher versions)**.
2. Select **Basic Auth**.
3. Enter:
| Field | Description |
| ------------ | ------------------------------------------------------------------------- |
| Instance URL | ServiceNow instance URL (for example, `https://devXXX67.service-now.com`) |
| User Name | ServiceNow account username |
| Password | ServiceNow account password |
| Queue ID | Unique queue identification number |
| Webhook URL | Web URL for custom application function callbacks |
**Option 2: OAuth with Refresh Token**
Follow [this ServiceNow documentation](https://support.servicenow.com/kb?id=kb_article_view\&sysparm_article=KB0778194) to generate a refresh token.
1. Select **Agent Chat (Supported for Utah and higher versions)**.
2. Select **Basic Auth**.
3. Enter:
| Field | Description |
| ------------ | ------------------------------------------------------------------------- |
| Instance URL | ServiceNow instance URL (for example, `https://devXXX67.service-now.com`) |
| User Name | ServiceNow account username |
| Password | ServiceNow account password |
| Queue ID | Unique queue identification number |
| Webhook URL | Web URL for custom application function callbacks |
**Option 2: OAuth with Refresh Token**
Follow [this ServiceNow documentation](https://support.servicenow.com/kb?id=kb_article_view\&sysparm_article=KB0778194) to generate a refresh token.
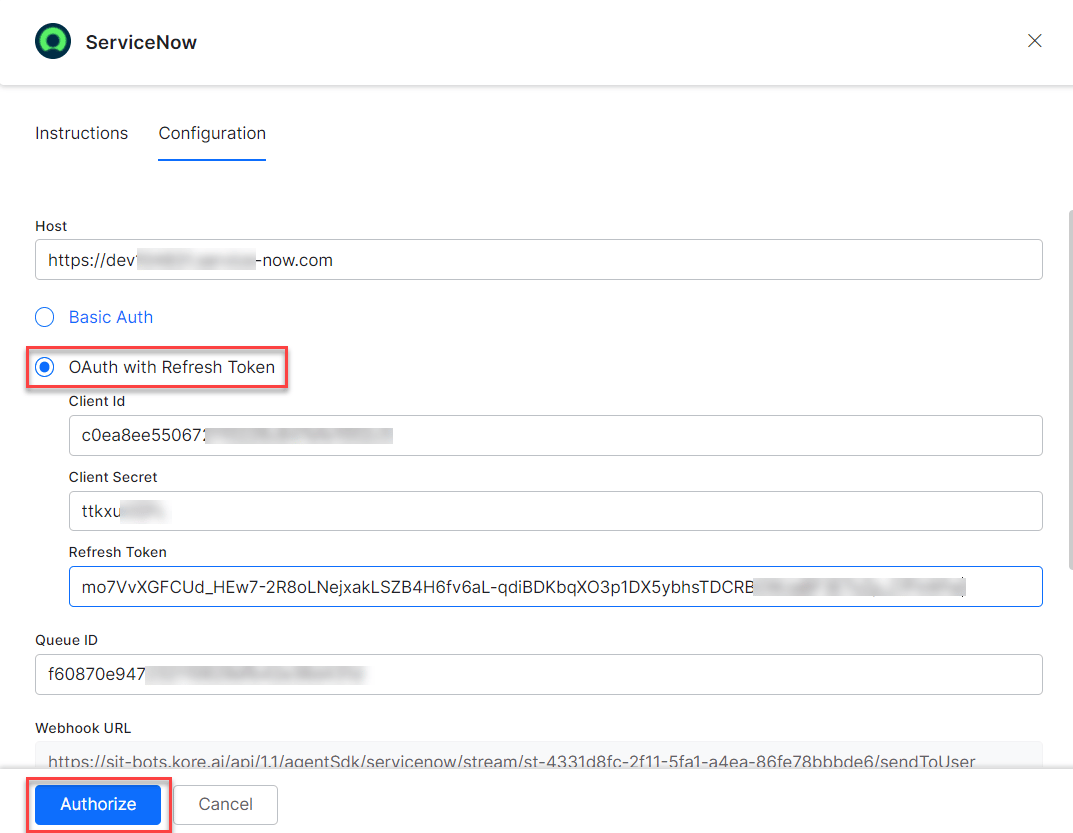 1. Select **Agent Chat (Supported for Utah and higher versions)**.
2. Select **OAuth with Refresh Token**.
3. Enter:
| Field | Description |
| ------------- | ------------------------------------------------- |
| Instance URL | ServiceNow instance URL |
| Client ID | Client ID from your ServiceNow application |
| Client Secret | Client secret from your ServiceNow application |
| Refresh Token | Refresh token generated per the documentation |
| Webhook URL | Web URL for custom application function callbacks |
5. Click **Authorize** to authenticate.
6. To make ServiceNow the default agent, enable **Default Agent System for all AI Agent channels**.
This option is enabled only when multiple agents are configured.
7. Click **Configure** to map channels.
1. Select **Agent Chat (Supported for Utah and higher versions)**.
2. Select **OAuth with Refresh Token**.
3. Enter:
| Field | Description |
| ------------- | ------------------------------------------------- |
| Instance URL | ServiceNow instance URL |
| Client ID | Client ID from your ServiceNow application |
| Client Secret | Client secret from your ServiceNow application |
| Refresh Token | Refresh token generated per the documentation |
| Webhook URL | Web URL for custom application function callbacks |
5. Click **Authorize** to authenticate.
6. To make ServiceNow the default agent, enable **Default Agent System for all AI Agent channels**.
This option is enabled only when multiple agents are configured.
7. Click **Configure** to map channels.
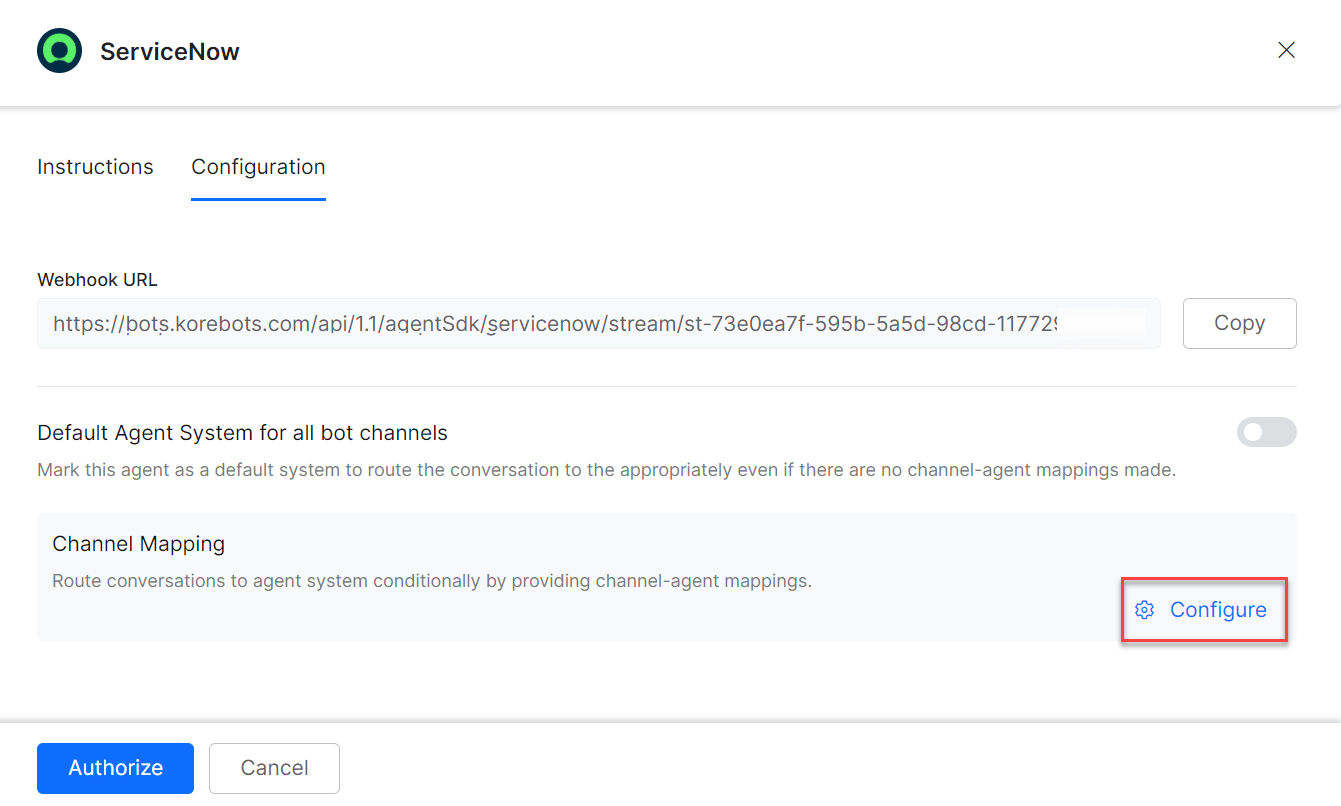 8. Select channels to map to the ServiceNow agent.
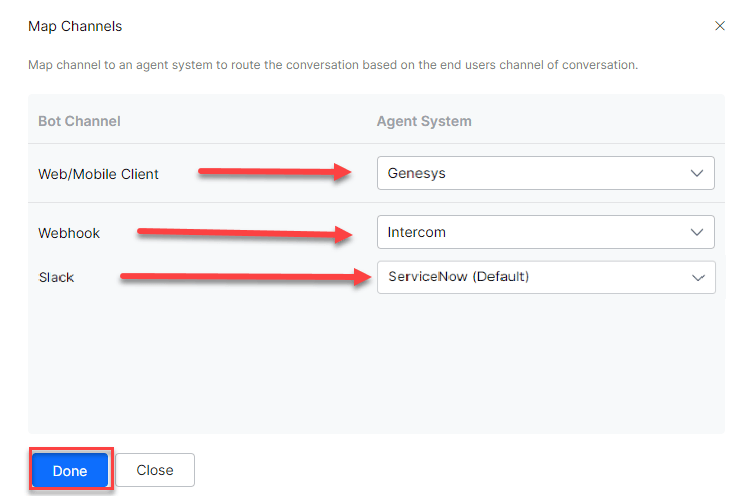 9. Click **Done**, then **Save**.
10. Publish the app. See [Publishing your App](/ai-for-service/deployment/publishing-app).
### Step 3: Install the Required Plugins
1. Log in to the ServiceNow Developer instance with admin credentials.
2. Navigate to **System Definition > Plugins** from the left menu.
9. Click **Done**, then **Save**.
10. Publish the app. See [Publishing your App](/ai-for-service/deployment/publishing-app).
### Step 3: Install the Required Plugins
1. Log in to the ServiceNow Developer instance with admin credentials.
2. Navigate to **System Definition > Plugins** from the left menu.
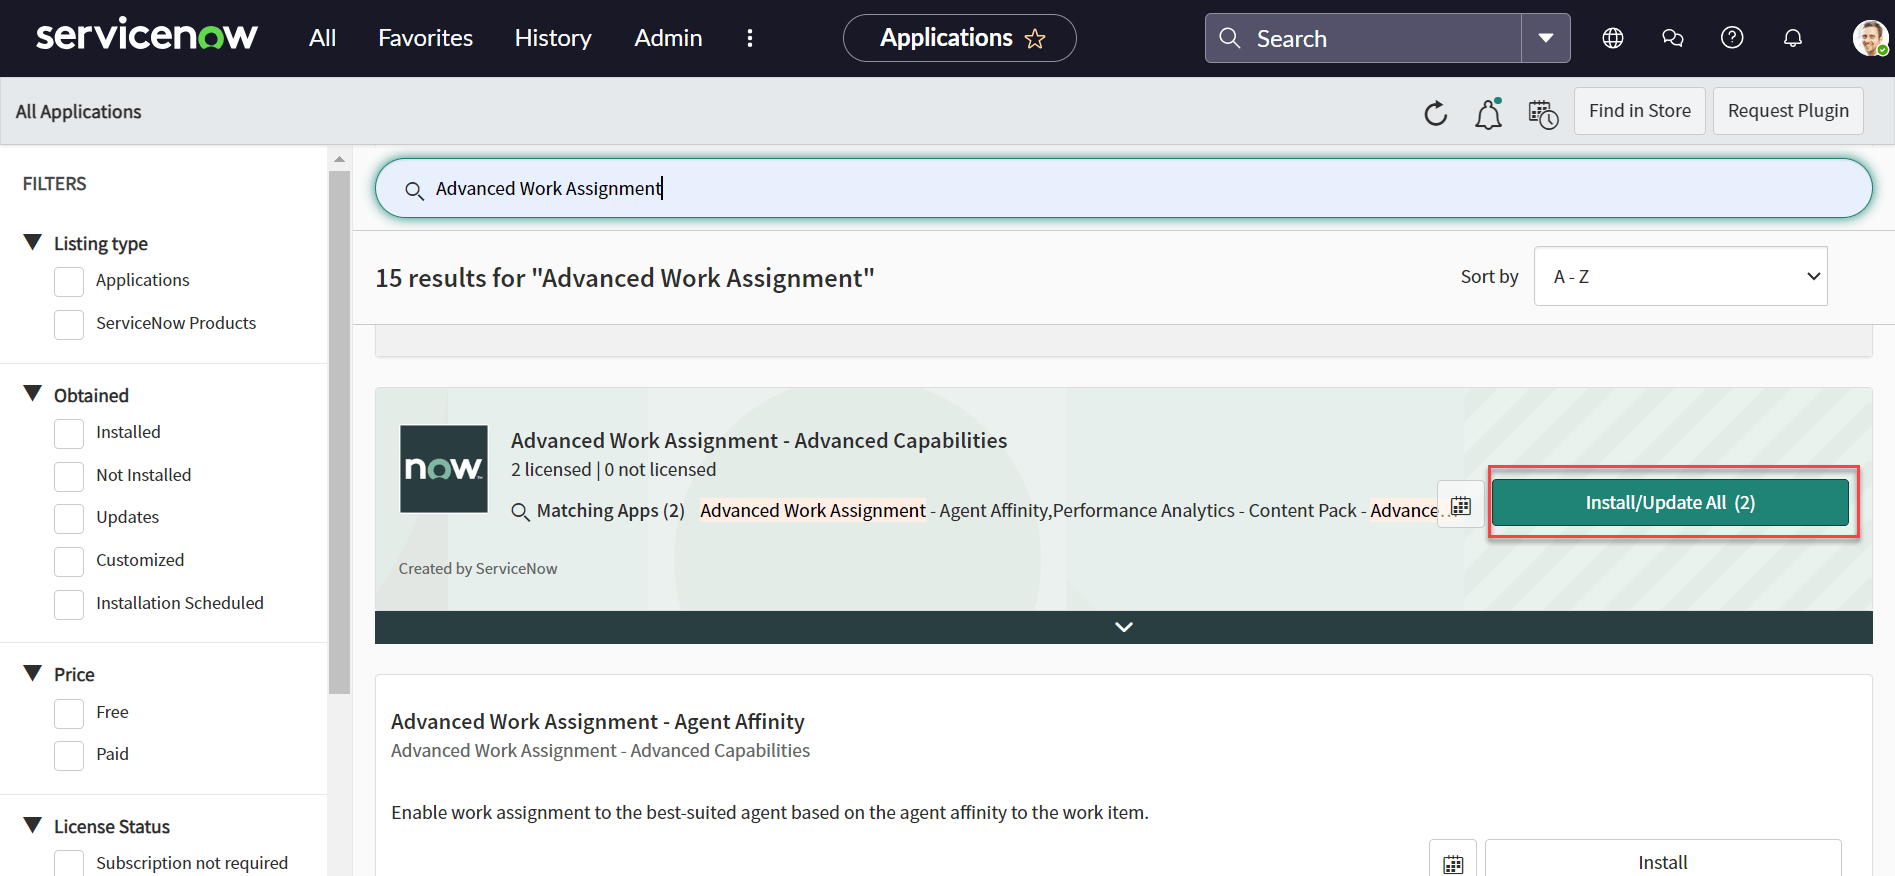
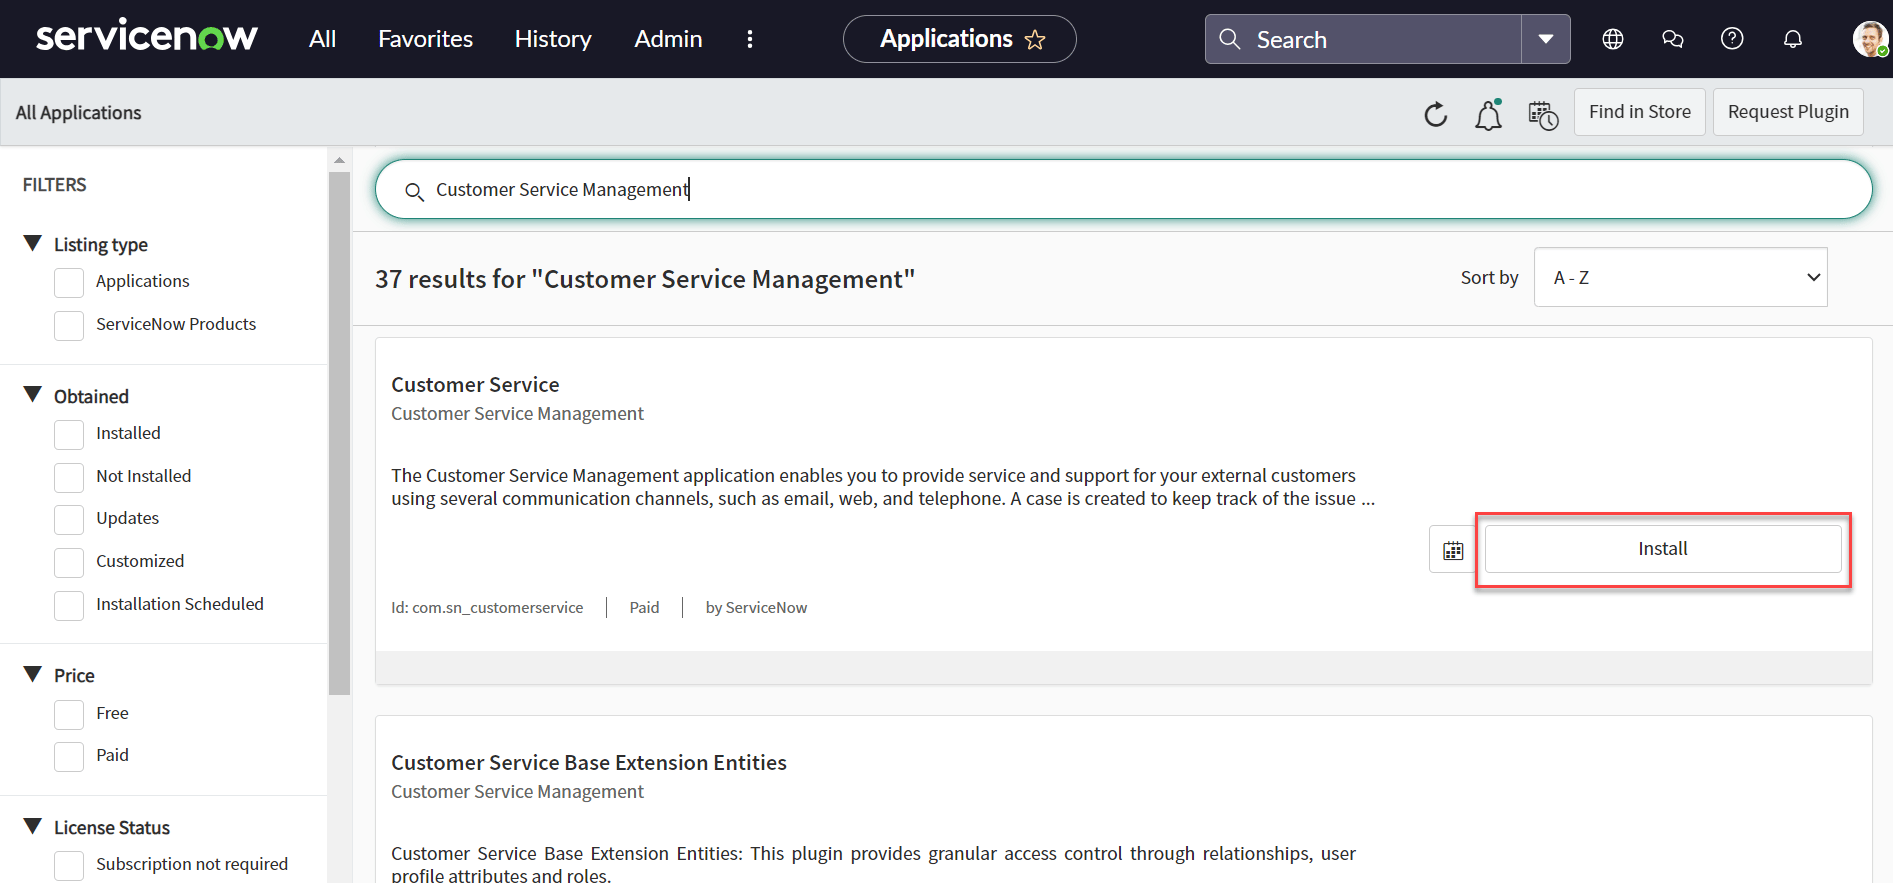
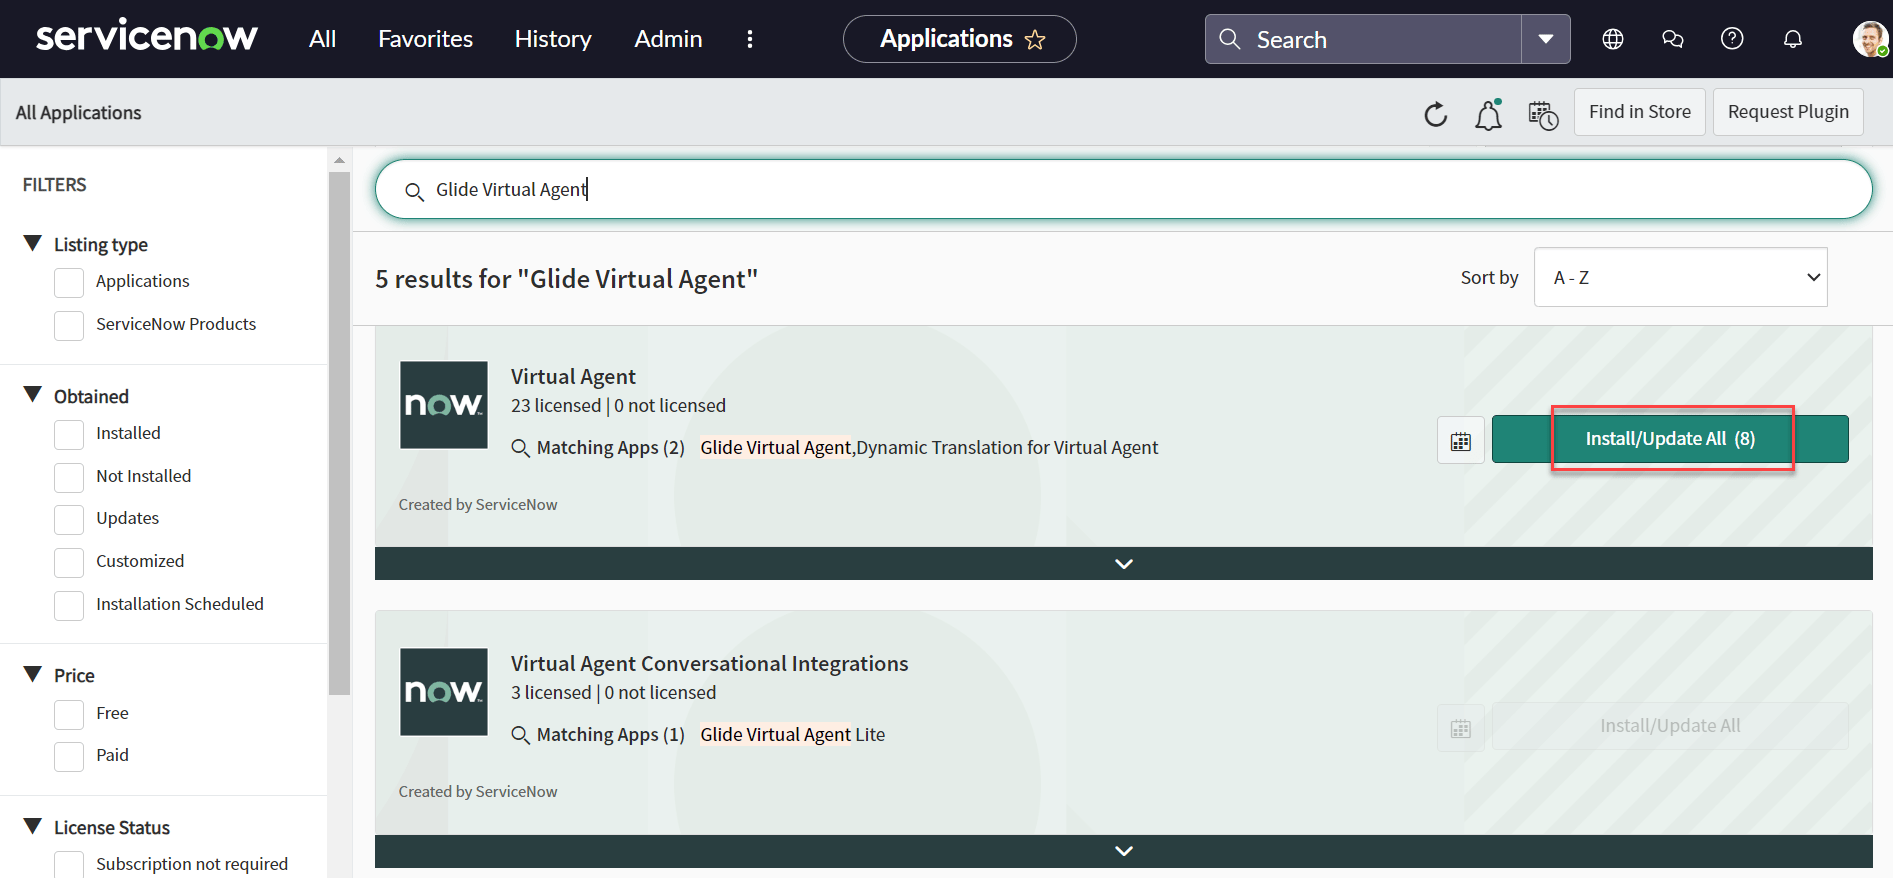
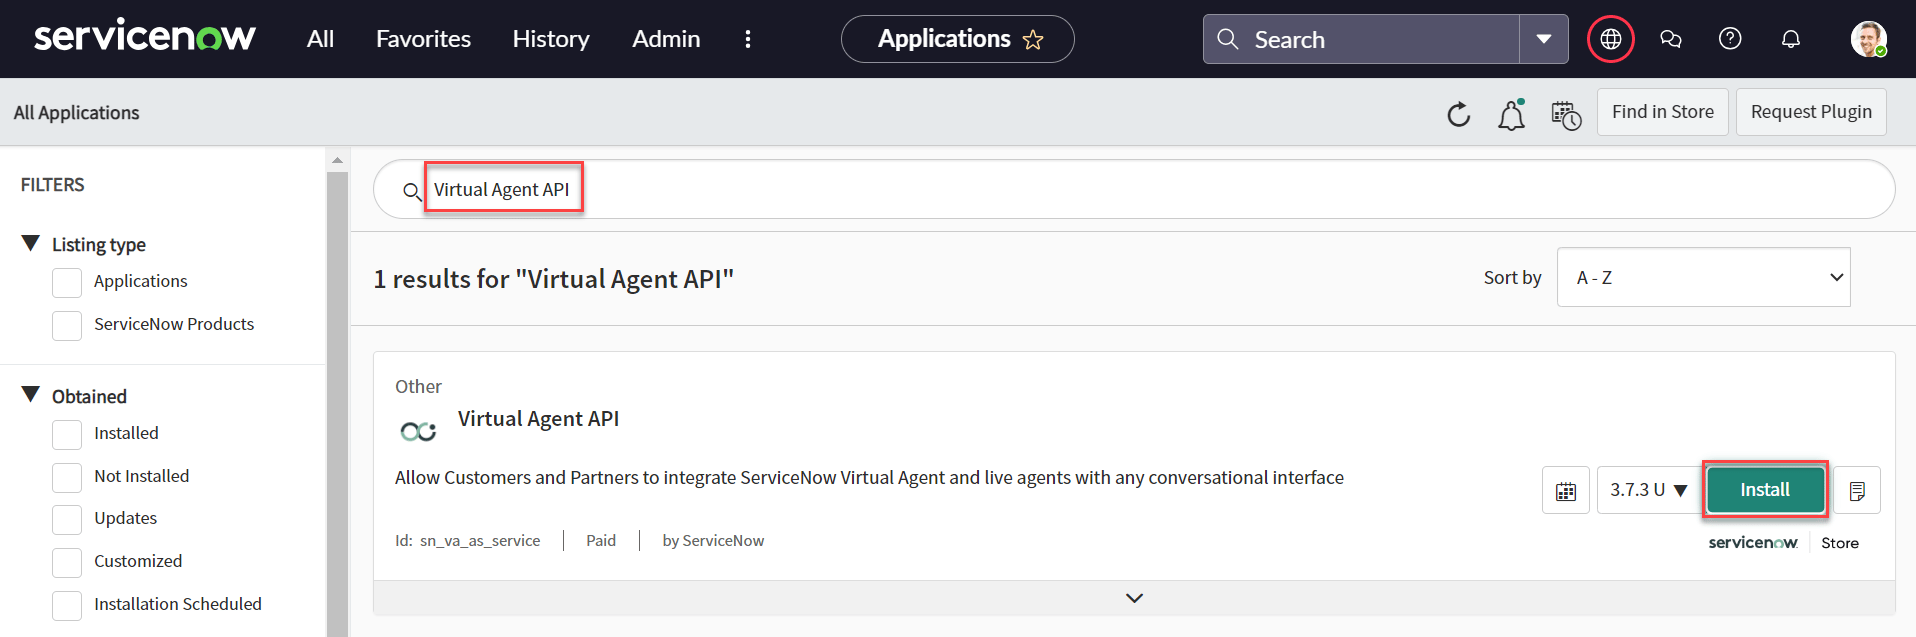
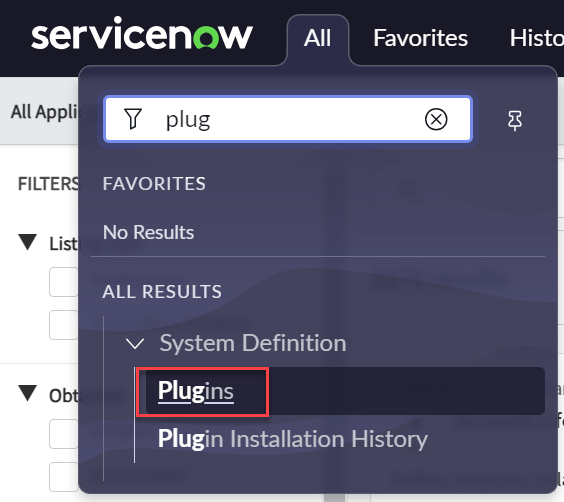 3. Search and install the following plugins:
* **Omni-experience Standard Feature Set**
3. Search and install the following plugins:
* **Omni-experience Standard Feature Set**
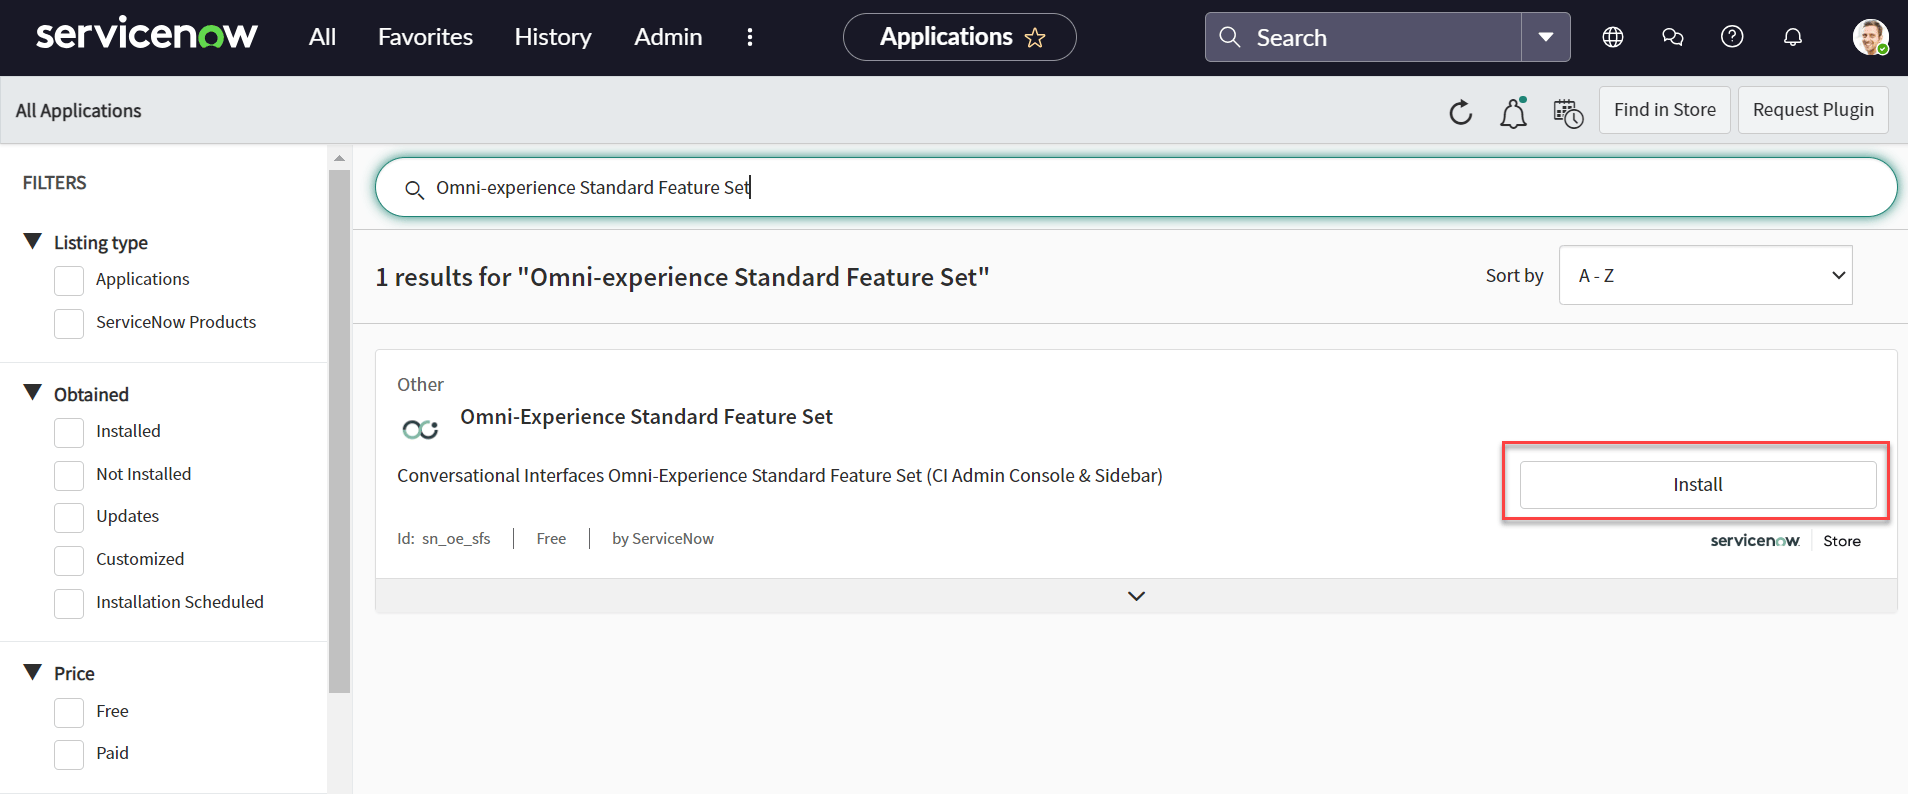 * **Advanced Work Assignment**
 * **Customer Service Management**
 * **Glide Virtual Agent**
 * **Virtual Agent API**
 4. Verify all plugins are installed with required permissions.
### Step 4: Assign Agent Roles to the Consumer Service Support Group
1. Log in to the ServiceNow Developer instance with admin credentials.
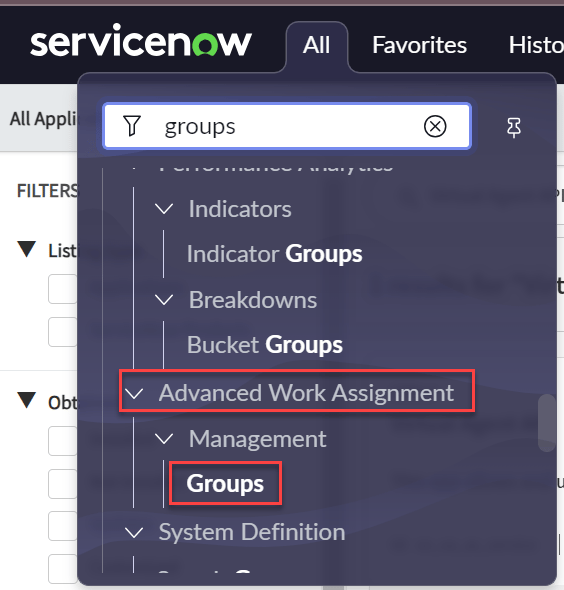
2. Navigate to **Advanced Work Assignment > Management > Groups**.
4. Verify all plugins are installed with required permissions.
### Step 4: Assign Agent Roles to the Consumer Service Support Group
1. Log in to the ServiceNow Developer instance with admin credentials.
2. Navigate to **Advanced Work Assignment > Management > Groups**.
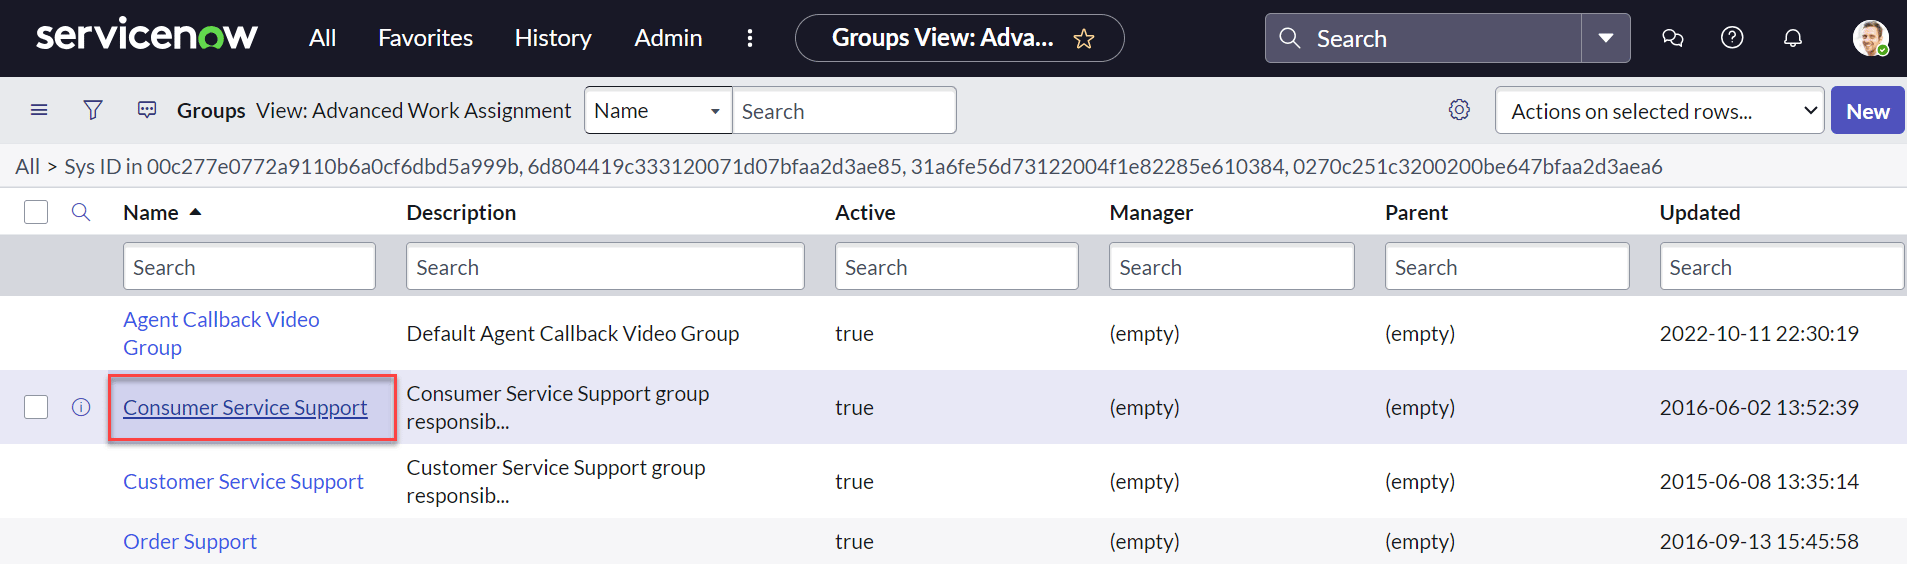
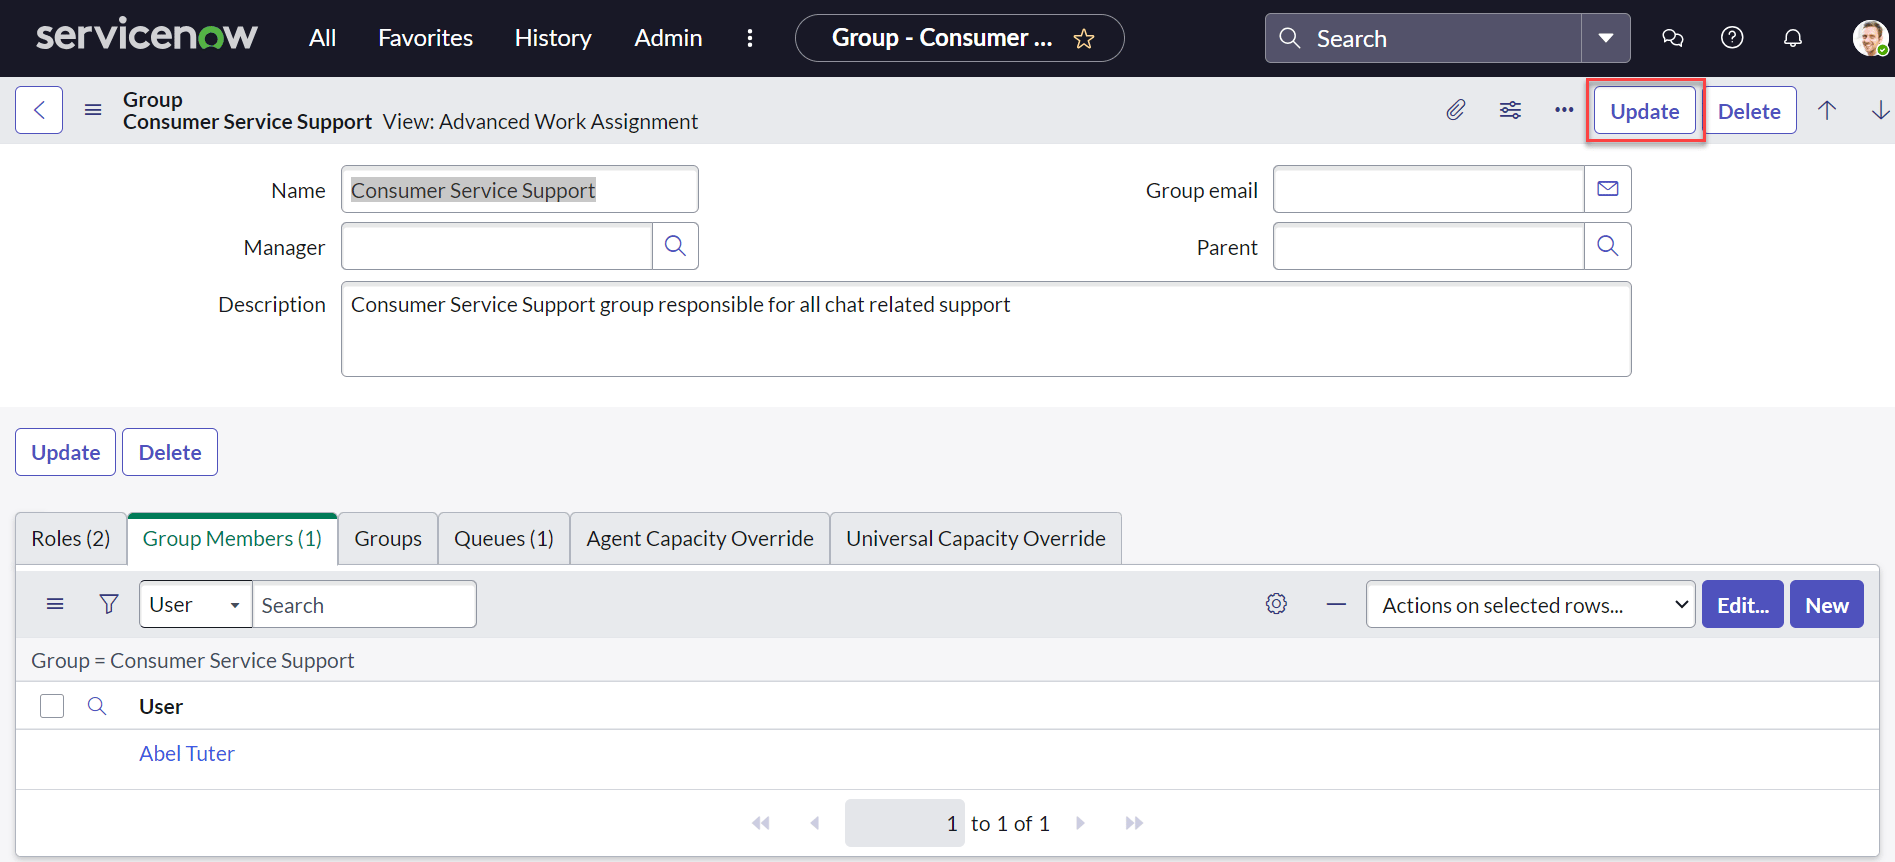
 3. Select the **Consumer Service Support** group.
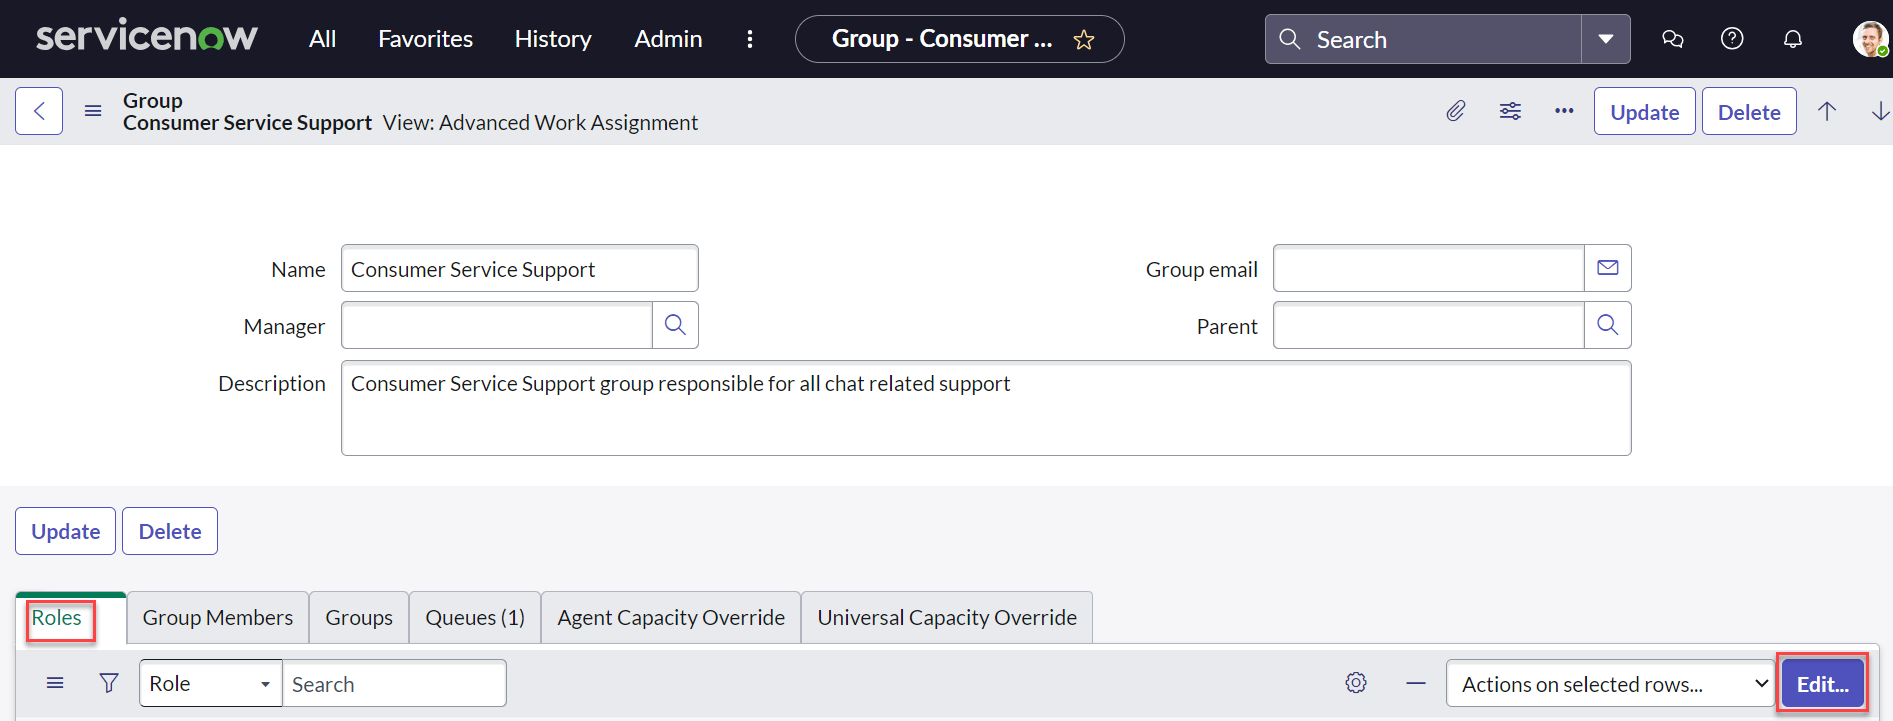
 4. Select the **Roles** tab and click **Edit**.
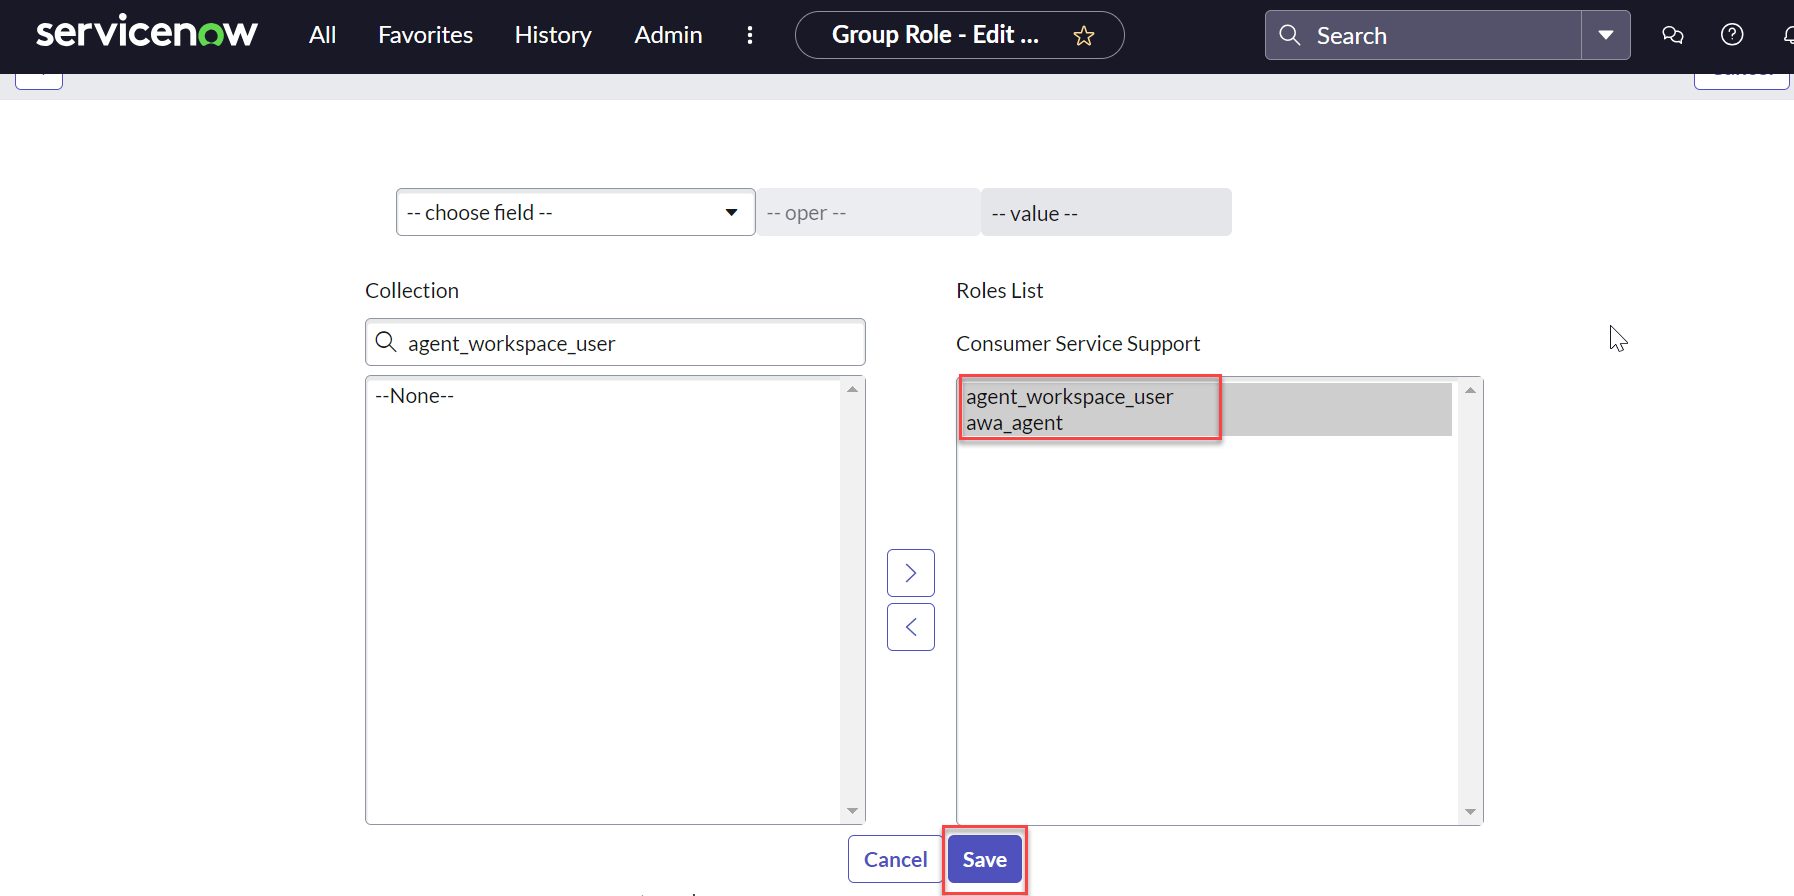
 5. Search for and assign the **awa\_agent** and **agent\_workspace\_user** roles to the Consumer Service Support group. Click **Save**.
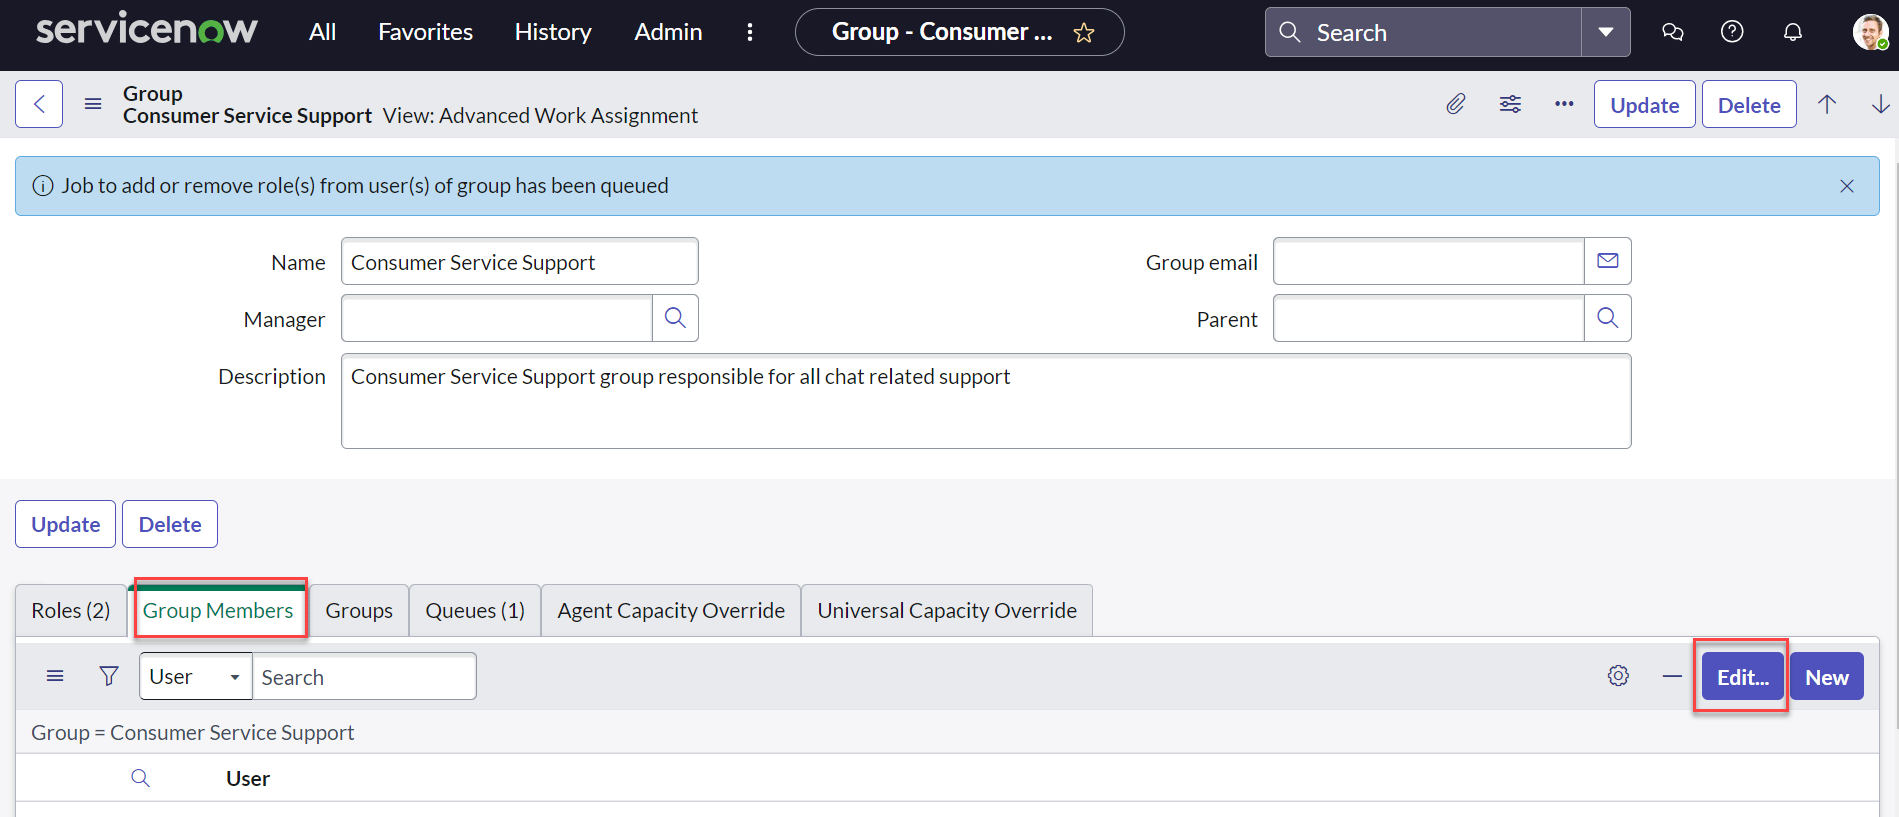
 6. Go back to the group details screen, select **Group Members**, click **Edit**, and navigate to **Edit Members**.
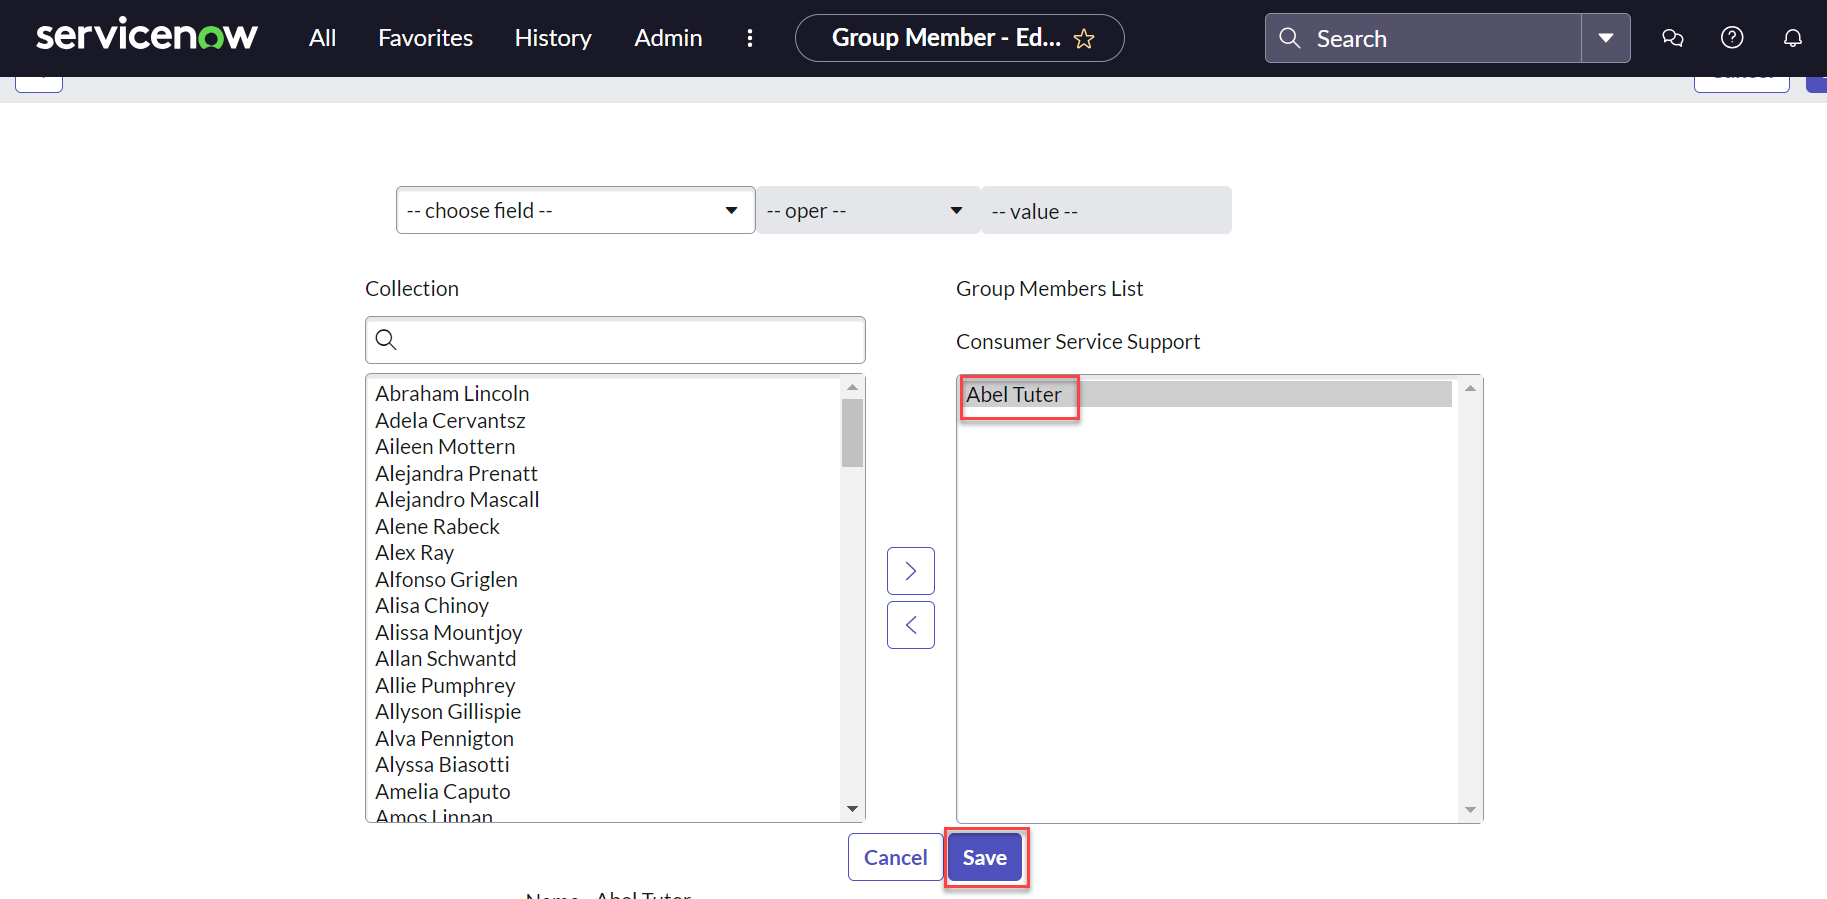
 7. Search for and assign the required user (for example, `Abel Tuter`) to the Consumer Service Support group. Click **Save**.
 8. Click **Update** on the group details screen.
 ### Step 5: Update the Webhook Endpoint and Enable the Integration
1. Log in to the ServiceNow instance.
2. Navigate to **System Web Services > Outbound > REST messages**.
### Step 5: Update the Webhook Endpoint and Enable the Integration
1. Log in to the ServiceNow instance.
2. Navigate to **System Web Services > Outbound > REST messages**.
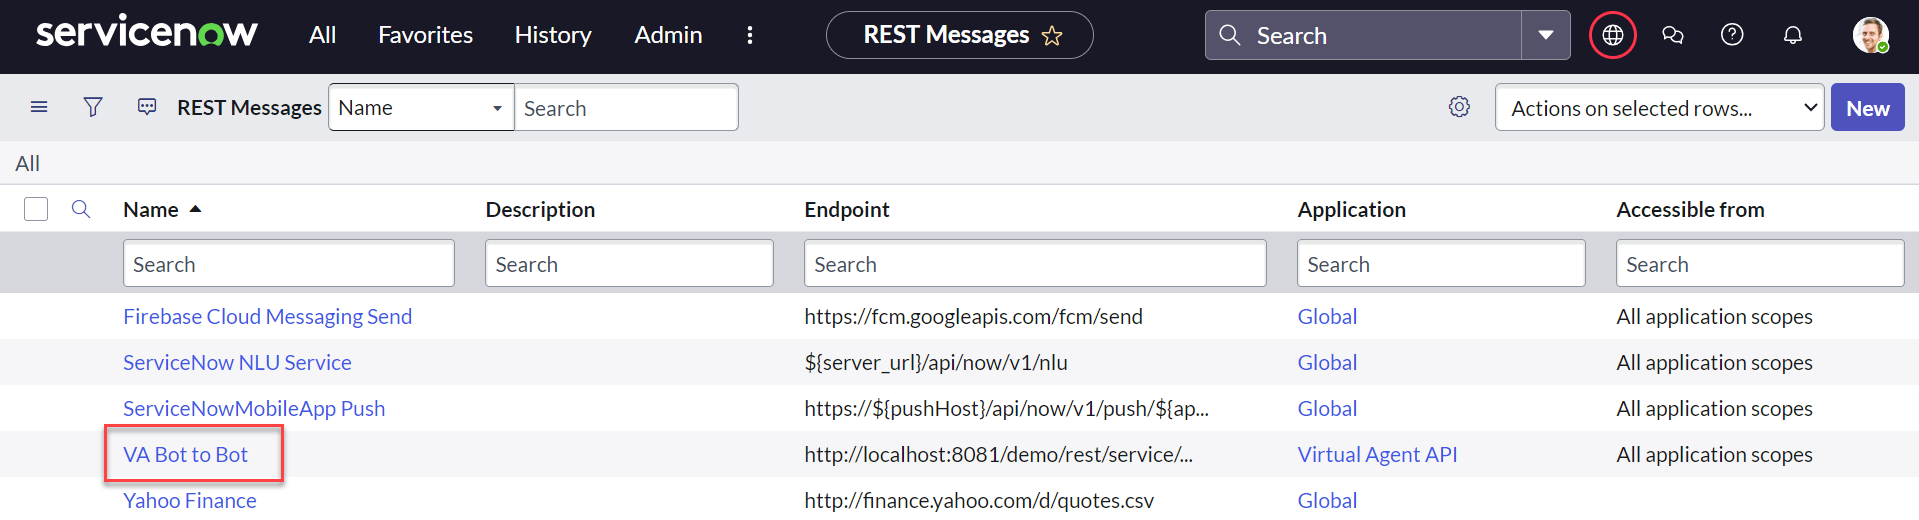
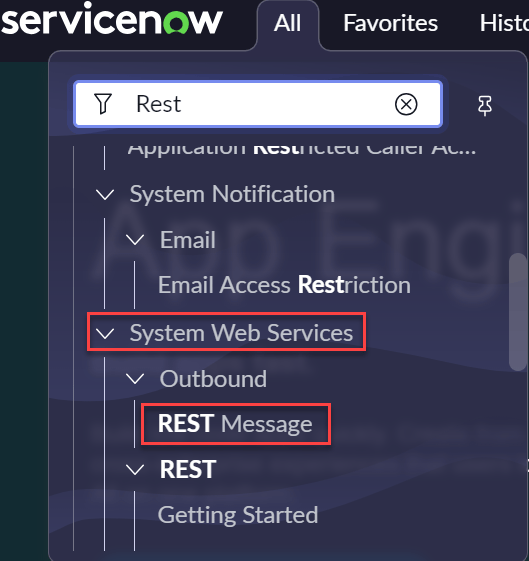 3. Select **VABot to Bot** from the list.
 4. Copy the **Webhook URL** from the **Configuration** tab of the ServiceNow Agent page.
5. Paste it into the **EndPoint** field on the VABot to Bot edit screen.
4. Copy the **Webhook URL** from the **Configuration** tab of the ServiceNow Agent page.
5. Paste it into the **EndPoint** field on the VABot to Bot edit screen.
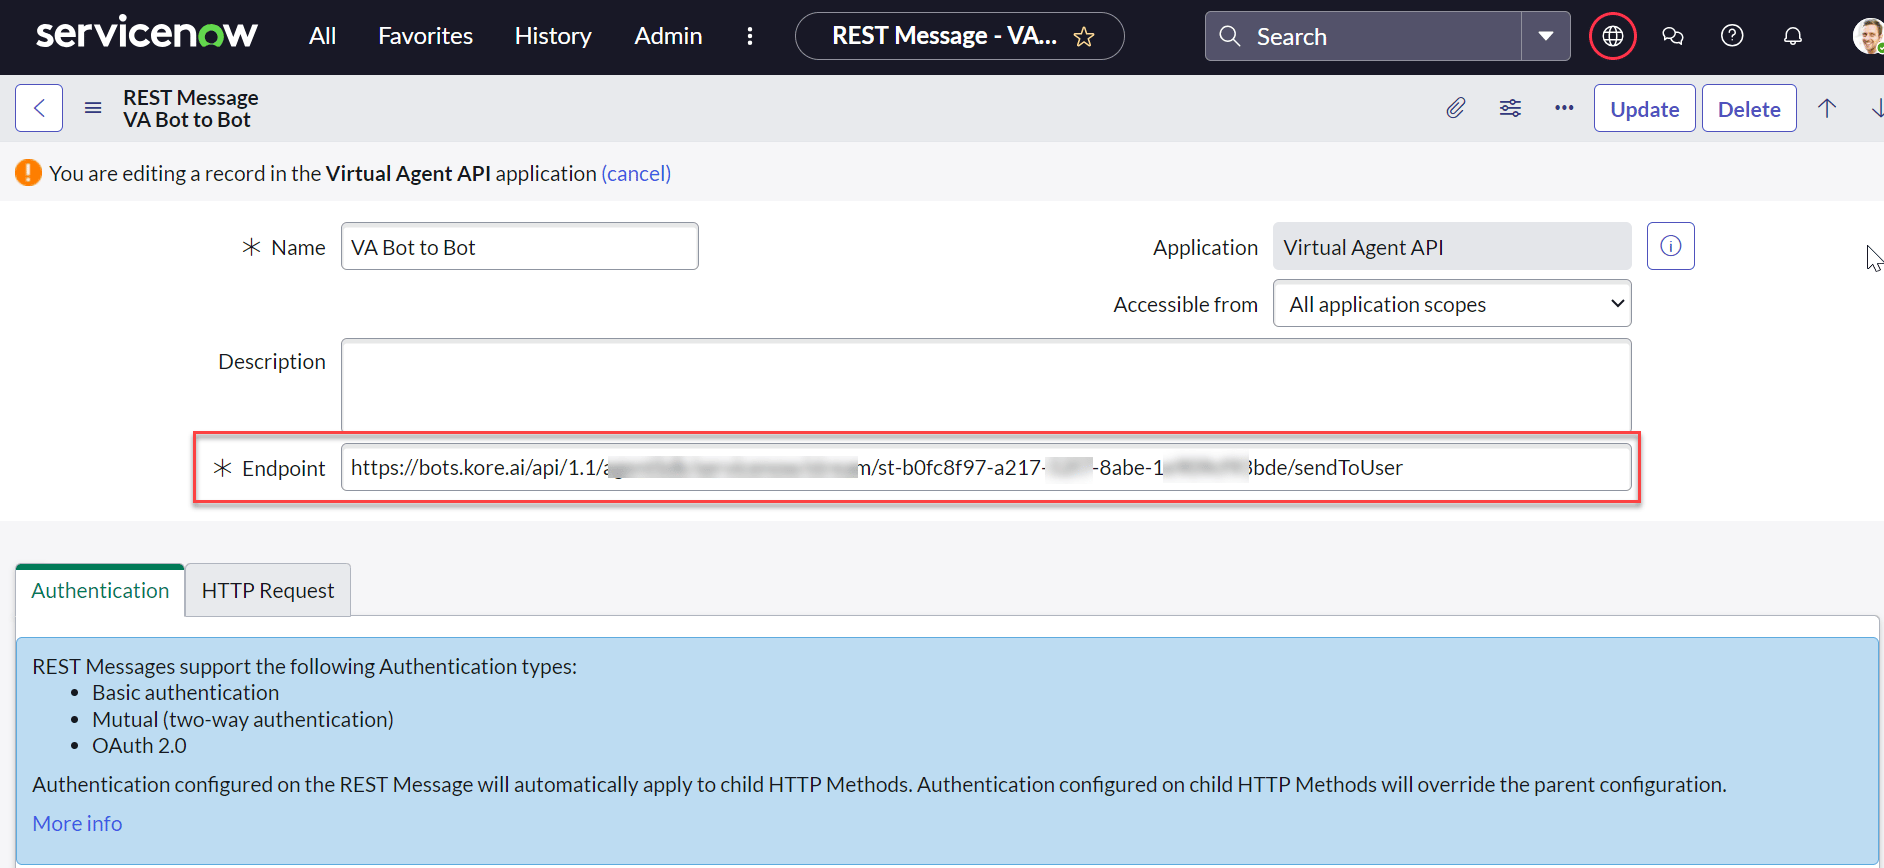 6. Scroll down, select **HTTP methods**, update the Webhook URL for **postMessage**, and click **Update**.
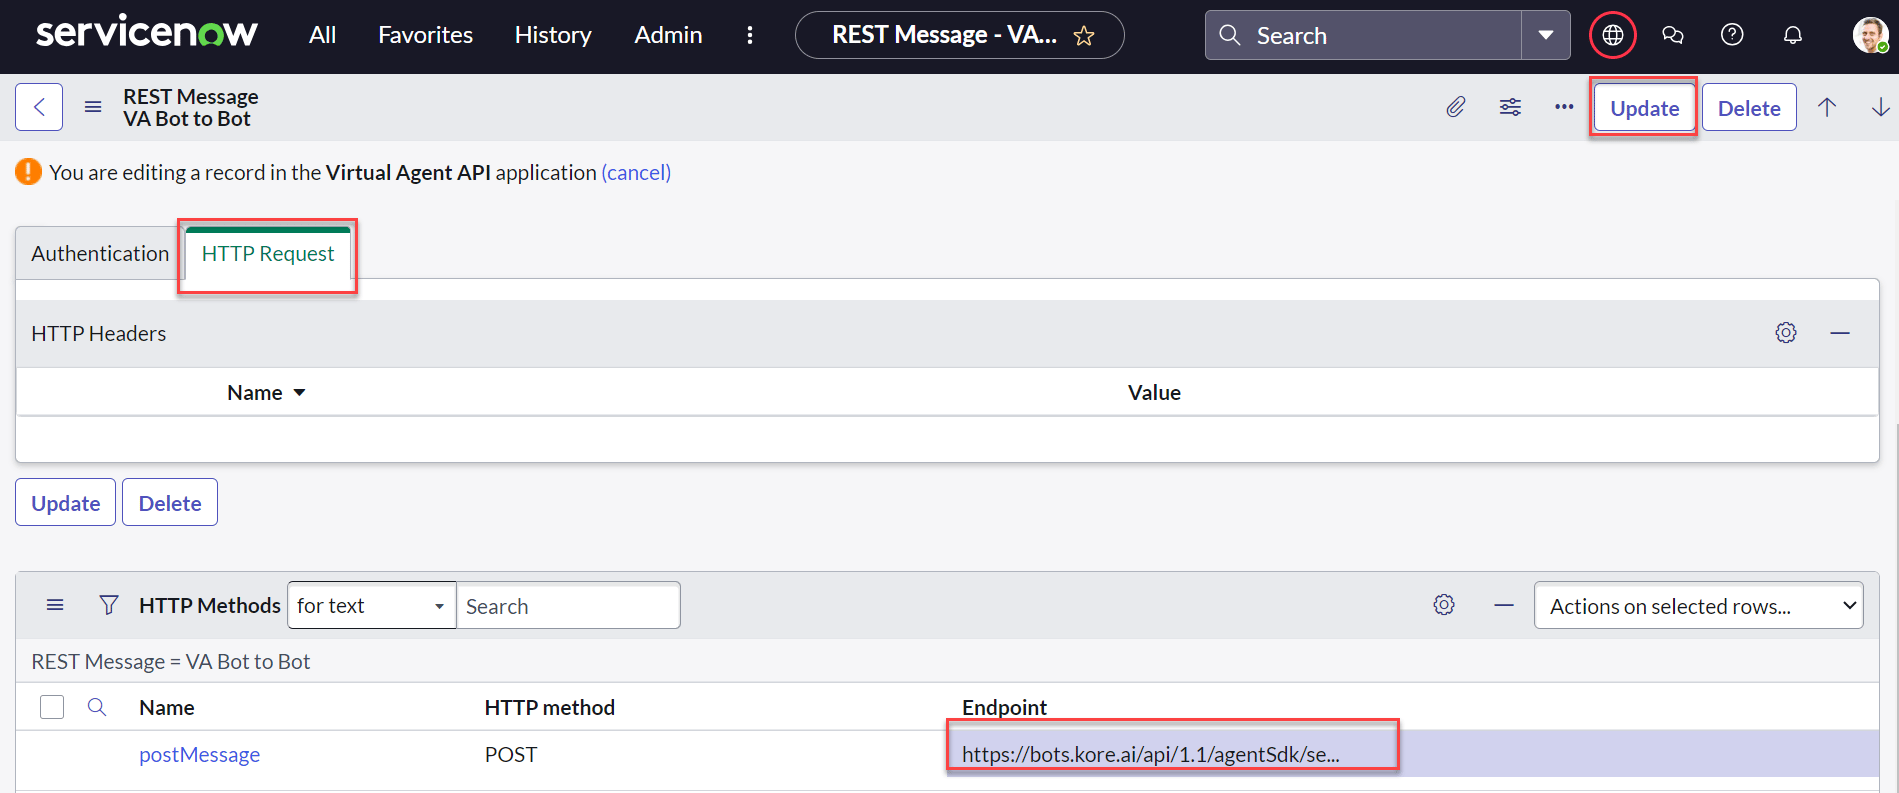 7. Click **Save** to enable the integration.
### Step 6: Testing Configuration
1. Open the AI Agent with ServiceNow enabled.
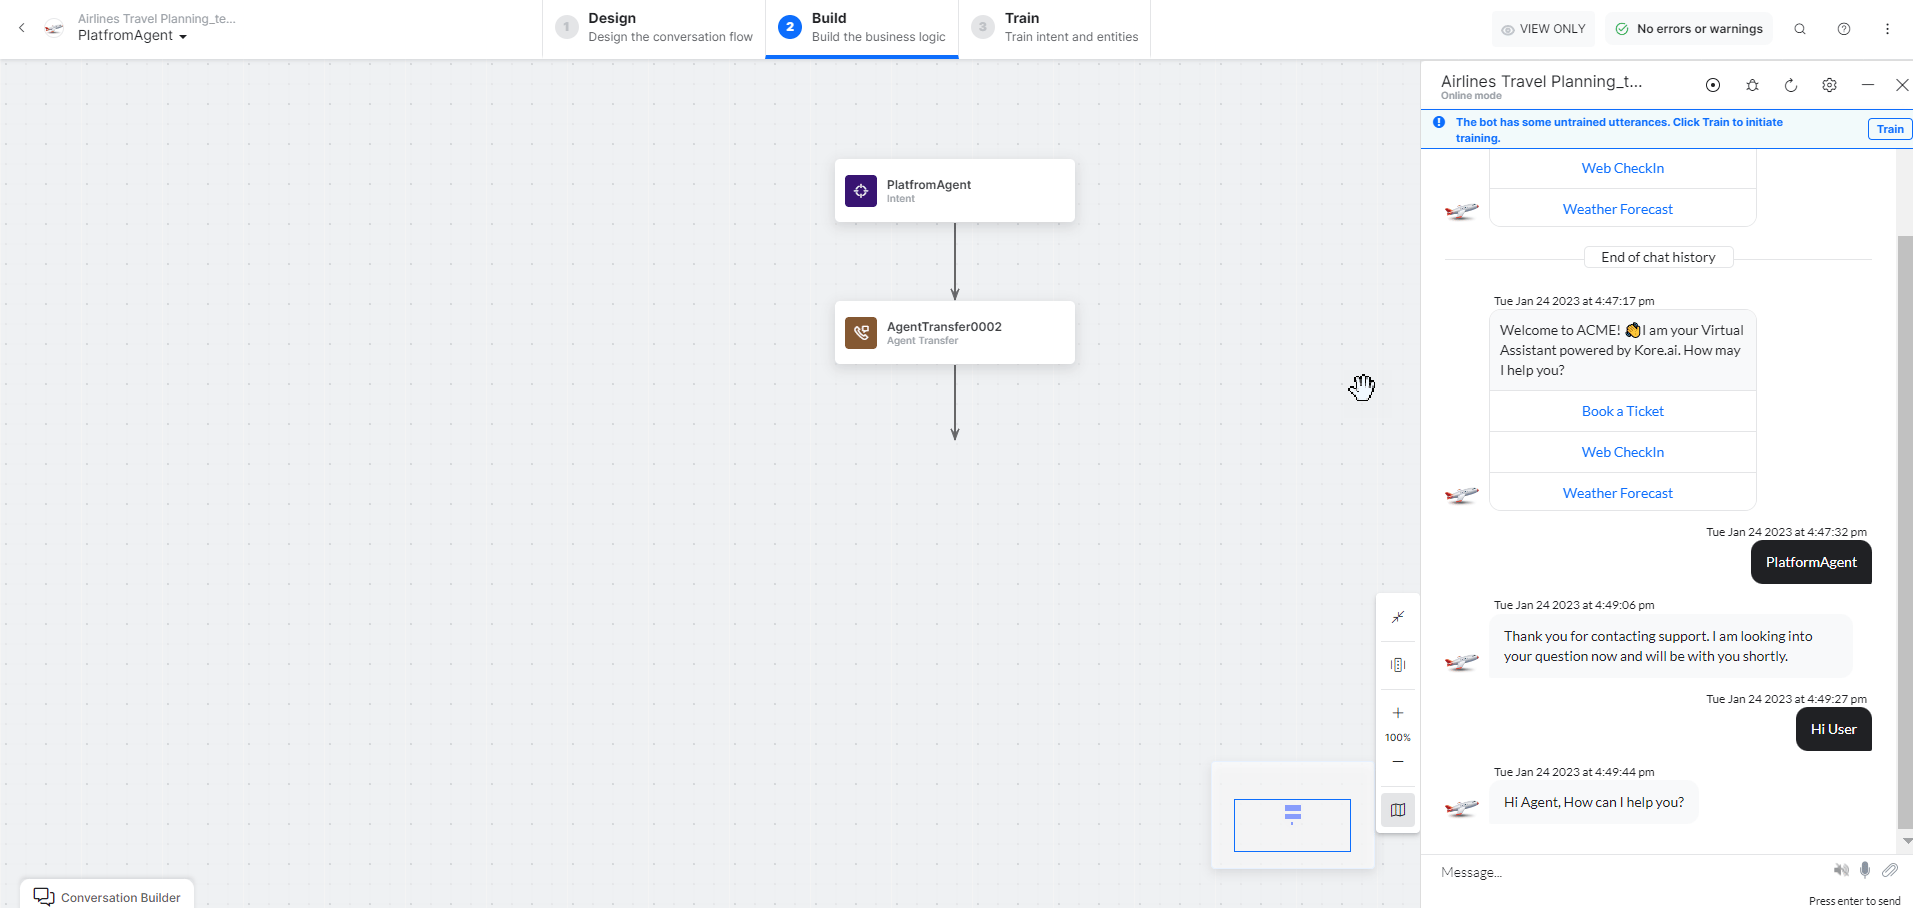
2. Create an Agent Transfer Node task (for example, `Platform Agent` task with a `UserAgent` node). See [Agent Transfer Node](/ai-for-service/automation/dialogs/node-types/agent-transfer-node).
7. Click **Save** to enable the integration.
### Step 6: Testing Configuration
1. Open the AI Agent with ServiceNow enabled.
2. Create an Agent Transfer Node task (for example, `Platform Agent` task with a `UserAgent` node). See [Agent Transfer Node](/ai-for-service/automation/dialogs/node-types/agent-transfer-node).
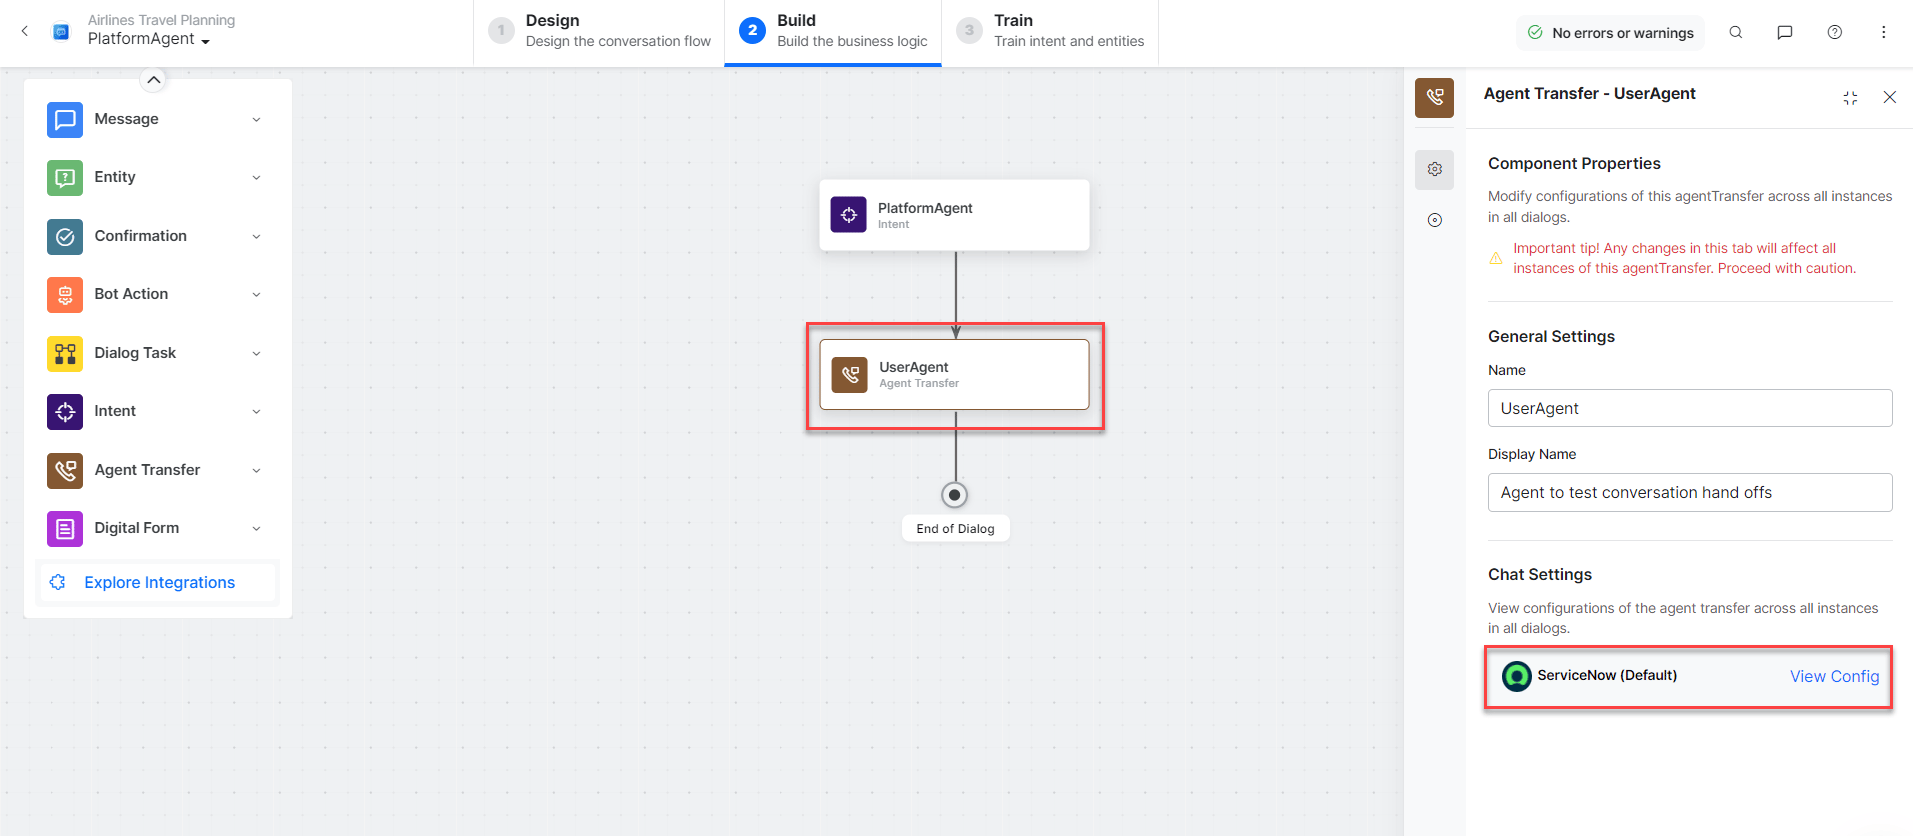 3. Click **Talk to Bot** and enter **Help**.
4. Log in to ServiceNow, go to **Profile**, and select **Impersonate User**.
3. Click **Talk to Bot** and enter **Help**.
4. Log in to ServiceNow, go to **Profile**, and select **Impersonate User**.
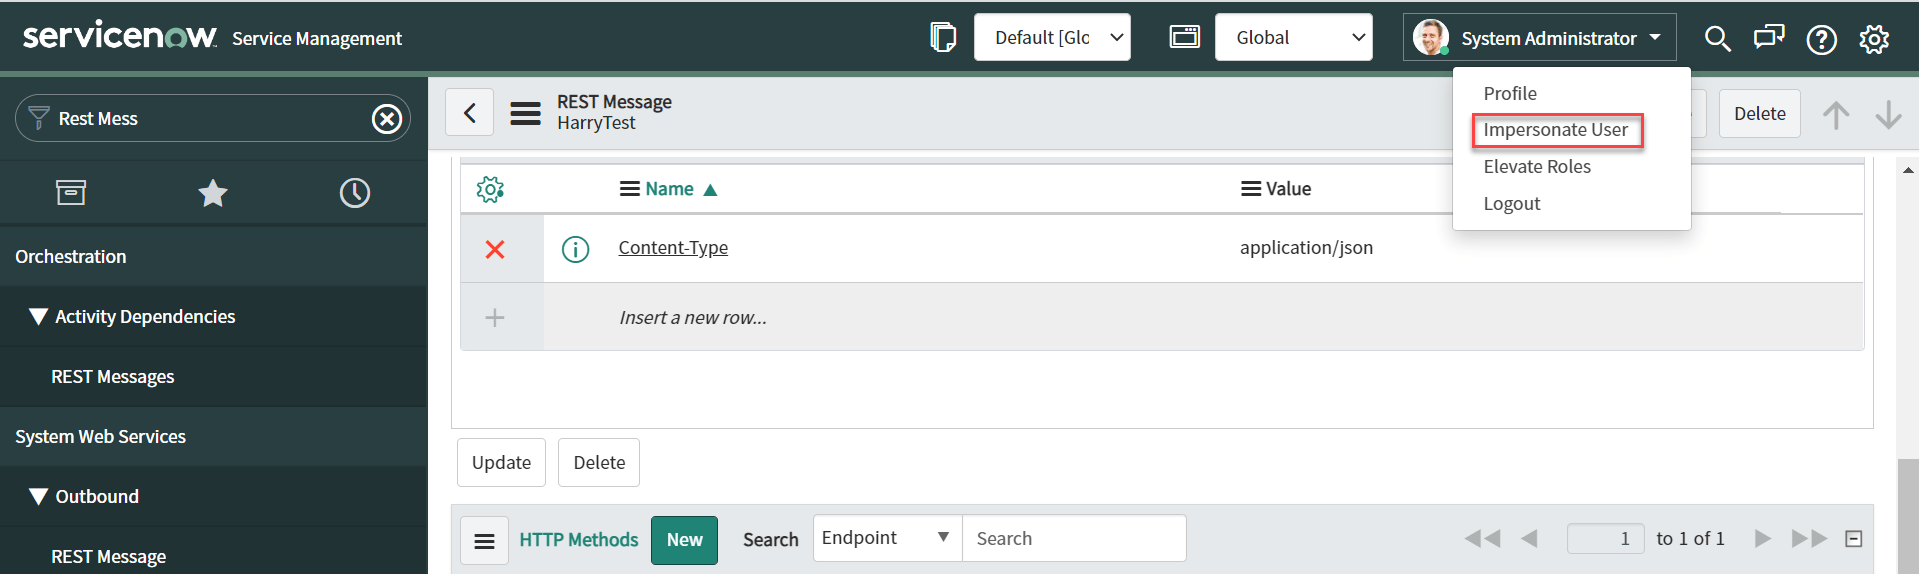 5. Select the username created (for example, `Abel Tuter`).
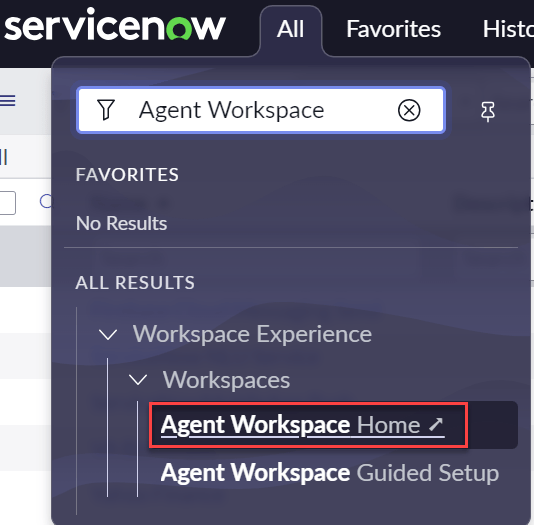
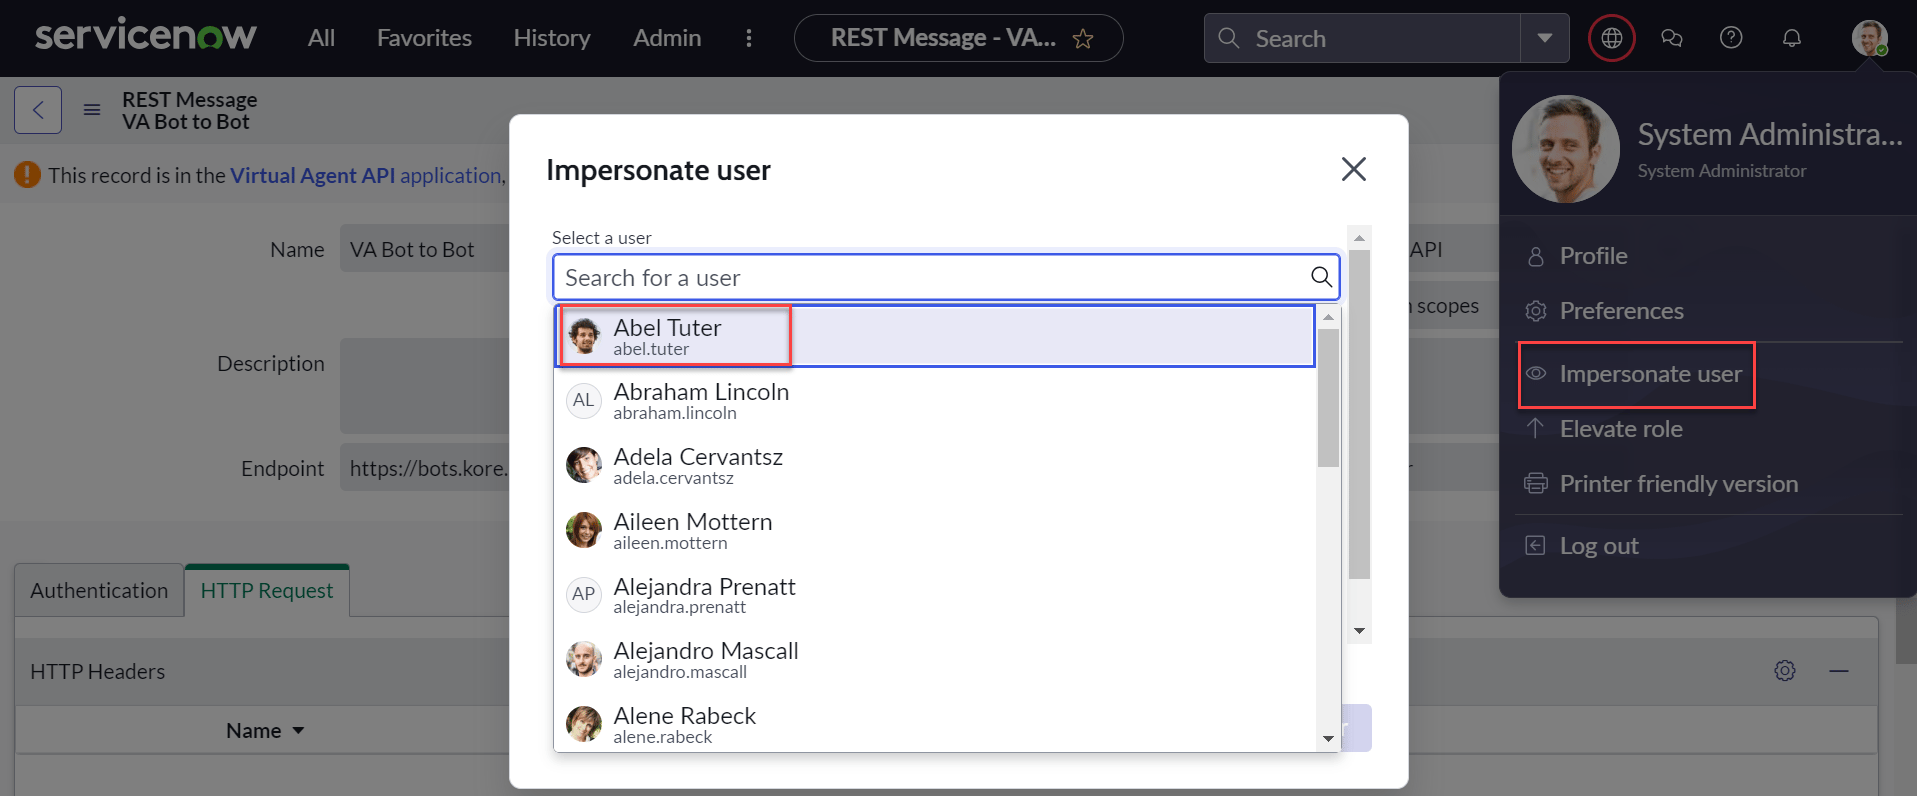 6. Navigate to **Workspace Experience > Workspaces > Agent Workspace Home**.
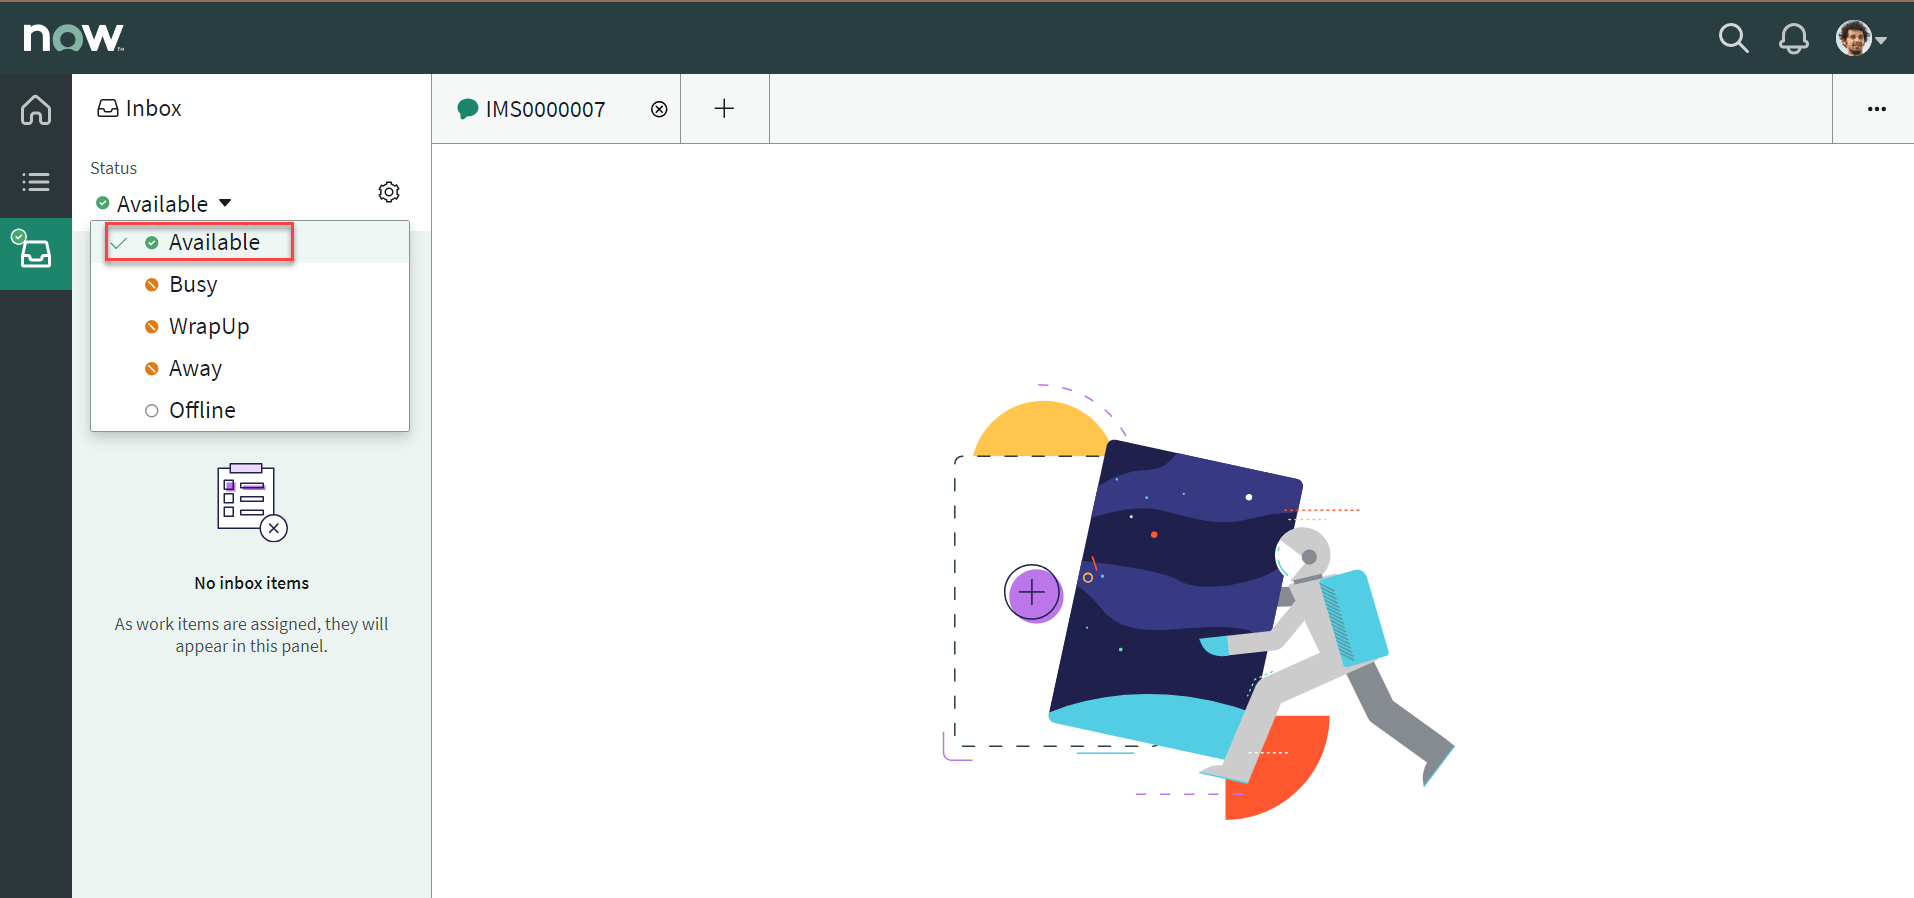
 7. In the Agent Workspace, select **Inbox** and set **Status** to **Available**.
 8. When the user initiates chat, the conversation transfers to the ServiceNow agent and the connection is established.
 ***
## Additional Capabilities
### Pass User Information to ServiceNow
By default, users appear as Guest in ServiceNow. Use the `ServiceNowMetaData` object with `agentUtils.setMetaInfo` to pass user identity information.
**Steps:**
1. Configure Message Authentication for inbound communication in your ServiceNow instance — see [ServiceNow Message Authentication setup](https://docs.servicenow.com/bundle/vancouver-servicenow-platform/page/administer/virtual-agent/task/set-up-message-auth-va-api.html).
2. Before the agent transfer node, set meta info using a Script node:
```javascript theme={null}
let metaData = {
"payloadFields": {
"userId": context.entities.UserID, // ServiceNow user ID (dynamic or static)
"emailId": context.entities.UserEmail // ServiceNow user email (dynamic or static)
},
"headerFields": {
"token": "Token_generated_in_ServiceNow_Instance"
}
}
agentUtils.setMetaInfo("ServiceNowMetaData", JSON.stringify(metaData))
```
The app can collect `UserID` and `UserEmail` via entity nodes.
***
## Additional Capabilities
### Pass User Information to ServiceNow
By default, users appear as Guest in ServiceNow. Use the `ServiceNowMetaData` object with `agentUtils.setMetaInfo` to pass user identity information.
**Steps:**
1. Configure Message Authentication for inbound communication in your ServiceNow instance — see [ServiceNow Message Authentication setup](https://docs.servicenow.com/bundle/vancouver-servicenow-platform/page/administer/virtual-agent/task/set-up-message-auth-va-api.html).
2. Before the agent transfer node, set meta info using a Script node:
```javascript theme={null}
let metaData = {
"payloadFields": {
"userId": context.entities.UserID, // ServiceNow user ID (dynamic or static)
"emailId": context.entities.UserEmail // ServiceNow user email (dynamic or static)
},
"headerFields": {
"token": "Token_generated_in_ServiceNow_Instance"
}
}
agentUtils.setMetaInfo("ServiceNowMetaData", JSON.stringify(metaData))
```
The app can collect `UserID` and `UserEmail` via entity nodes.
 Context doesn't include user ID or email by default. Capture required details explicitly. If `ServiceNowMetaData` isn't defined, values aren't shared with ServiceNow.
### Route Messages to Agent Groups by `streamId`
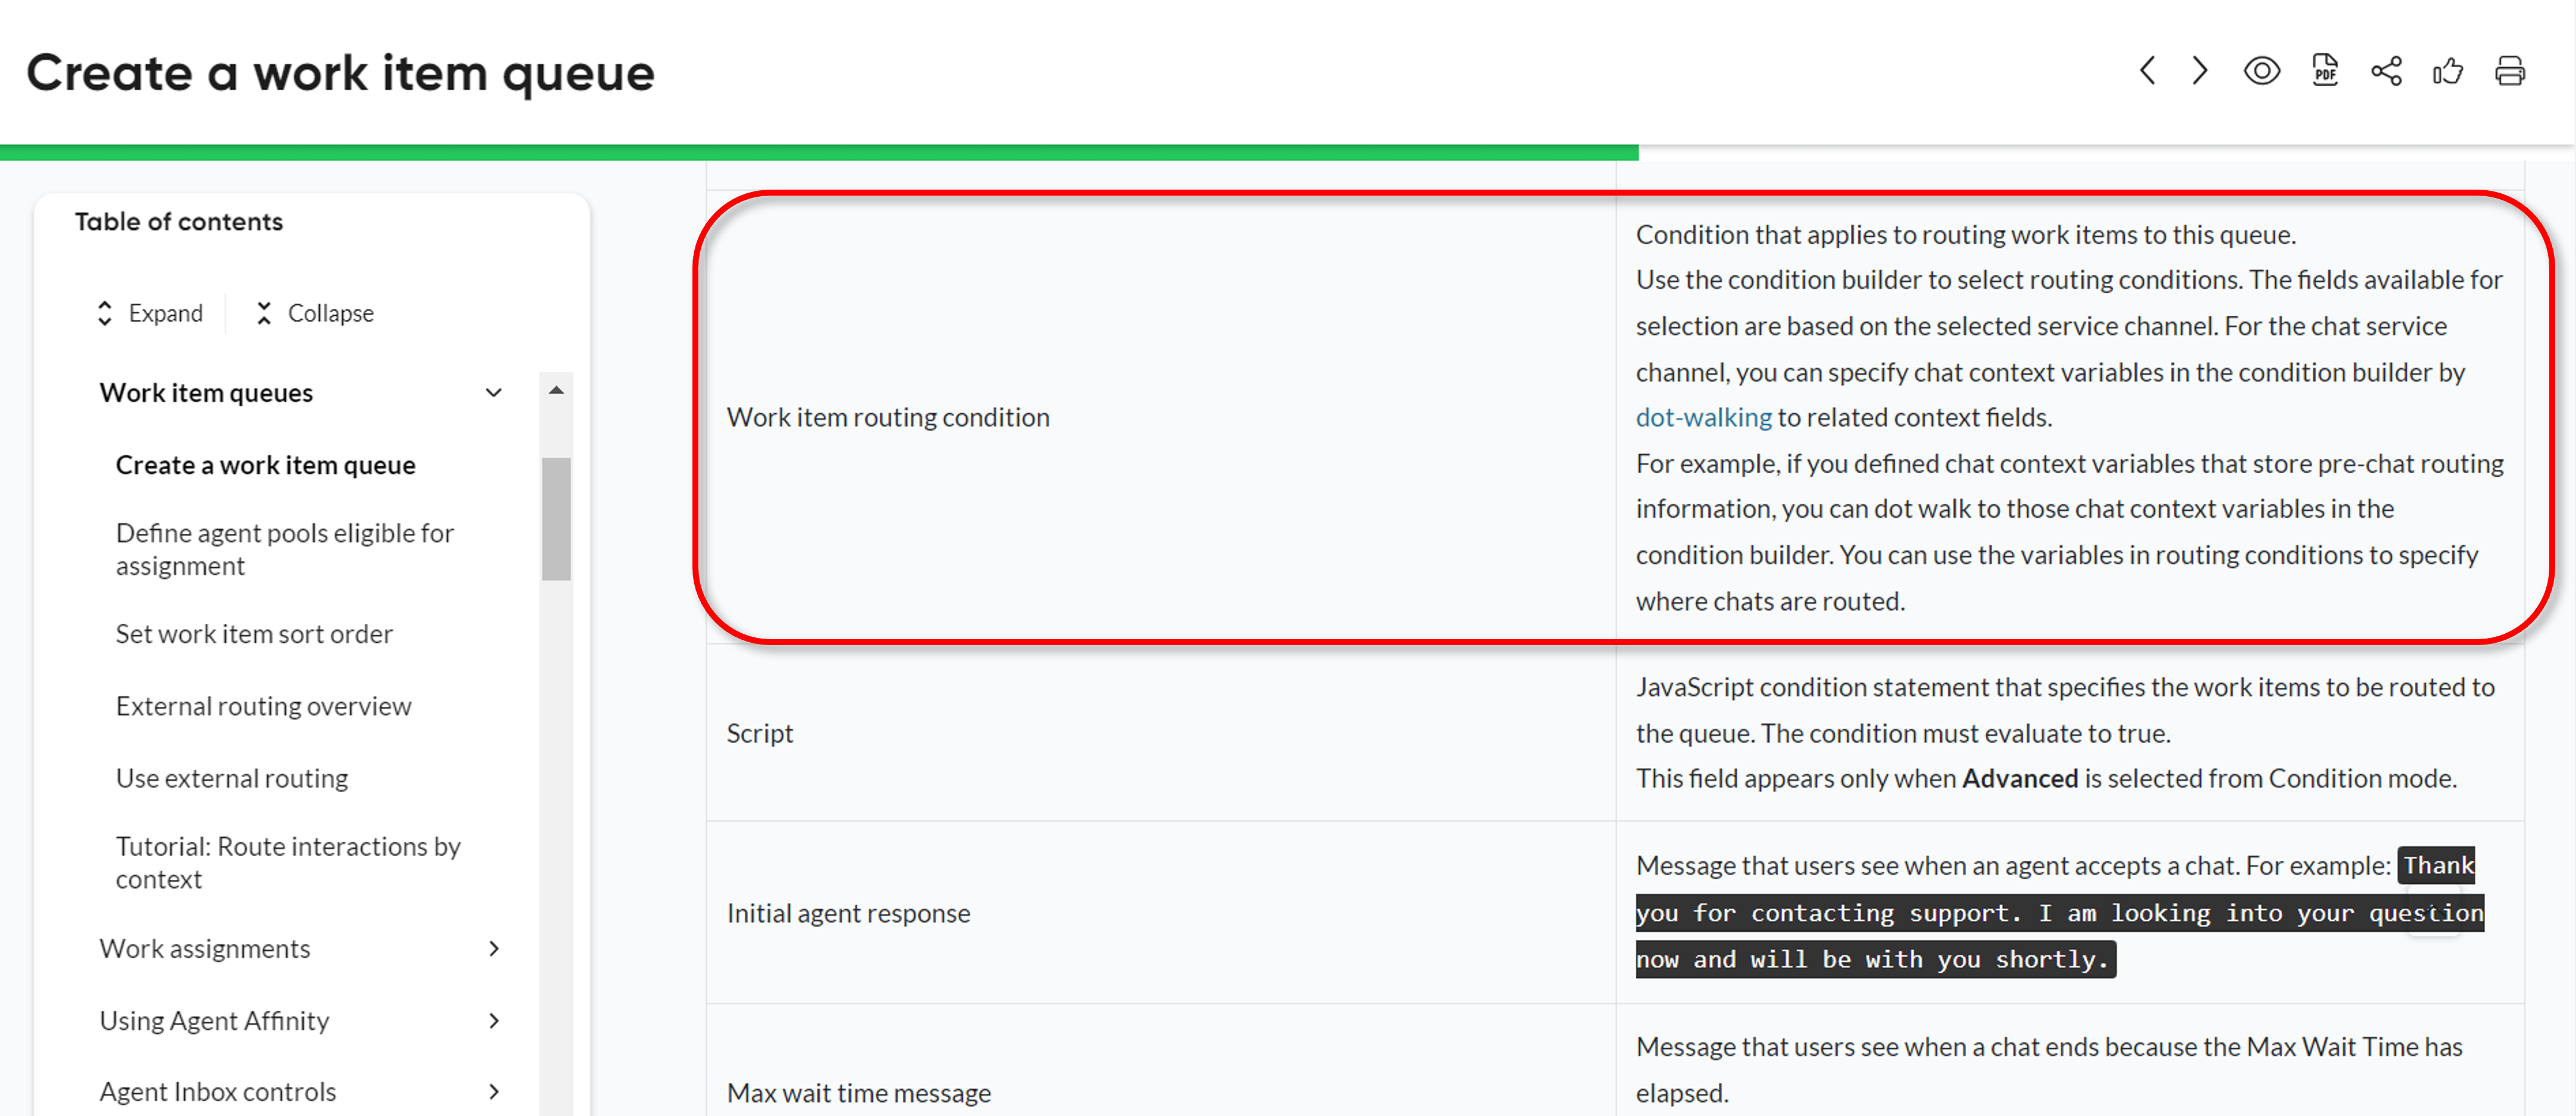
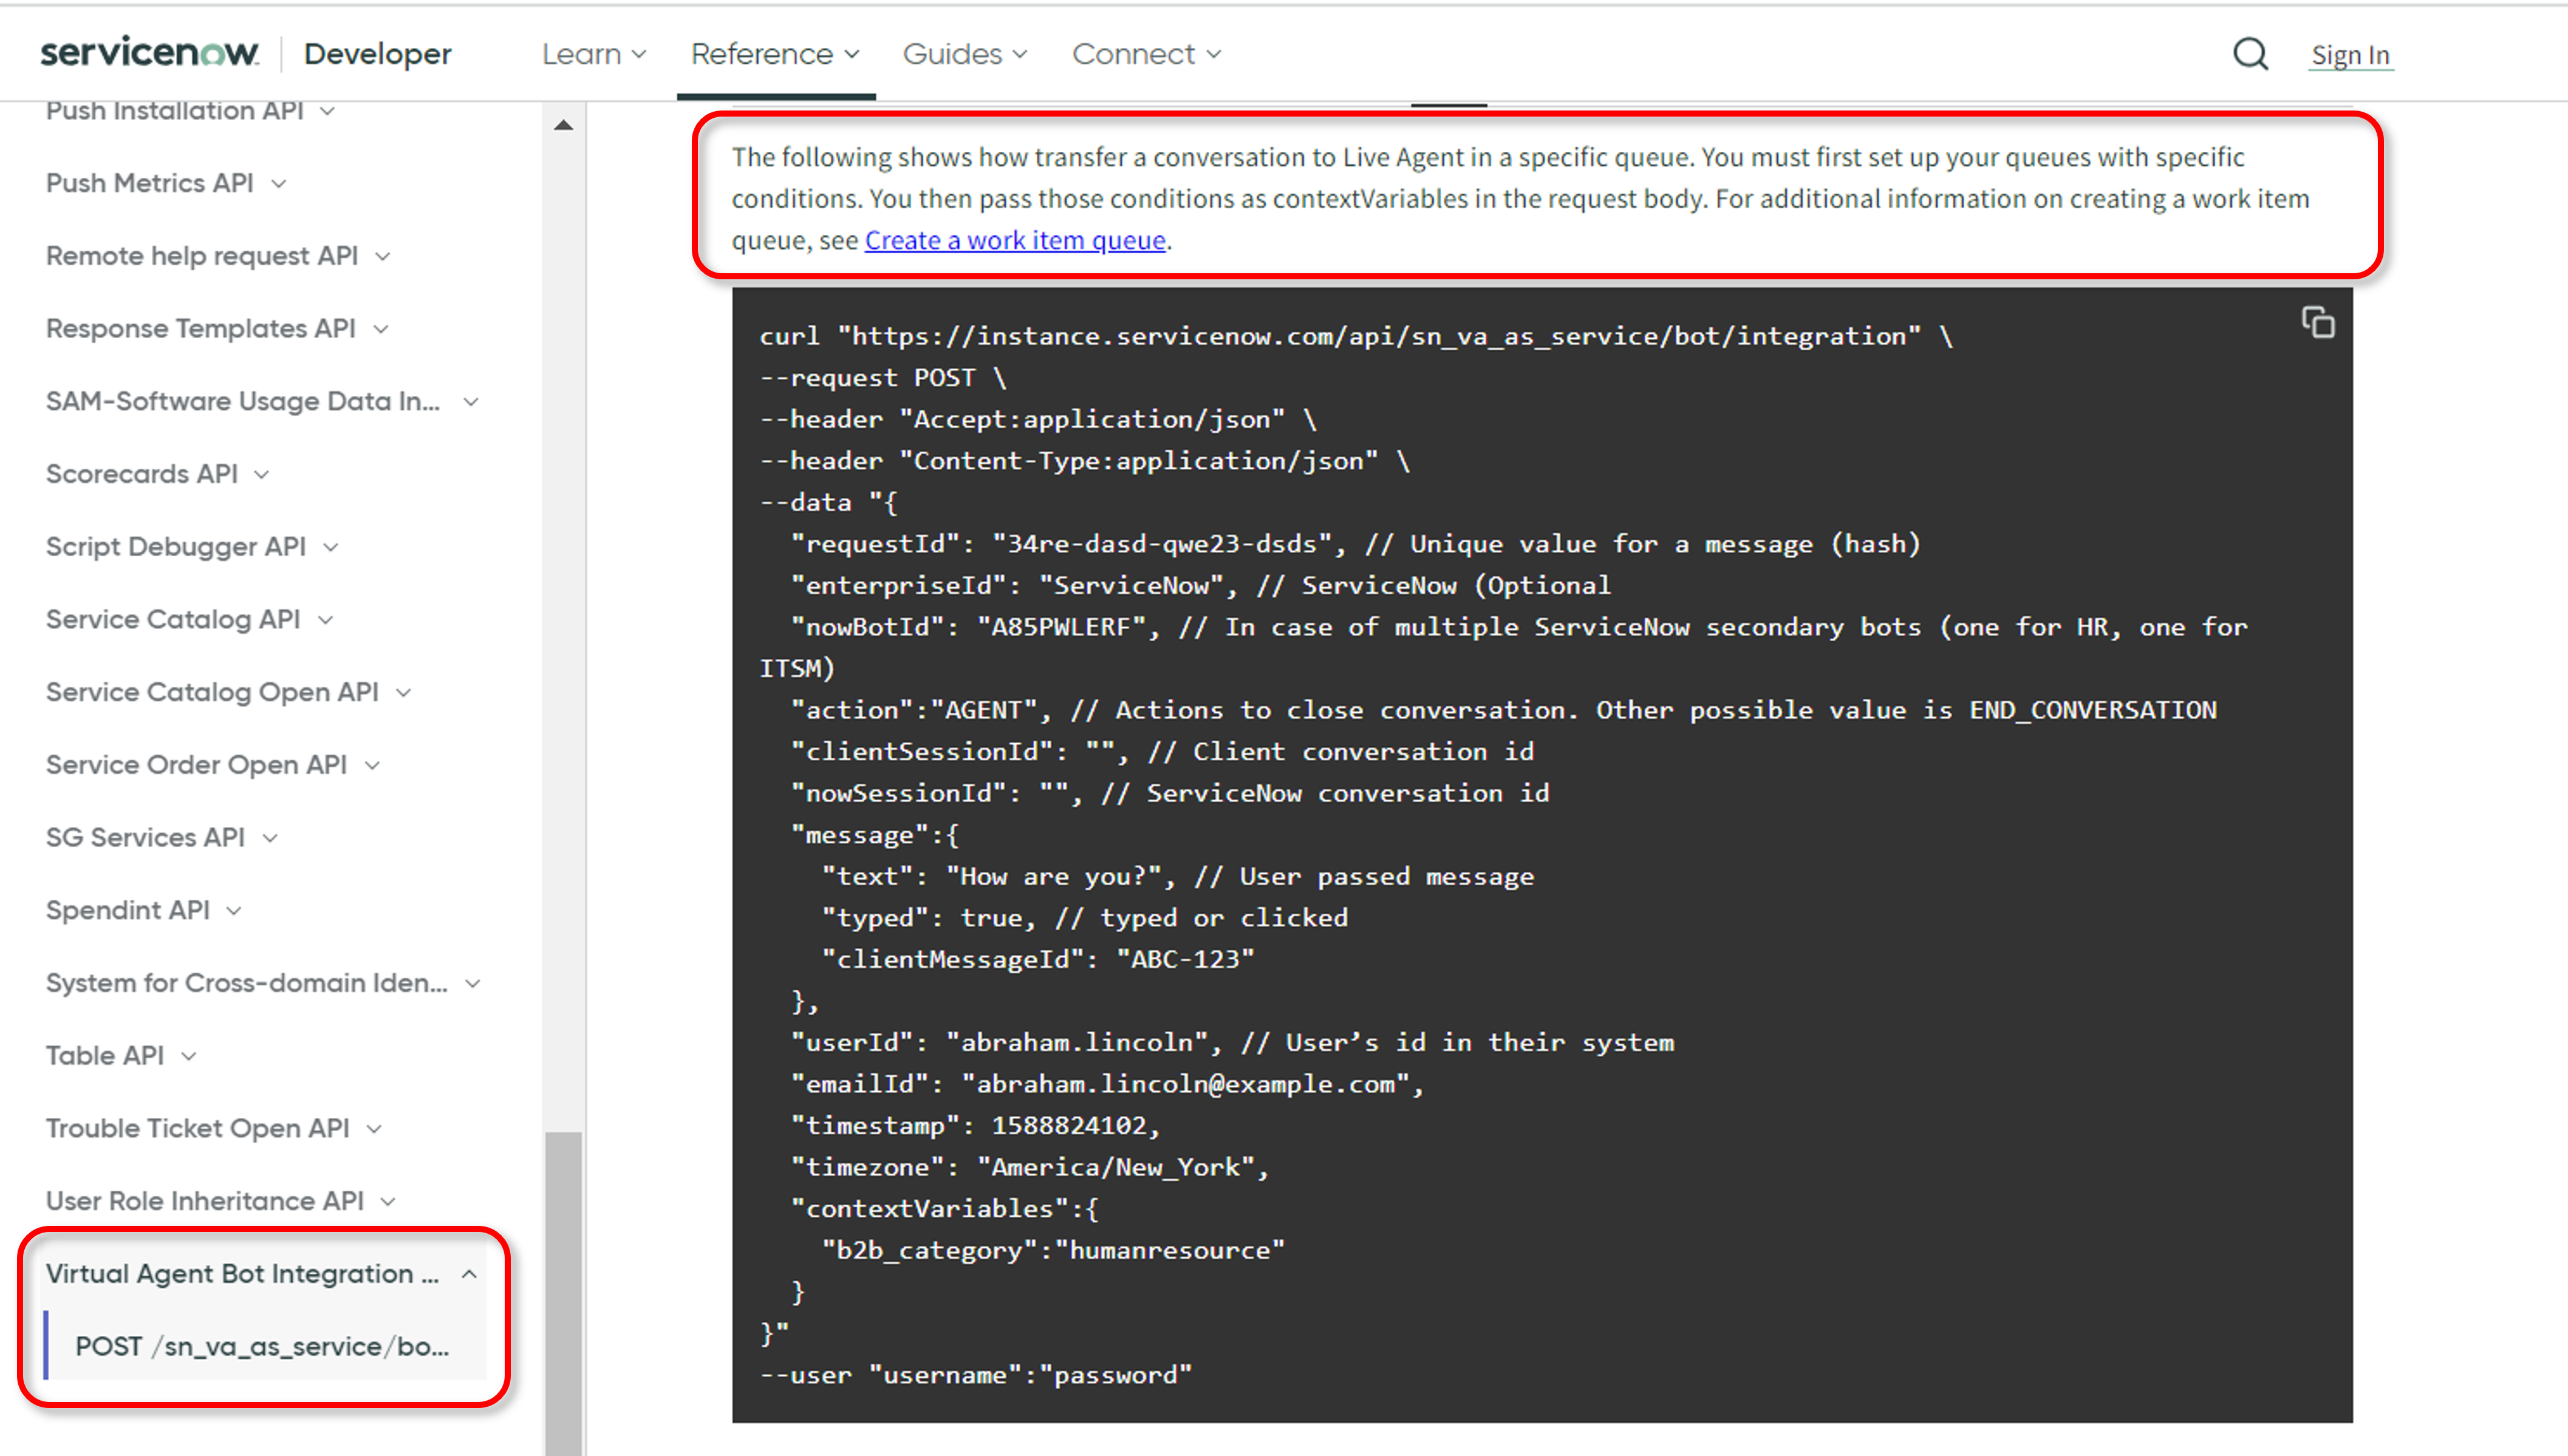
The platform sends `streamId` as a context variable in the ServiceNow request payload. Use it to route work items to different agent groups via a Work Item Routing Condition.
**Steps:**
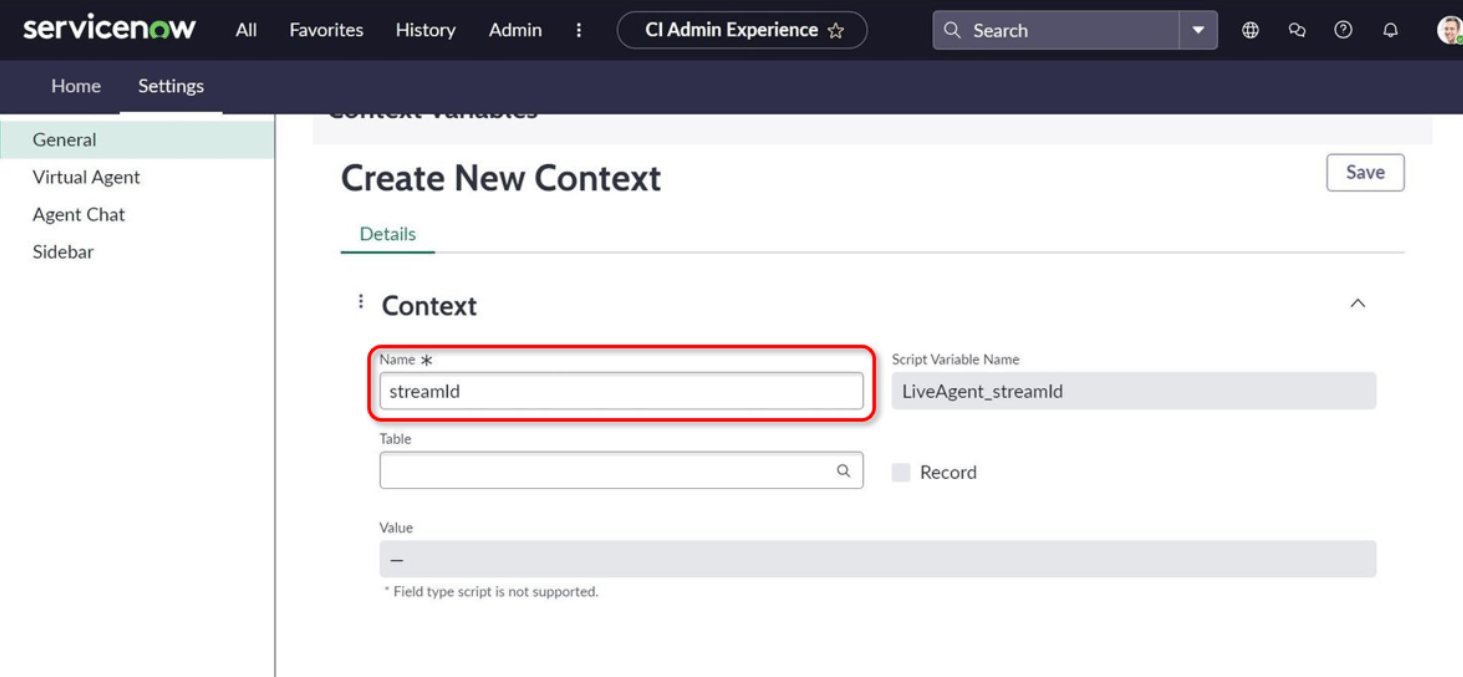
1. In **Conversational Interfaces Home**, create a new context variable named `streamId`.
Context doesn't include user ID or email by default. Capture required details explicitly. If `ServiceNowMetaData` isn't defined, values aren't shared with ServiceNow.
### Route Messages to Agent Groups by `streamId`
The platform sends `streamId` as a context variable in the ServiceNow request payload. Use it to route work items to different agent groups via a Work Item Routing Condition.
**Steps:**
1. In **Conversational Interfaces Home**, create a new context variable named `streamId`.
 2. Define a Work item routing condition in the Queue using the `streamId` context variable.
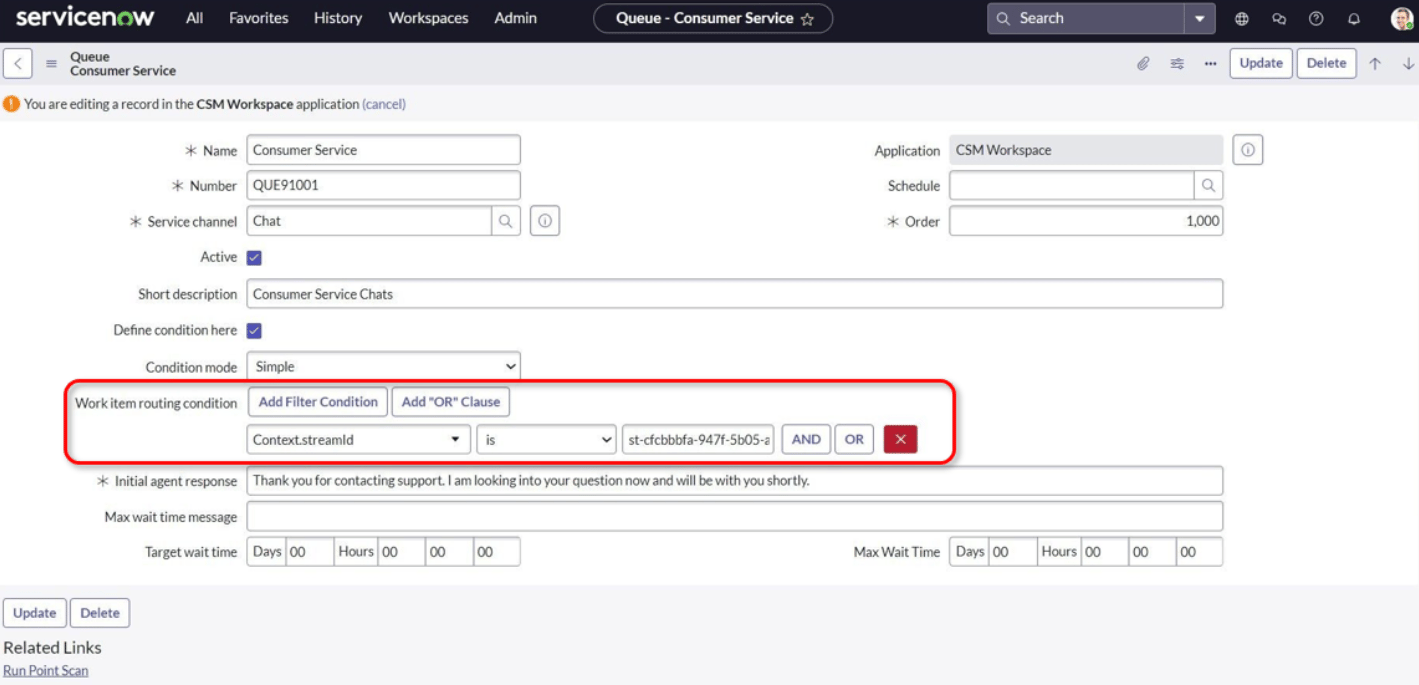 3. Configure the routing condition in every queue that handles these work items. If queue 1 has a `streamId` condition but queue 2 doesn't, both queues will qualify. Define the condition in all relevant queues.
Reference:
* [ServiceNow: Create a work item queue](https://docs.servicenow.com/bundle/tokyo-servicenow-platform/page/administer/advanced-work-assignment/task/awa-create-queue.html)
3. Configure the routing condition in every queue that handles these work items. If queue 1 has a `streamId` condition but queue 2 doesn't, both queues will qualify. Define the condition in all relevant queues.
Reference:
* [ServiceNow: Create a work item queue](https://docs.servicenow.com/bundle/tokyo-servicenow-platform/page/administer/advanced-work-assignment/task/awa-create-queue.html)
 * [ServiceNow: Virtual Agent Bot Integration API](https://developer.servicenow.com/dev.do#!/reference/api/tokyo/rest/bot-api)
 ### Enable Attachment Sharing with Live Agents
1. Log in to ServiceNow with admin credentials.
2. Navigate to **System Properties > sys\_cs\_provider\_application.list > Configure > Form Layout**.
3. In the **Trusted Media Domains** field, enter the domain for sending and receiving attachments.
### Enable Attachment Sharing with Live Agents
1. Log in to ServiceNow with admin credentials.
2. Navigate to **System Properties > sys\_cs\_provider\_application.list > Configure > Form Layout**.
3. In the **Trusted Media Domains** field, enter the domain for sending and receiving attachments.
 This feature supports only Utah and Vancouver versions.
### Agent Transfer Status
The platform records agent transfer status in Debug Logs and Analytics, enabling tracking and troubleshooting of transfer-related issues.
### Failed Agent Transfer Notification
When a ServiceNow agent transfer fails due to agent unavailability, users see a default non-editable message:
*No agents are available to handle your request. Please try again later.*
This feature supports only Utah and Vancouver versions.
### Agent Transfer Status
The platform records agent transfer status in Debug Logs and Analytics, enabling tracking and troubleshooting of transfer-related issues.
### Failed Agent Transfer Notification
When a ServiceNow agent transfer fails due to agent unavailability, users see a default non-editable message:
*No agents are available to handle your request. Please try again later.*