

This integration process also applies to the Genesys Desktop App.
Definitions
Architecture Diagrams
Chat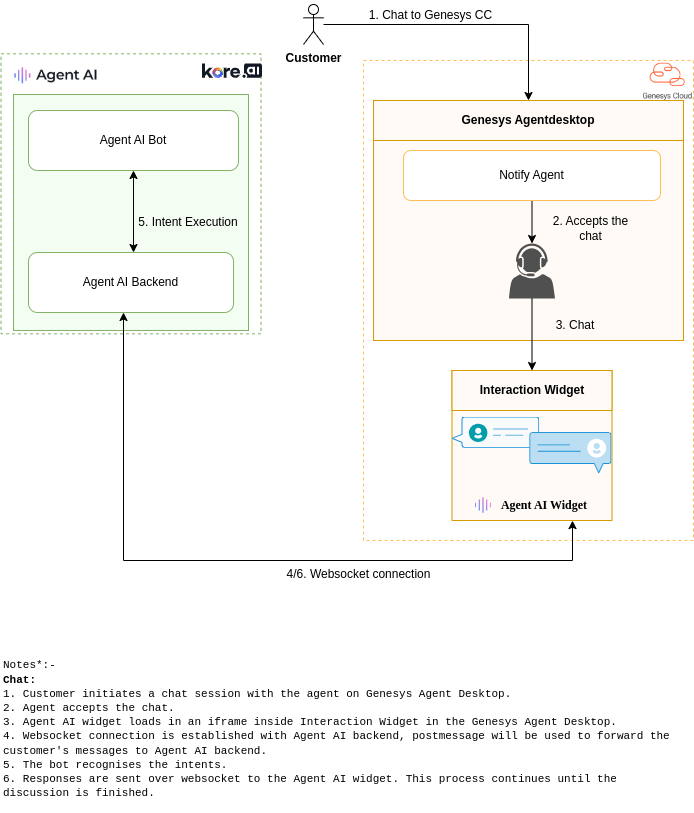
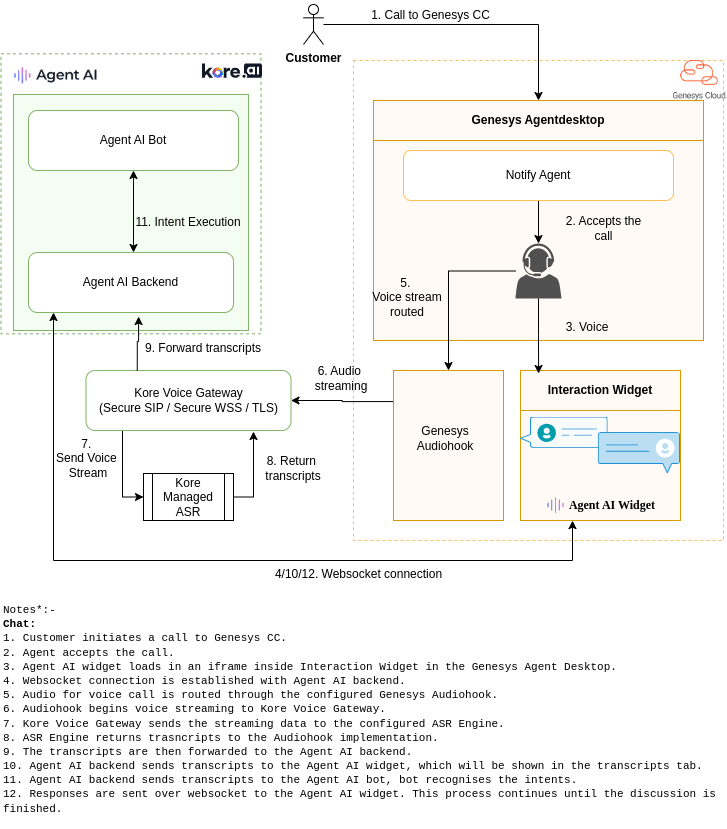
Interaction Sequence
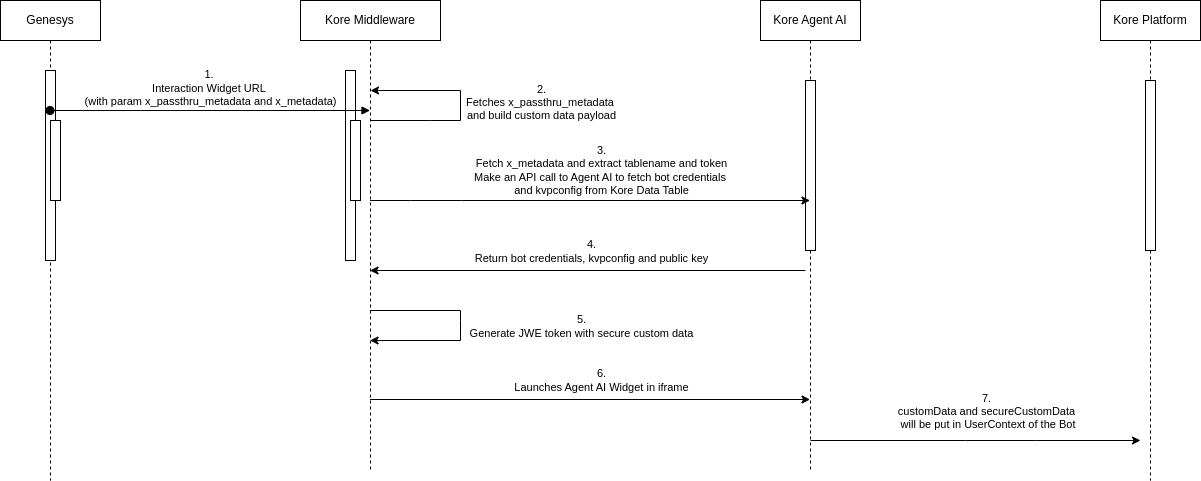
Activities on Platform
- Capture AI Agent information in Kore Data Table
- Access Custom Data and Secure Custom Data in Agent AI
Activities on Genesys Cloud
- Generate an Oauth ID to connect Kore Services with Genesys
- Create an Interaction Widget in Genesys for Agent AI
- Provide Interaction Widget Access to Agents
- Create a Queue in Genesys
Chat Setup
- Create or Update Architect Inbound Message Flow in Genesys for the Agent Queue
- Create Messenger Configuration
- Create Messenger Deployments
- Steps to start a Chat Request Simulation
Voice Setup
- (Optional) Install Audiohook for Voice Streaming
- Create or Update an Architect Inbound Call Flow in Genesys for the Agent Queue
- Steps to start a Voice Request Simulation
Prerequisites
- Genesys Administrator with access to a Genesys Cloud account with Admin rights
- Platform Administrator with access to Agent AI instance
AI for Service Configuration
For the configured app, ensure configuration of at least one Dialog Task for Agent AI use.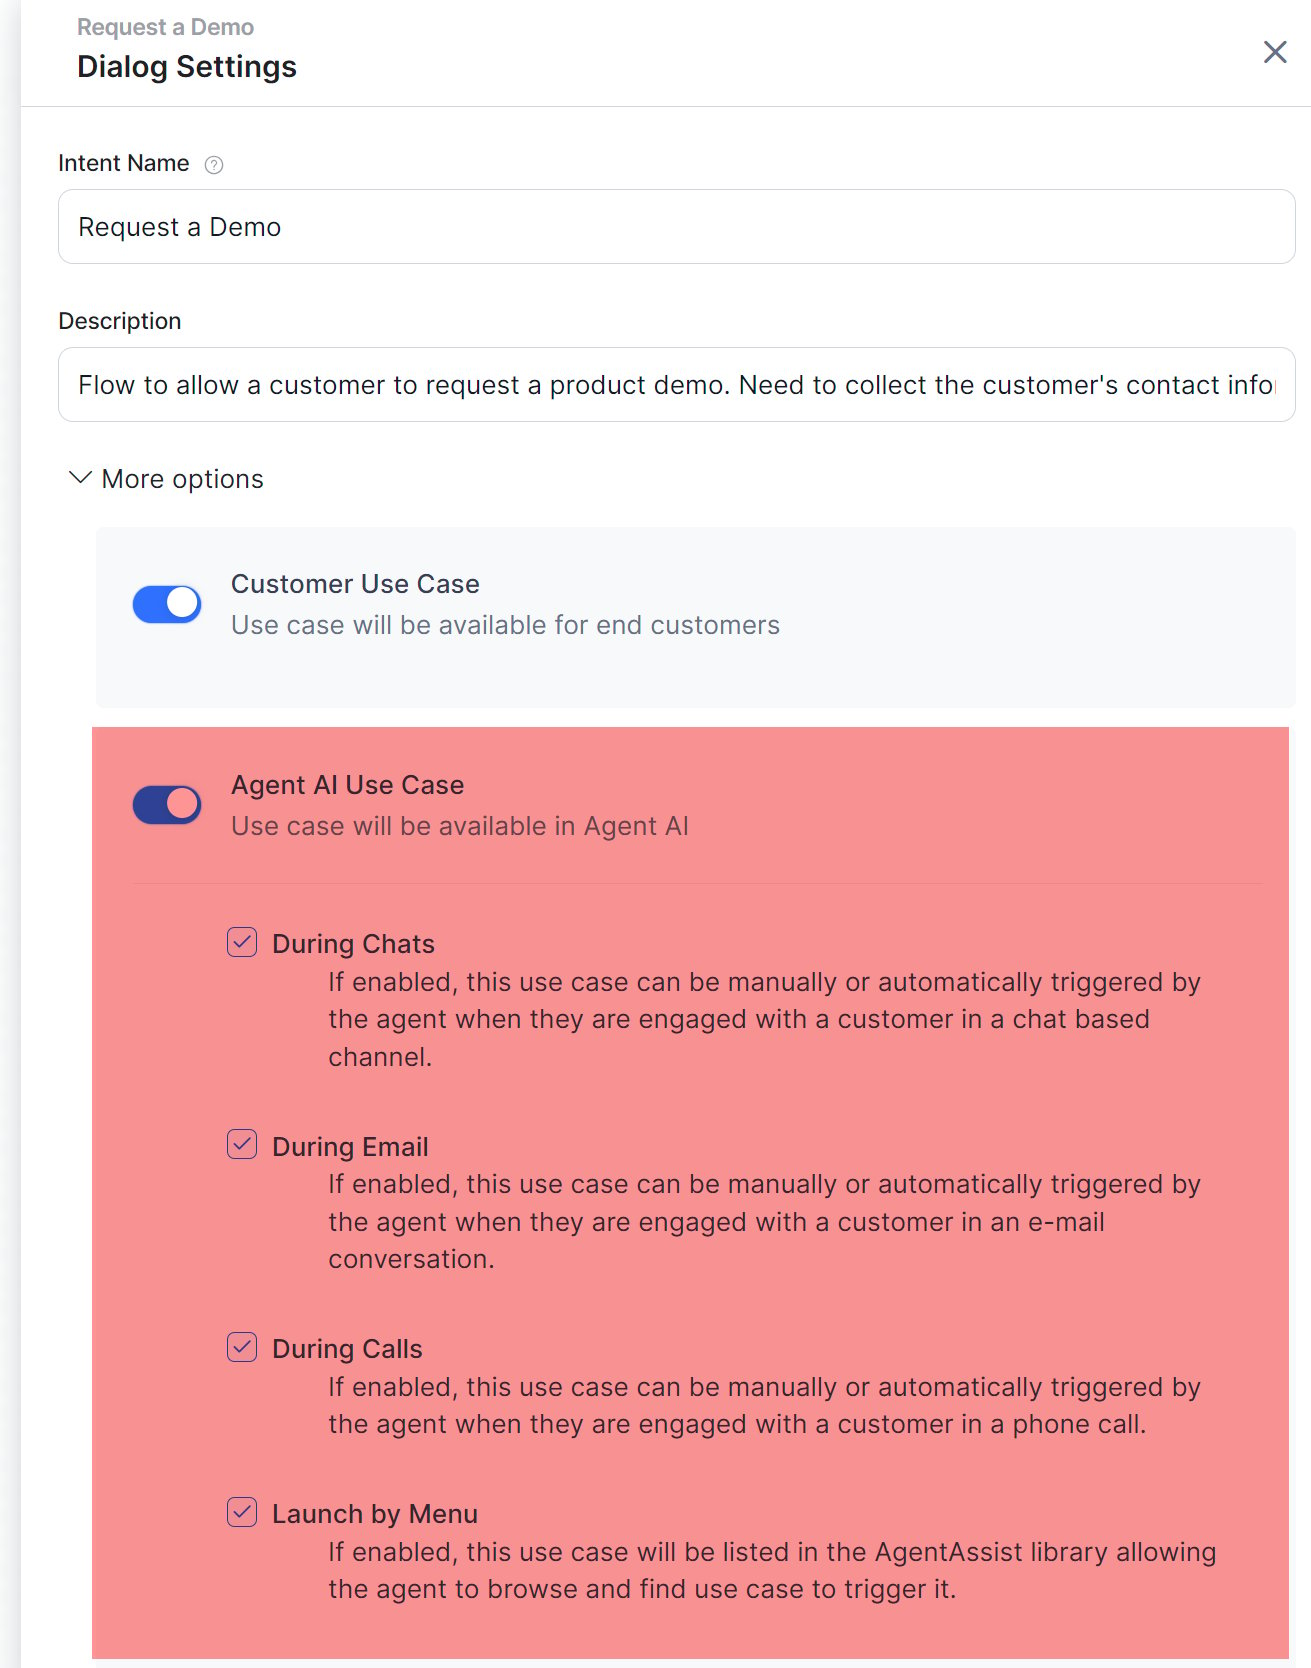
Capture AI Agent Information
Genesys Data Table
Create a Genesys Data Table with Agent AI bot details:The Custom Fields of the Data Table store the configuration data, not the Data Table row. A single Data Table represents one AgentAssist configuration. The default values of the Custom Fields contain the configuration data the AgentAssist widget needs to load.
- Sign in to Genesys Cloud.
- Select Collaborate / Communicate.
- Select Menu > Orchestration > Orchestration Assets > Data Tables.
- Select + Add to create a new Data Table.
-
Enter a relevant name, such as KoreaiAA-configuration, and then select Save.
You must set the Reference Key Label to
AgentAssist. The Interaction Widget uses this value to load the configuration data. -
Select the pencil icon to edit a data table.
Don’t select the data table name.
-
Select Add Field under Custom Fields to create seven custom fields to provide the AgentAssist configuration. Set the data type of all custom fields as String.
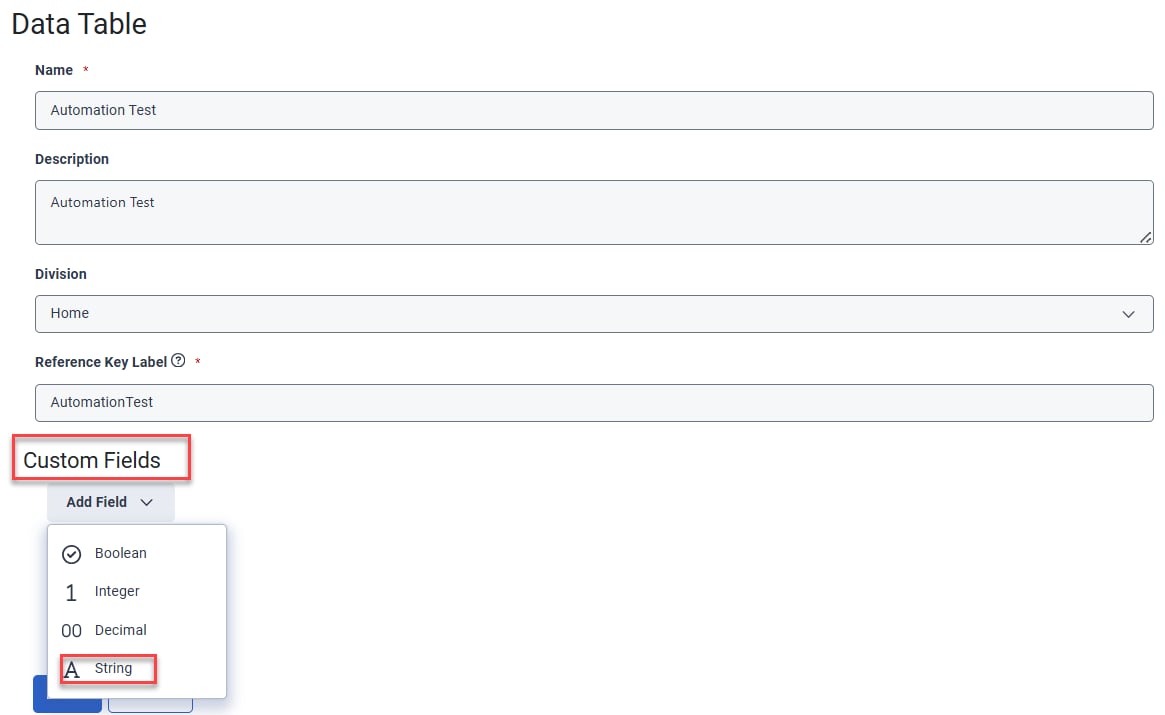
- Add the custom fields with bot details.
- Follow these conventions in the table for other custom fields. Use the exact names, including upper/lowercase.
When is Audiohook Enabled is set to
false, the application uses the Genesys native transcription service through the Transcriptions API.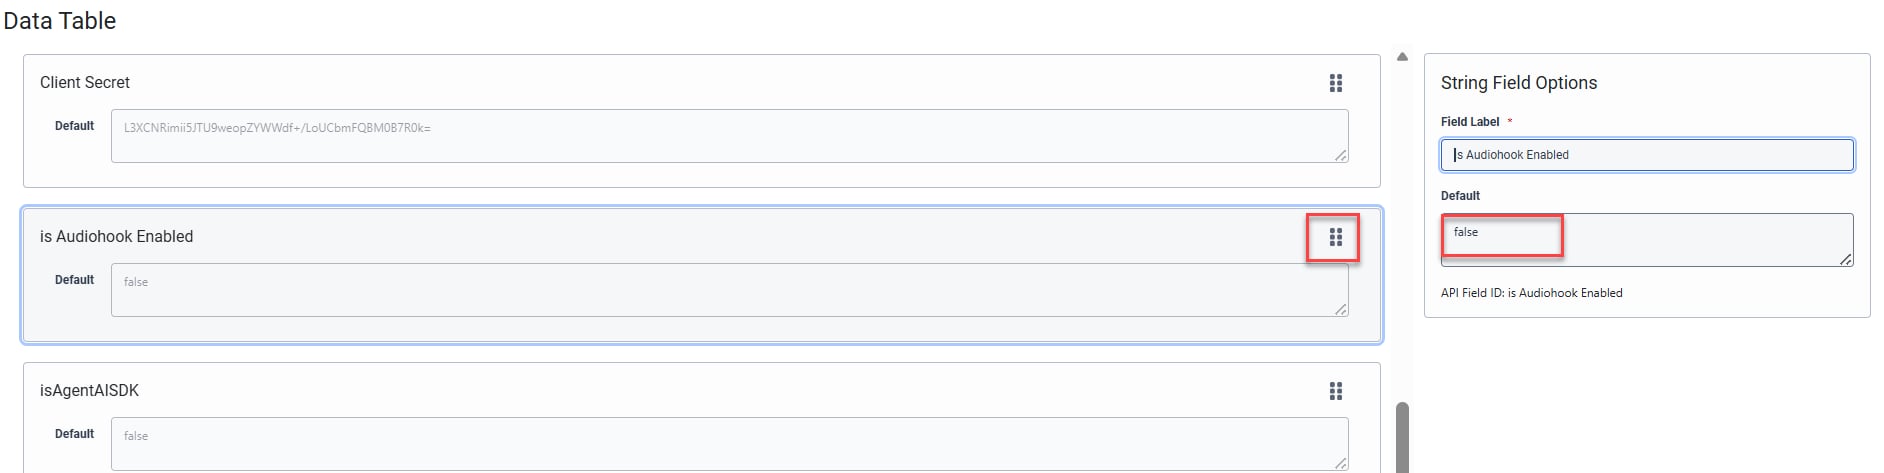
Third-Party Configuration
Third-Party Configuration maps Agent AI bots to specific queues. Within this configuration, you can define the bot’s language, custom data configuration, or secure custom data configuration. For example, if you want to associate Agent AI Bot1 with Queue1 and Agent AI Bot2 with Queue2, you need to:- Create a record in Third Party Configuration for Agent AI Bot1, setting the Queue Identifier as Queue1.
- Create a record in Third Party Configuration for Agent AI Bot2, setting the Queue Identifier as Queue2.
- The system doesn’t support Custom Data.
- You can’t map one queue to multiple Agent AI bots.

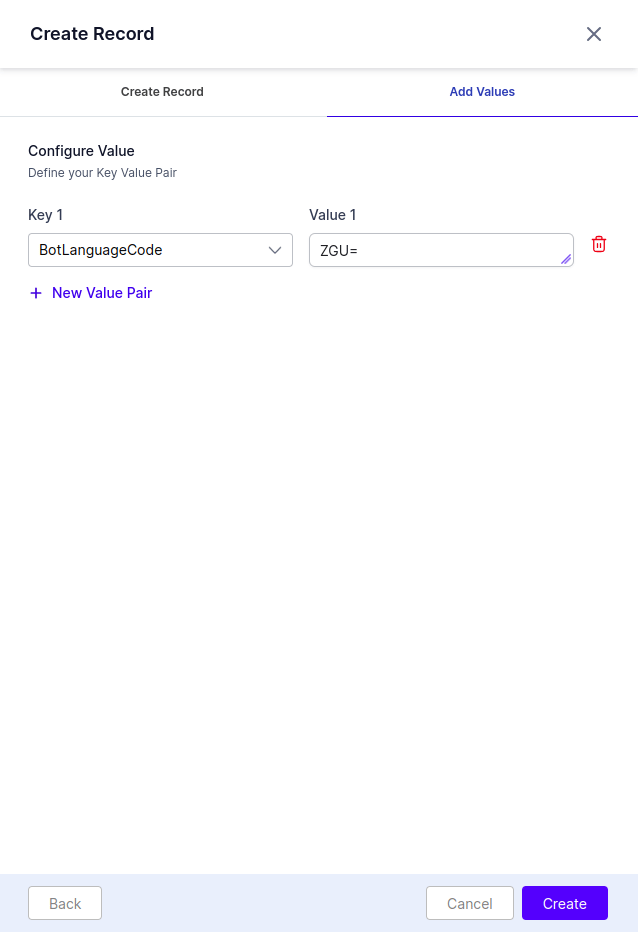
Encode all values in base64.

Verify that Third Party Configuration is on in Widget Settings > Agent AI General Settings.
Kore Data Table
Data Tables store queue-specific AI Agent credentials. Each record in the Kore Data Table represents a unique Genesys agent queue and its corresponding AI Agent definitions. If you use a single AI Agent for several queues, create a record and insert the queue names, separated by commas, as the value for the QueueIdentifier, along with the AI Agent details. Kore matches the third-party queue name with theQueueIdentifier credential name in its AI Agent credentials to render the appropriate AI Agent.
- The system fetches AI Agent credentials based on Genesys desktop queue names. If the Genesys queue name is of the
<QUEUEIDENTIFIER><QDELIMITER>XXXXXformat, for exampleALPHAINC_CUSTOMERSERVICE_16092024, then: - QueueIdentifier =
ALPHAINCand qDelimiter =_. - Update the QueueIdentifier in the Kore Data Table.
- Update the qDelimiter in the Create an Interaction Widget in Genesys for Agent AI section.
Don’t enter multiple records with different AI Agent credentials in Kore Data Table for a single QueueIdentifier.
How to create a new Data Table
- Sign in to AI for Service.
- Select Data > Data Tables.
- Select New Table.
- Enter the following details in the New Table page:
- Name of the Data Table (any alphanumeric name).
- Description of the Data Table.
-
Columns to include in the Data Table. Select the check mark to add multiple columns.
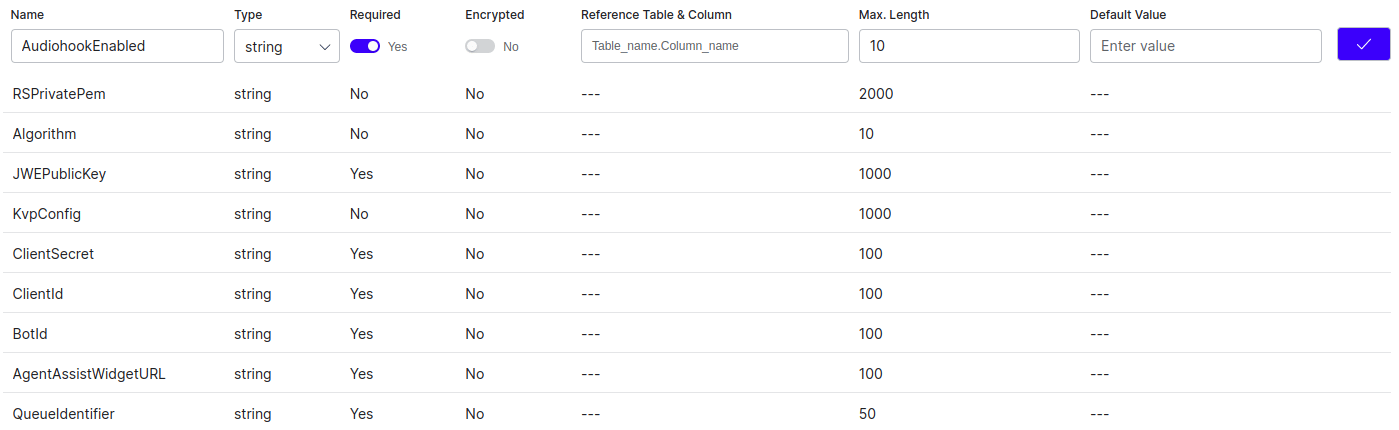
- QueueIdentifier (unique identifier for the table)
- BotId
- ClientId
- ClientSecret
- AgentAssistWidgetURL
- AudiohookEnabled
- JWEPublicKey
- KvpConfig
- Algorithm (HS256)
- RSPrivatePem (Ignore/Not Supported)
- isAgentAISDK
-
Indexes for the table.
- Index Name for reference.
- Is Unique flag to define if the index contains unique values. (Turn on is Unique.)
- Column & Sort Order - List of columns to include in the index; you can select multiple columns and specify the sorting order (ascending or descending) for each column. (Select QueueIdentifier with ascending order.)
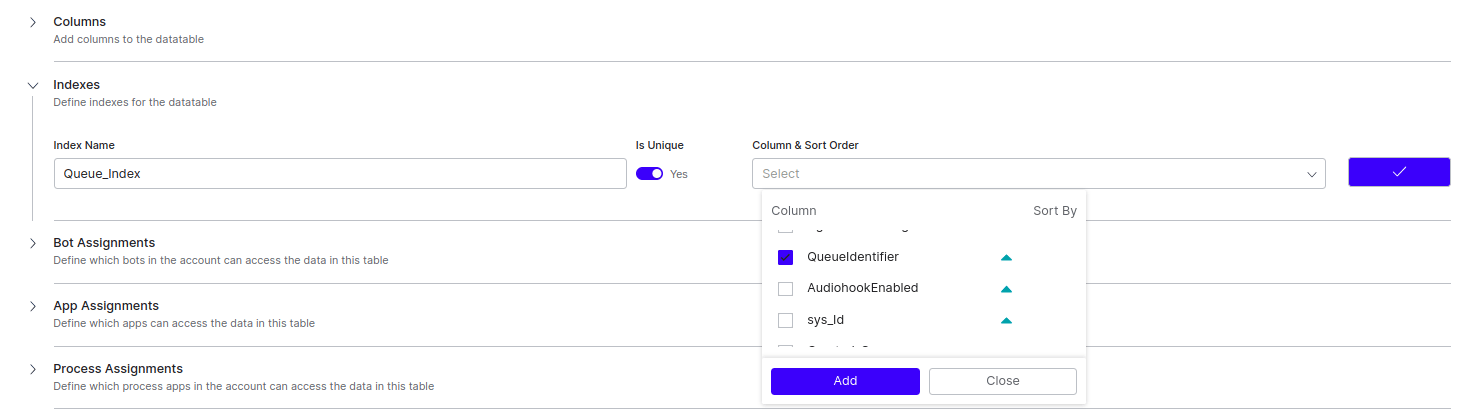
- AI Agent Assignments (not applicable).
-
App Assignments to let apps access data in this table.
- Select any app from the list, or select Create New App and enter your app name.
-
Select the Read, Write, and Delete permissions, based on your requirement.
You can also create new apps by selecting Data > Apps > New App in the home page:
- Process Assignments (not applicable).
- Select Create to create the new data table.
Insert data into Data Table
Set up necessary permissions and app assignments and insert AI Agent-specific data into the Data Table.- Sign in to AI for Service.
- Select Data > Apps.
- Select the app with write access to the Data Table where you want to add information.
-
Copy Client ID and Client Secret of the app.
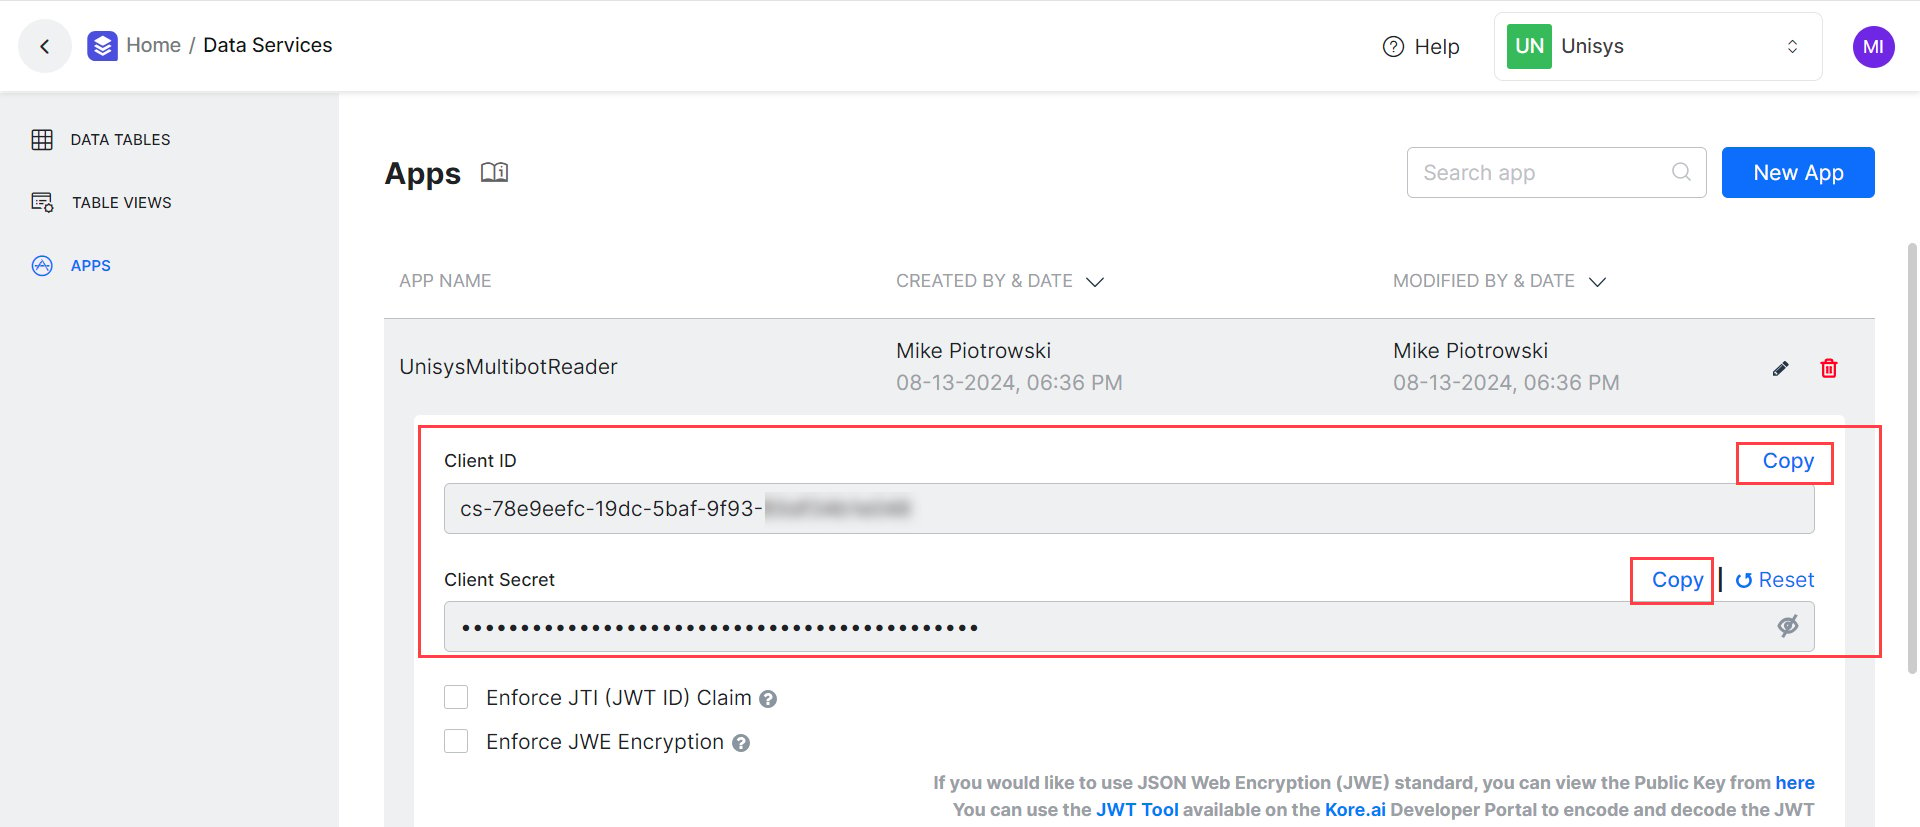
- Create a JWT Token using the Client ID and Client Secret by following the Generating the JWT Token doc.
-
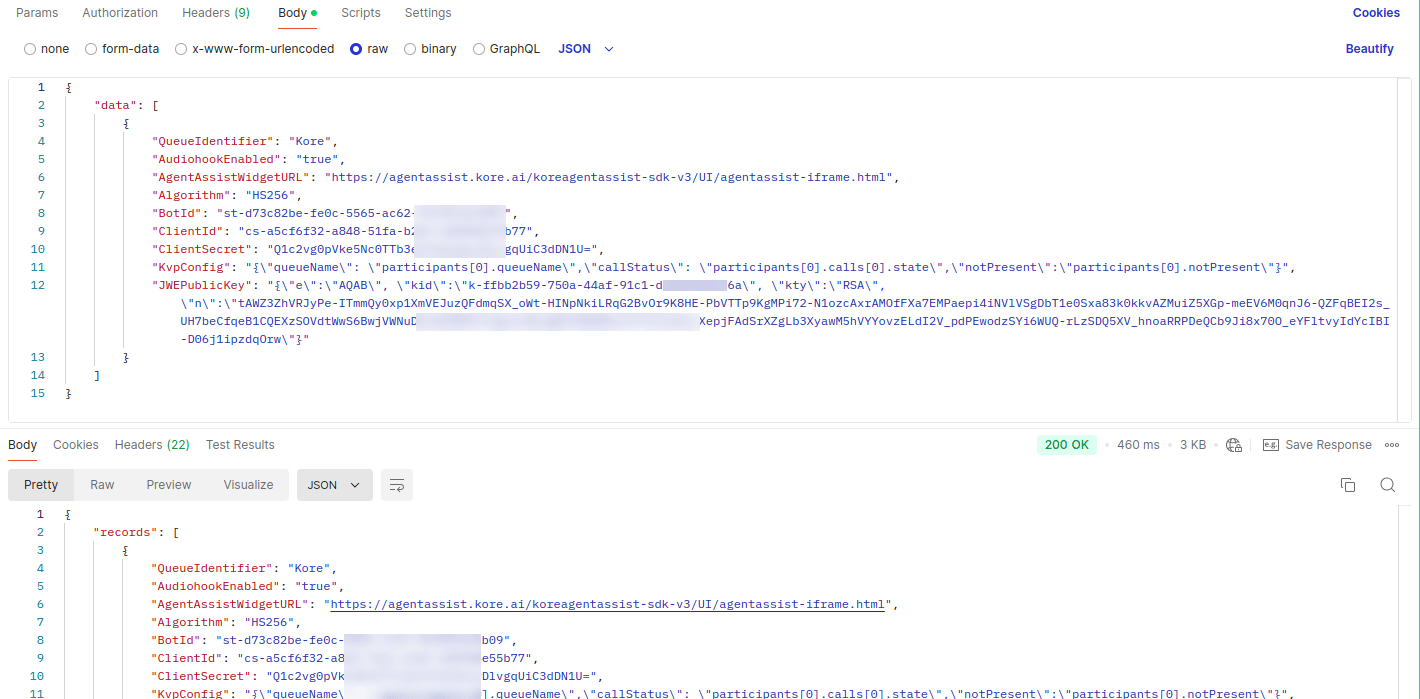
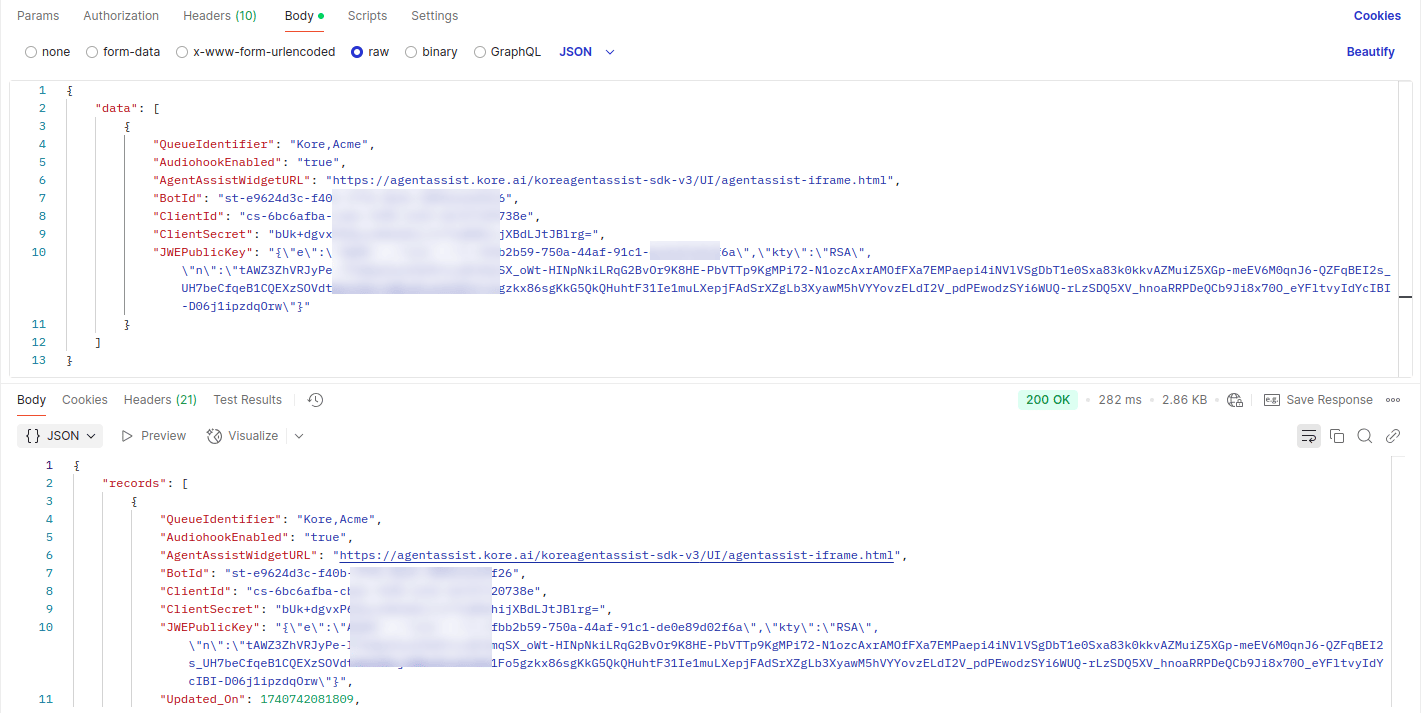
Insert the following data into the Data Table by following the Data Insert API doc. Use the JWT Token you created.
API Body Payload Structure:
- For a single queue, the QueueIdentifier value contains one queue name (for example,
Kore). For multiple queues, it includes all the queue names separated by commas (for example,Kore, KoreSupport). JWEPublicKeyandKvpConfigvalues must be JSON objects converted to strings.
- For a single queue, the QueueIdentifier value contains one queue name (for example,
Generate an Oauth ID to connect Kore Services with Genesys
- Sign in to Genesys Cloud.
- Select Collaborate / Communicate.
-
Search for OAuth.
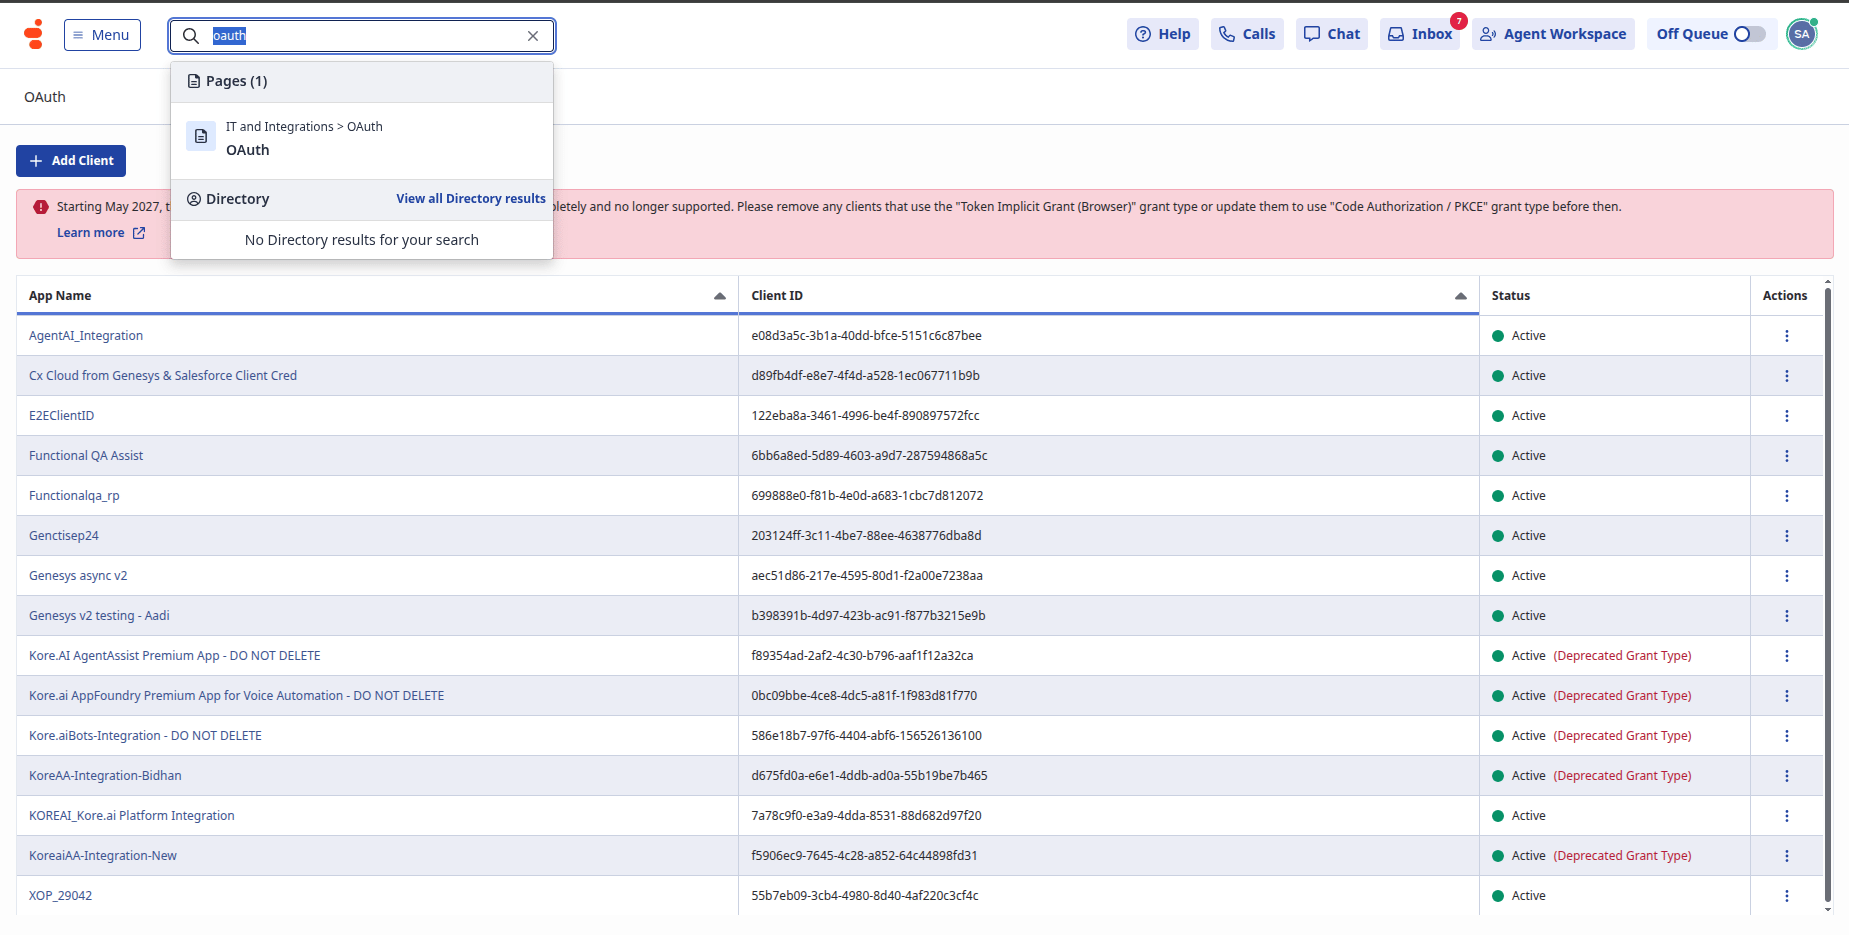
- Select Add Client.
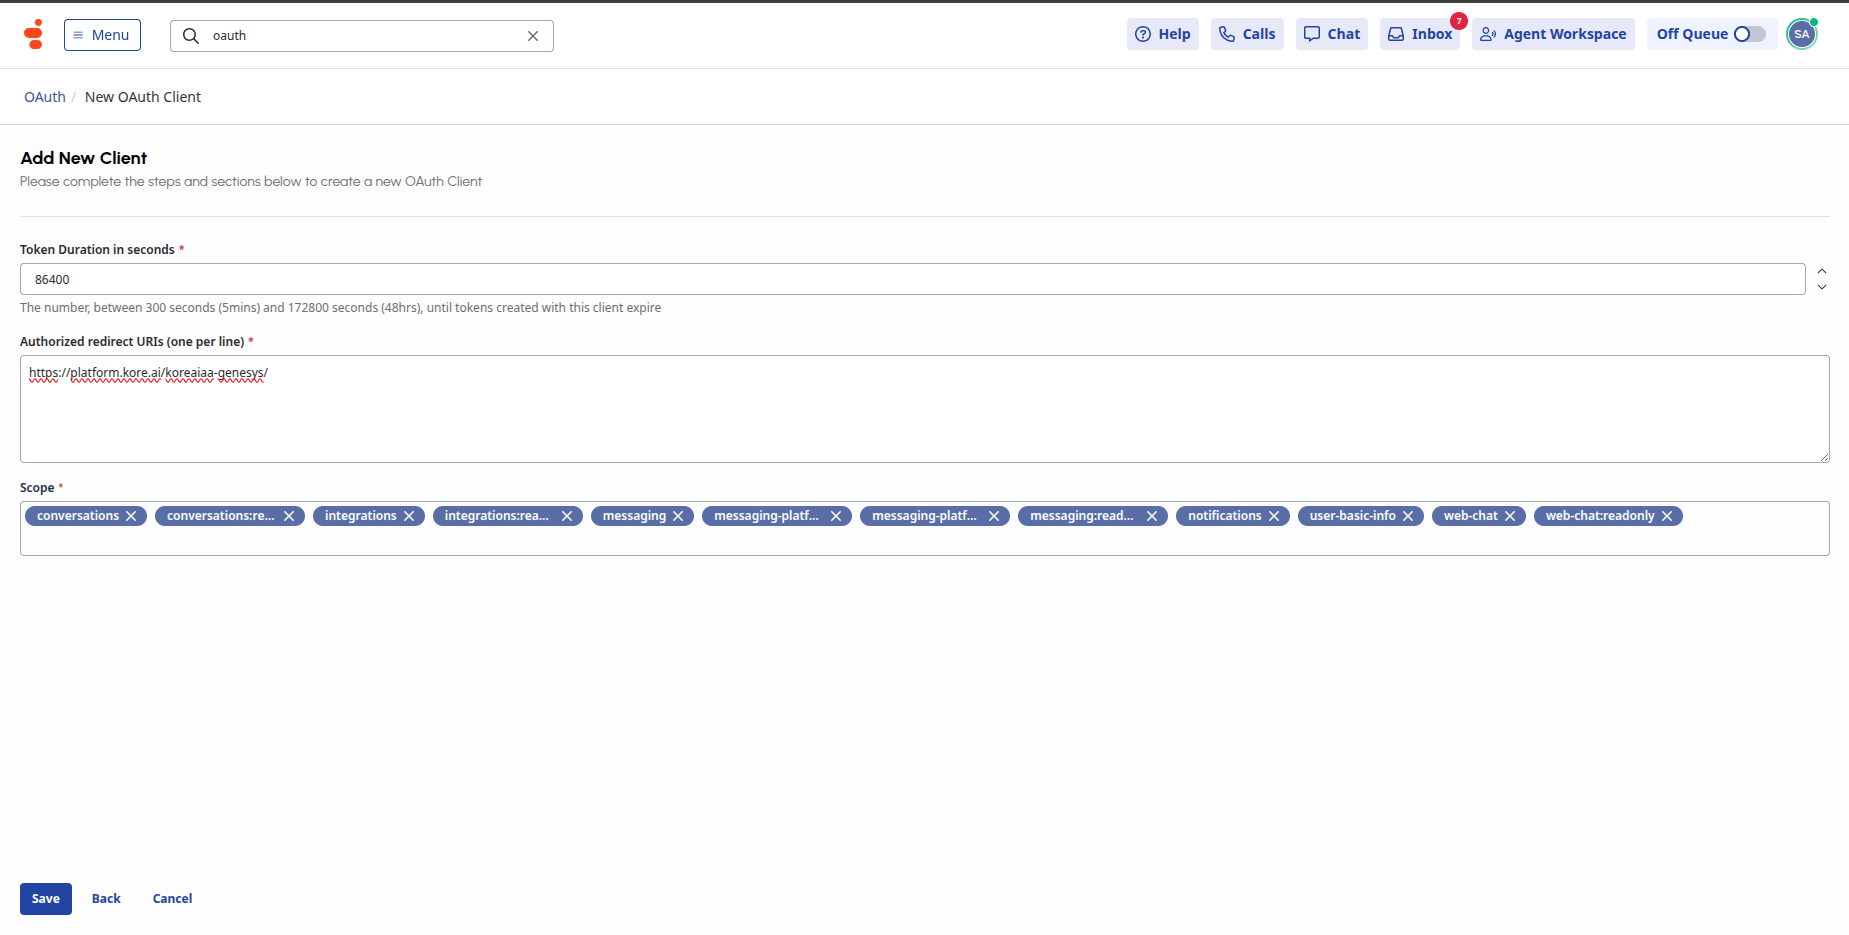
- Enter the app name and description, and select Code Authoriztion/PKCE as the Grant Type.
-
Enter token duration and add
{Agent AI URL}/koreaiaa-genesys/in the Authorized redirect URIs field. -
Add the following list of scopes in the Scope section:
- architect:readonly
- conversations
- conversations:readonly
- integrations
- integrations:readonly
- messaging
- messaging-platform
- messaging-platform:readonly
- messaging:readonly
- notifications
- user-basic-info
- web-chat
- web-chat:readonly
Create an Interaction Widget in Genesys for Agent AI
Create a new Interaction Widget. The Genesys Agent Desktop hosts this widget, and it provides the Agent AI solution features to agents.- Sign in to Genesys Cloud.
- Select Collaborate / Communicate.
- Select Menu > Integrations.
- If you haven’t created an Interaction Widget for Agent AI, install a new Interaction Widget by selecting Add integration.
- Enter a meaningful name for the Interaction Widget, such as KoreaiAA Interaction Widget.
- Open the Interaction Widget by selecting the name.
- Go to the Configuration tab of the Interaction Widget.
-
In the Application URL field, enter the following structure:
x_passthru_metadatais an optional query parameter for passing custom data to Agent AI.showWidget: Determines whether the Agent AI widget appears during agent transitions.- Set to
trueto display the widget for Agent 1, if Agent 1 exits and Agent 2 takes over the conversation. - Set to
falseto hide the widget during these transitions.
- Set to
sendEventsToVG: Determines whether the system sends events to Voice Gateway to pause or resume transcriptions when agents put a call on hold or resume it. This reduces Automatic Speech Recognition (ASR) costs by avoiding transcription of hold music from Genesys.- Set to
trueto use the new Audiohook flow for transcriptions, which uses the configurations under Advanced Settings. - Set to
falseto continue using the old Audiohook flow for transcriptions.
- Set to
&multibot=true&x_metadata=<?x=%7B%22datatable%22%xxxxx>
The x_metadata value equals the URL-encoded string of JSON object.
Third Party Configuration: &accountid=<bot-account-id>
You can fetch the accountId from the Agent AI > Flows & Channels > Digital > Web/Mobile Client > JWT App Details page.
The x_metadata value equals the URL-encoded string of the JSON object.
- For the oauthId value, use the OAuth ID from the Generate Oauth ID section.
-
Build
x_metadata:- Sign in to AI for Service.
- Select Data > Data Tables, and copy the Data Table name.
- Select Apps, and select one of the app names with read access.
- Copy the Client ID and Client Secret values.
- Create a JWT Token using the Client ID and Client Secret by following the Generating the JWT token doc.
-
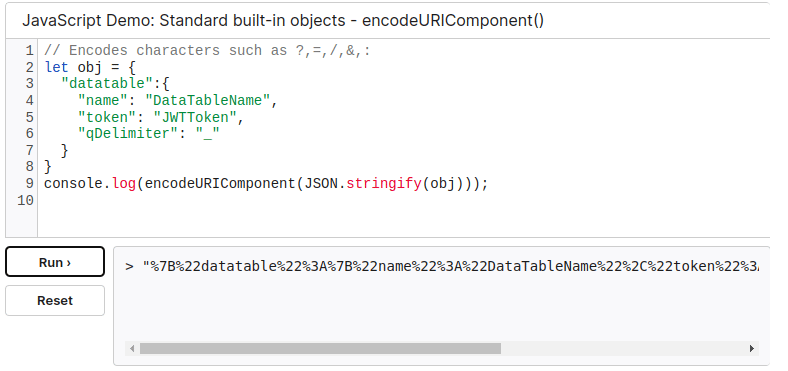
Generate a JSON object with the following structure, and then convert it into a URL-encoded string:
Reference:
-
Copy the URL-encoded string and paste it as the
x_metadatavalue.
- Allow all permissions in iFrame Sandbox Options and iFrame Feature/Permission Policy: iFrame Sandbox Options: allow-forms,allow-modals,allow-popups,allow-presentation,allow-same-origin,allow-scripts,allow-downloads. iFrame Feature/Permission Policy: camera,microphone,geolocation,clipboard-write,display-capture,fullscreen. Communication Type Filtering: chat and call.
Provide Interaction Widget access to agents
To view the Interaction Widget, agents must have the following accesses:Group Membership
An Interaction Widget uses Group Membership to determine who can view it on the agent desktop.- Use an existing group, if your agents are already part of it. Otherwise, create a new group for Agent AI permission.
- Name the group as KoreAA-Agents or a similar name to distinguish it.
- Add any agent to allow them to use the Agent AI functionality. You can use multiple groups.
- Go back to the Integrations section and open the Interaction Widget you created in the Create an interaction widget section.
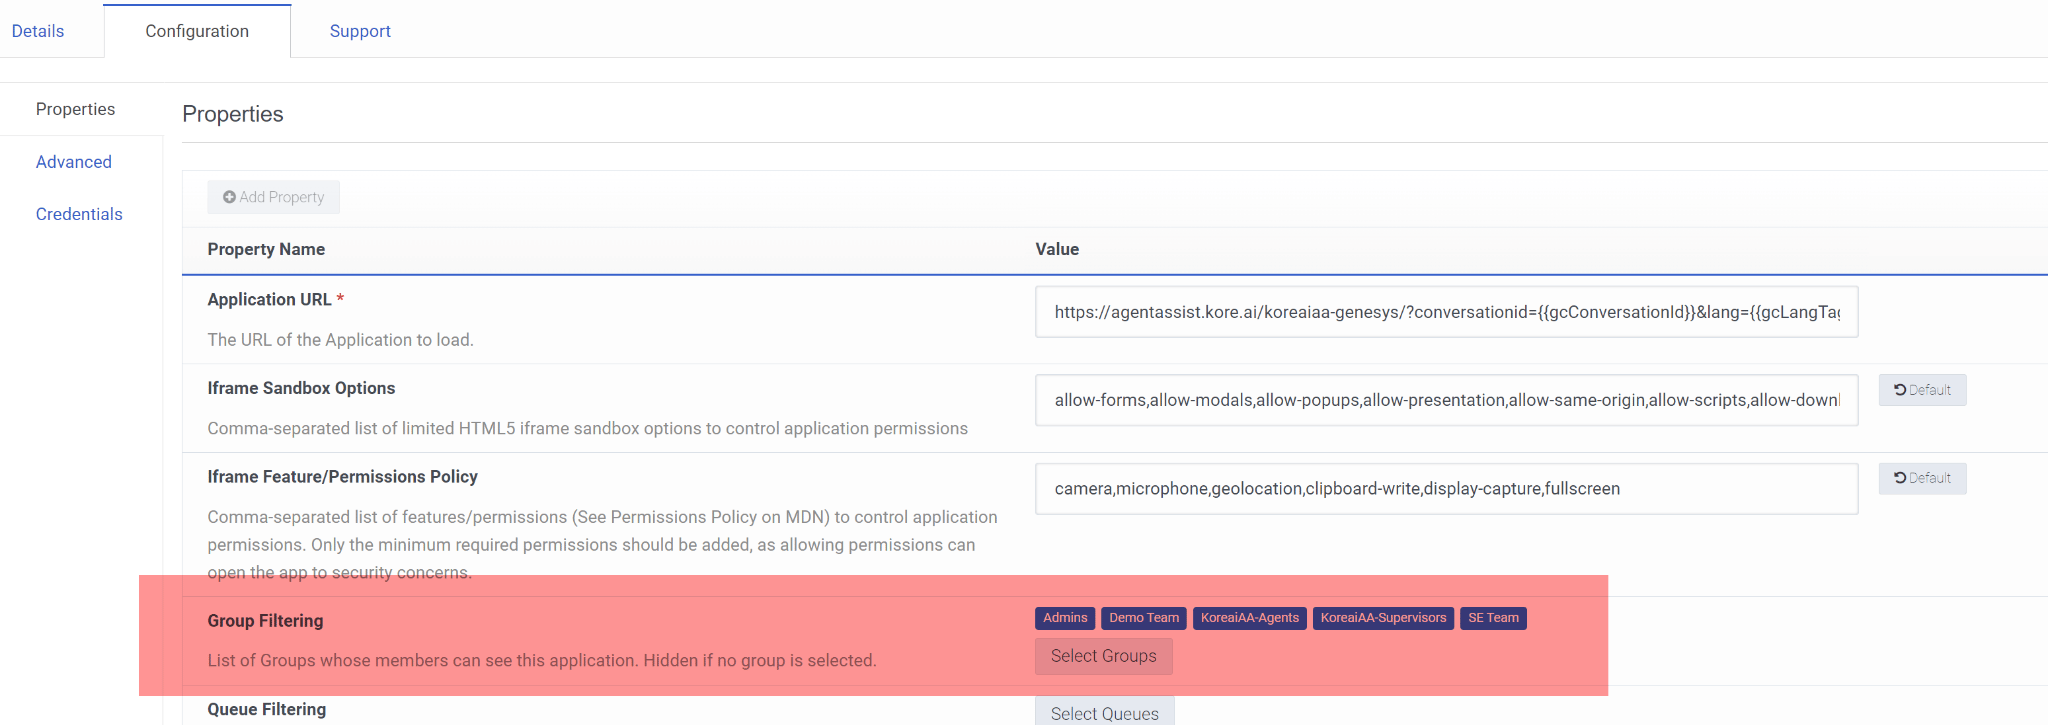
- On the Configuration tab, add access using the group you identified or created for Agent AI in the Group Filtering option.
You may also use Queue Filtering (optional).
Custom Role/Permission
along with the basic agent role, add the following role:- Sign in to Genesys Cloud.
- Select Collaborate / Communicate.
- Select Menu > User Management > Roles and Permissions.
- Select Add Role to create a new role.
- Enter a distinctive name to the role; for example, KoreaiAA Agent.
-
On the Permission tab, search for Conversation > Transcription - View, and add it (select the box):
The Assigned Permissions view looks like the following image:The Conversation permission is available only in the CX3 license.

-
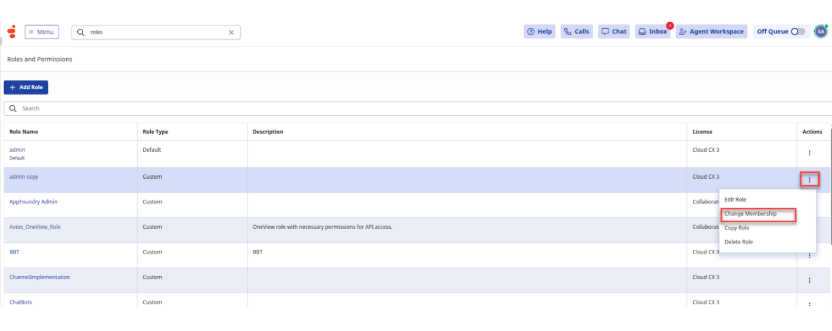
On the Roles and Permissions page, select the three dots at the right end of a role, and select Change Membership. Add the appropriate agents to the role.
Create a Queue in Genesys
- Sign in to Genesys Pure Cloud.
- Select Collaborate / Communicate.
-
Select Menu > User Management > Queues, or enter
queuesin the search bar under the Collaborate / Communicate section and press the Enter key. - Select Create Queue.
-
Enter/select the following details in the Create Queue page:
- Name: Enter a unique name for the new queue.
- Division: Select a division in which you want to place this queue.
- Copy settings and members from (optional): Select an existing queue name, if you want to copy the settings and members from it.
- Peer Id (optional): Enter a unique ID the system can use to identify the queue from an external platform.
- Select Save.
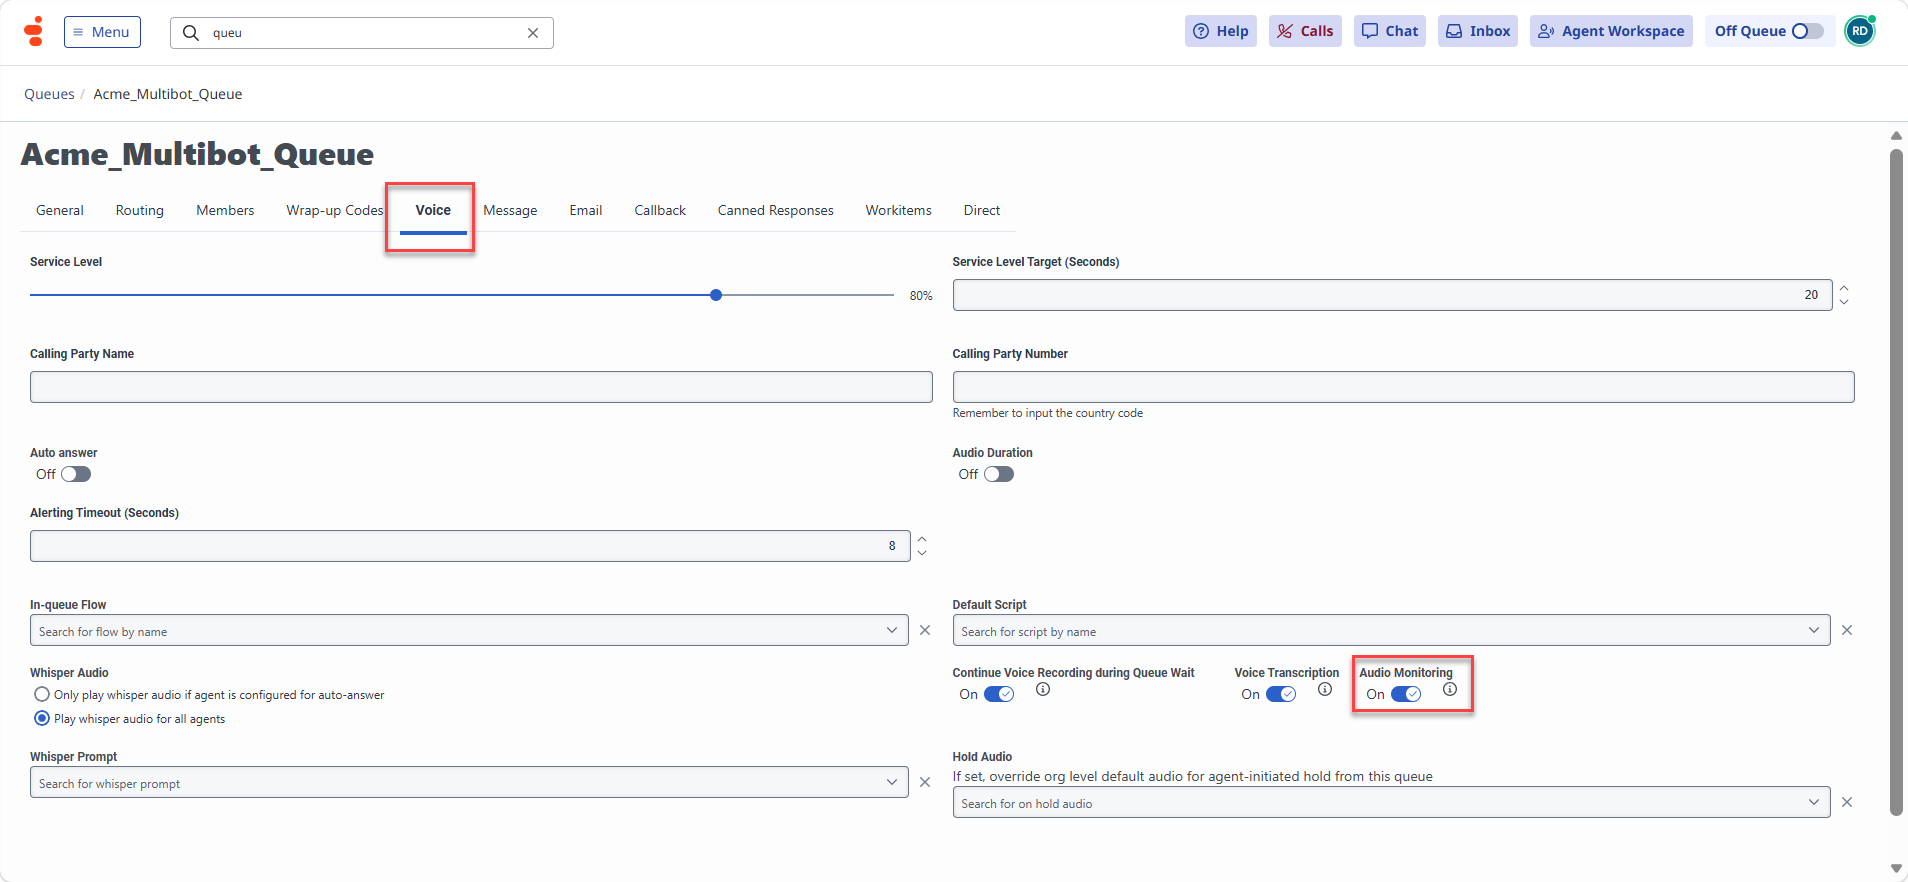
Enabling the Audio Monitoring toggle
To stream audio to third-party services, follow these steps:- Sign in to Genesys Cloud.
-
Select Menu > User Management > Queues, or enter
queuesin the search bar under the Collaborate / Communicate section and press the Enter key. - Select a queue name.
- Select the Voice tab.
-
Turn on the Audio Monitoring toggle.
Chat Setup
Create or Update Architect Inbound Message Flow in Genesys for the Agent Queue
This step manages incoming messages to the Genesys platform. When you initiate a chat from the web chat messenger, Genesys routes it to this inbound message flow first.- Sign in to Genesys Cloud.
- Go to Menu > Orchestration > Architect.
-
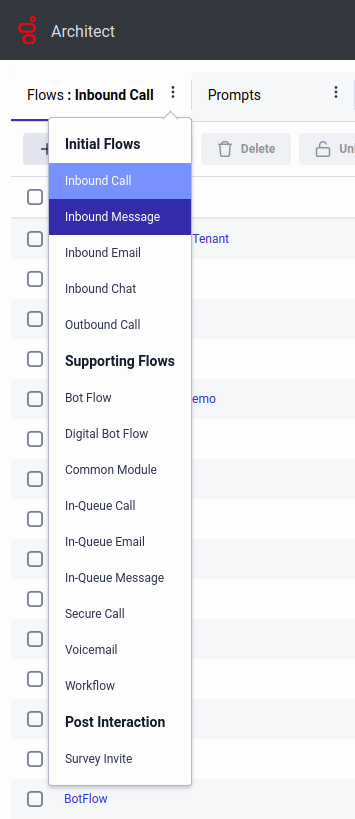
Select the three dots next to Flows: Inbound Call, and select Inbound Message.
- Select +Add to create an Inbound Message Flow.
- Enter the name and description of the inbound message flow.
-
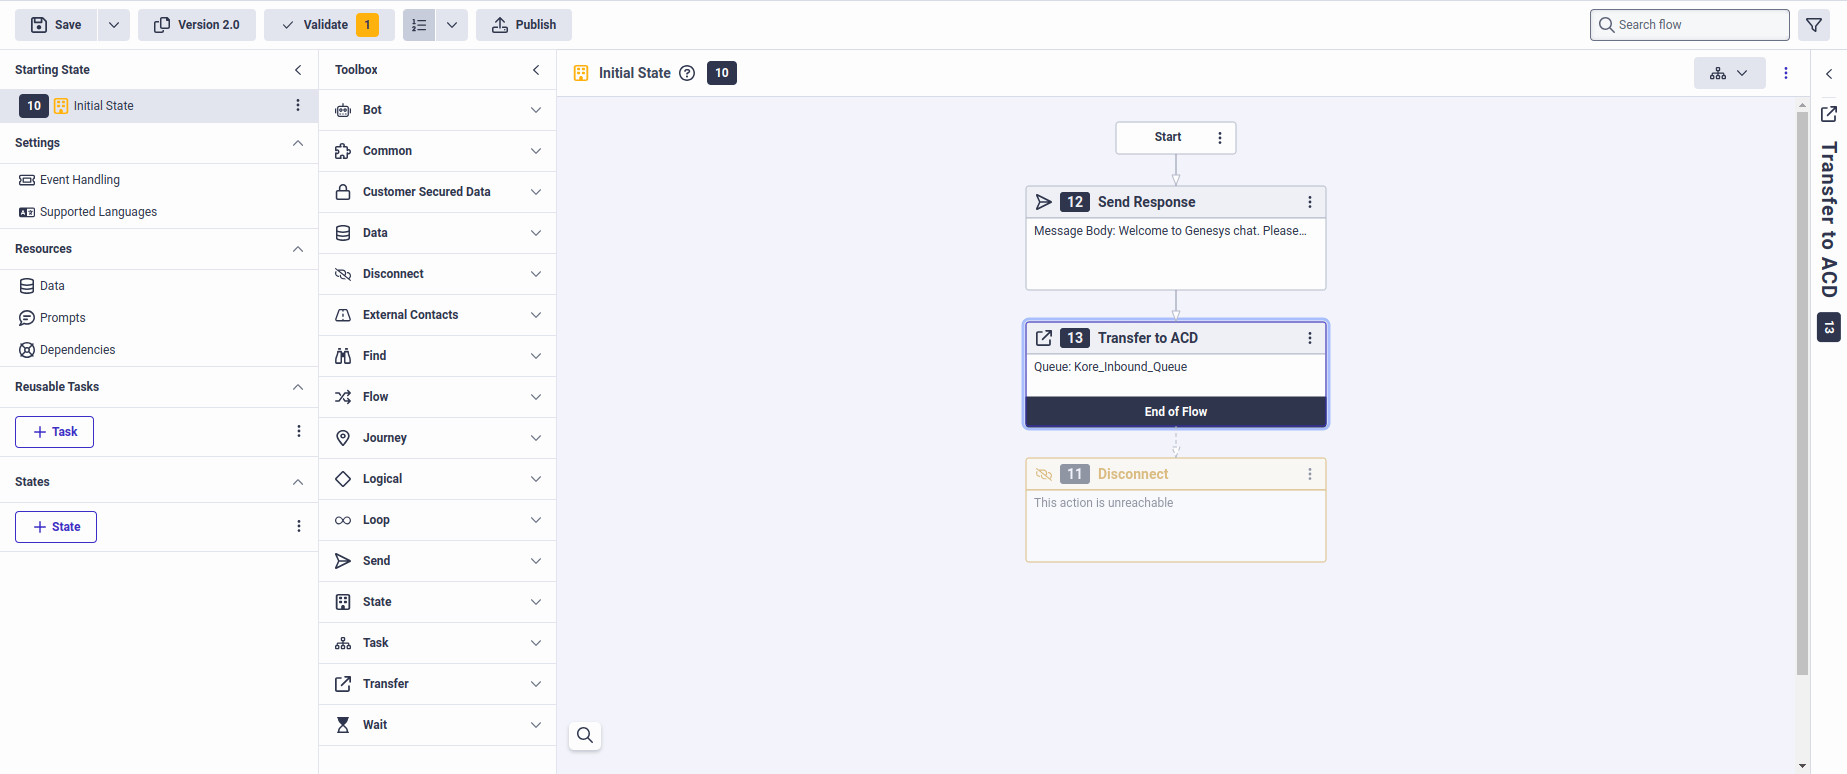
Select Create Flow. The final architect flow looks like the following screenshot:
- Select Publish.
Create Messenger Configuration
Before using web messaging, you must configure it in Genesys Cloud. To configure Web or Mobile Messaging in your organization, follow these steps:- In Genesys Cloud, go to Menu > Digital and Telephony > Message > Messenger Configurations.
- Select New Setup.
- Enter a name and description.
- Select a digital channel: Messaging, Knowledge, or Knowledge Portal.
- Select Next.
-
In the Appearance tab, complete the following information:
-
Under Select your Supported Languages, select the Select language(s) list and choose the languages that you want to support in the Messenger interface.
You must configure the same language in Kore AI Agent.
-
Under Select Default Language, select the Select language list and choose the default language.

- Adjust the other settings according to your preferences.
-
Under Select your Supported Languages, select the Select language(s) list and choose the languages that you want to support in the Messenger interface.
-
Select the Apps tab and complete the following steps:
-
Under Clear Conversation, turn the toggle on. You need this for the Agent AI Conversation Summary feature to work.
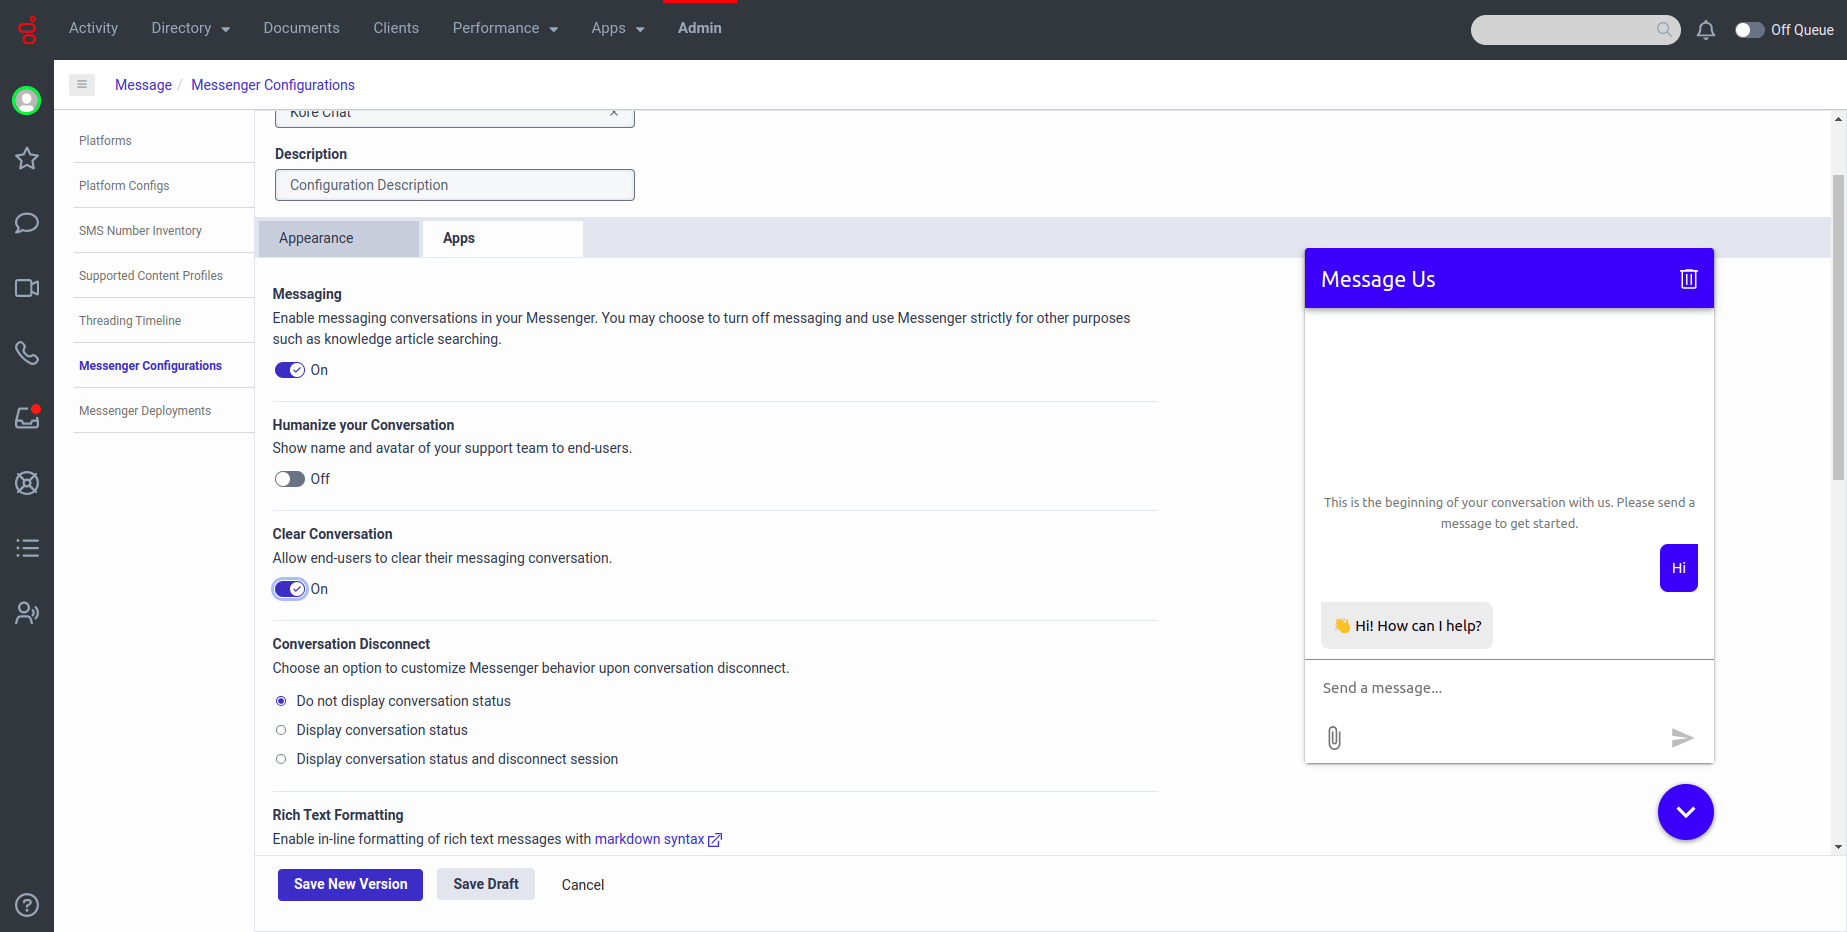
- Adjust the other settings according to your preferences.
-
Under Clear Conversation, turn the toggle on. You need this for the Agent AI Conversation Summary feature to work.
- Select Save New Version to create a new version.
Create Messenger Deployments
To deploy the Messenger snippet to your website, follow these steps:- In Genesys Cloud, go to Menu > Digital and Telephony > Message > Messenger Deployments.
- Select New Deployment.
- Enter a name and description.
-
Under Select your Configuration, select the Select Configuration option to select a version of a messenger configuration you created in the previous step to assign to this deployment.
- In the Assignment pane, navigate to the Messenger configuration you want to assign to the configuration, and select the name of the Messenger configuration.
- Select the version you want to assign.
- Select Save.
-
Under Restrict domain access, determine whether to allow all domains or restrict the domains on which you want to deploy the snippet.
- To allow all domains, select Allow all domains. (Use this option for testing and development purposes.)
- To restrict domains, enter a domain and select Add Domain. You can add multiple domains to the list. Restrict domains to prevent unauthorized usage of your snippet from unknown domains. If you restrict a domain, Messenger doesn’t run on that website and rejects API requests from that domain.
- Under Select your Architect Flow, select the inbound message flow you created in the previous steps.
- Select Save. The Messenger Deployments page now displays the snippet and the deployment key.
-
Copy the Messenger snippet and deploy the Messenger snippet to your website.
If you are building a custom Messenger, copy the deployment key.
The Messenger window appears after the website page loads.
(Optional) Install Audiohook for Voice Streaming
Install Audiohook for voice streaming if using Kore-managed transcriptions.- In Genesys Cloud, go to Collaborate / Communicate > Menu > IT and Integrations > Integrations.
-
Enter
audiohookin the search bar. Audiohook integration requires specific configuration values to support Agent AI configuration. - Install a new audiohook app by selecting Integrations in the upper-right corner.
-
Open the Audiohook, and go to the Configuration tab.
- Channel value must be both.
- The Connection URI format must be similar to
wss://{Voice Gateway}/audiosocket/genesys/?sipuri=xxx&token=xxx&botId=xxx&accountId=xxx&agentassist=true.
- Add
multiBot=trueparameter to it to use multiple Agent AI bots with different queues. - Configure the SIP of any of the bots inserted in the Data Table.
- Get the Voice Gateway host name from the corresponding environment you use at SaaS or on-prem.
-
Follow these steps to get the Connection URL:
- Go to Agent AI > Flows & Channels > Voice Gateway > SIP Numbers > Configure SIP Trunk.
- Select Agent AI in the Product Selection section.
- Select Genesys Audiohook in the Select the SIP Trunk connection method dropdown list.
- Select Copy next to the Connection URL field.
-
Add the following details in the Advanced tab:
Create an OAuth using the Client Credentials grant type, and use the resulting Client ID and Client Secret for configuration.
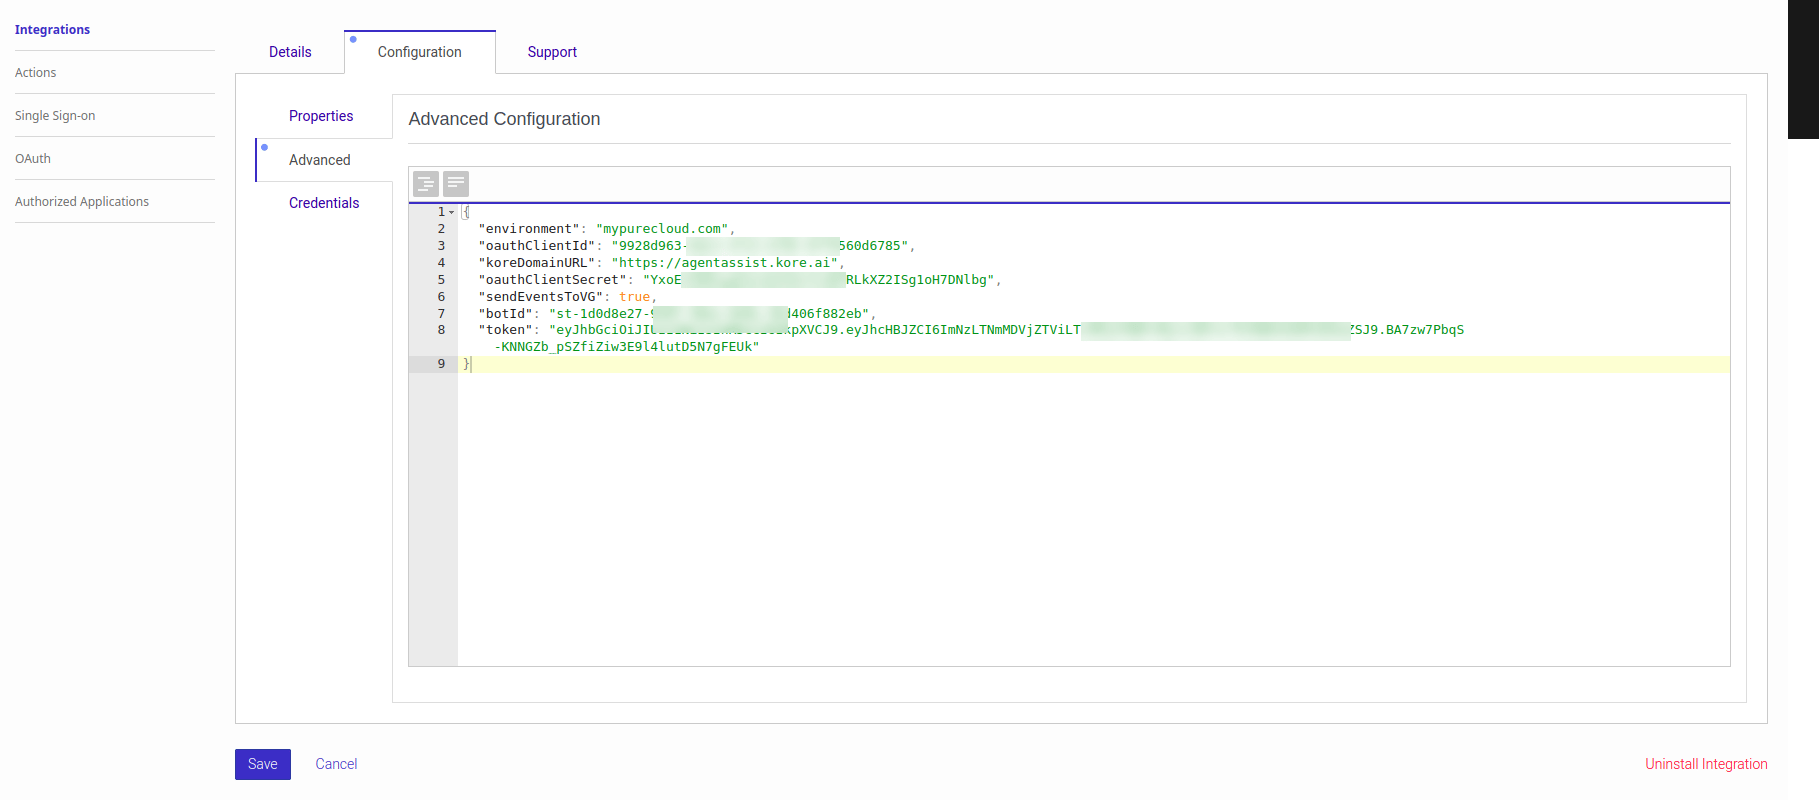
- Add credentials in the Credentials tab.
- Use the ClientID and ClientSecret of the AI Agent you used while configuring the Audiohook. The system uses these credentials to validate the audio stream signature.
- Select Save.
Create or Update Architect Inbound Call Flow in Genesys for the Agent Queue
Calls coming to a Genesys number pass through an architect flow. If you don’t have an Automatic Call Distribution (ACD) architect flow for the queue, create one by following this section.- In Genesys Cloud, go to Menu > Orchestration > Architect.
- Select +Add to create an Inbound Call Flow.
- Select Create Flow. The final architect flow looks like the following screenshot:
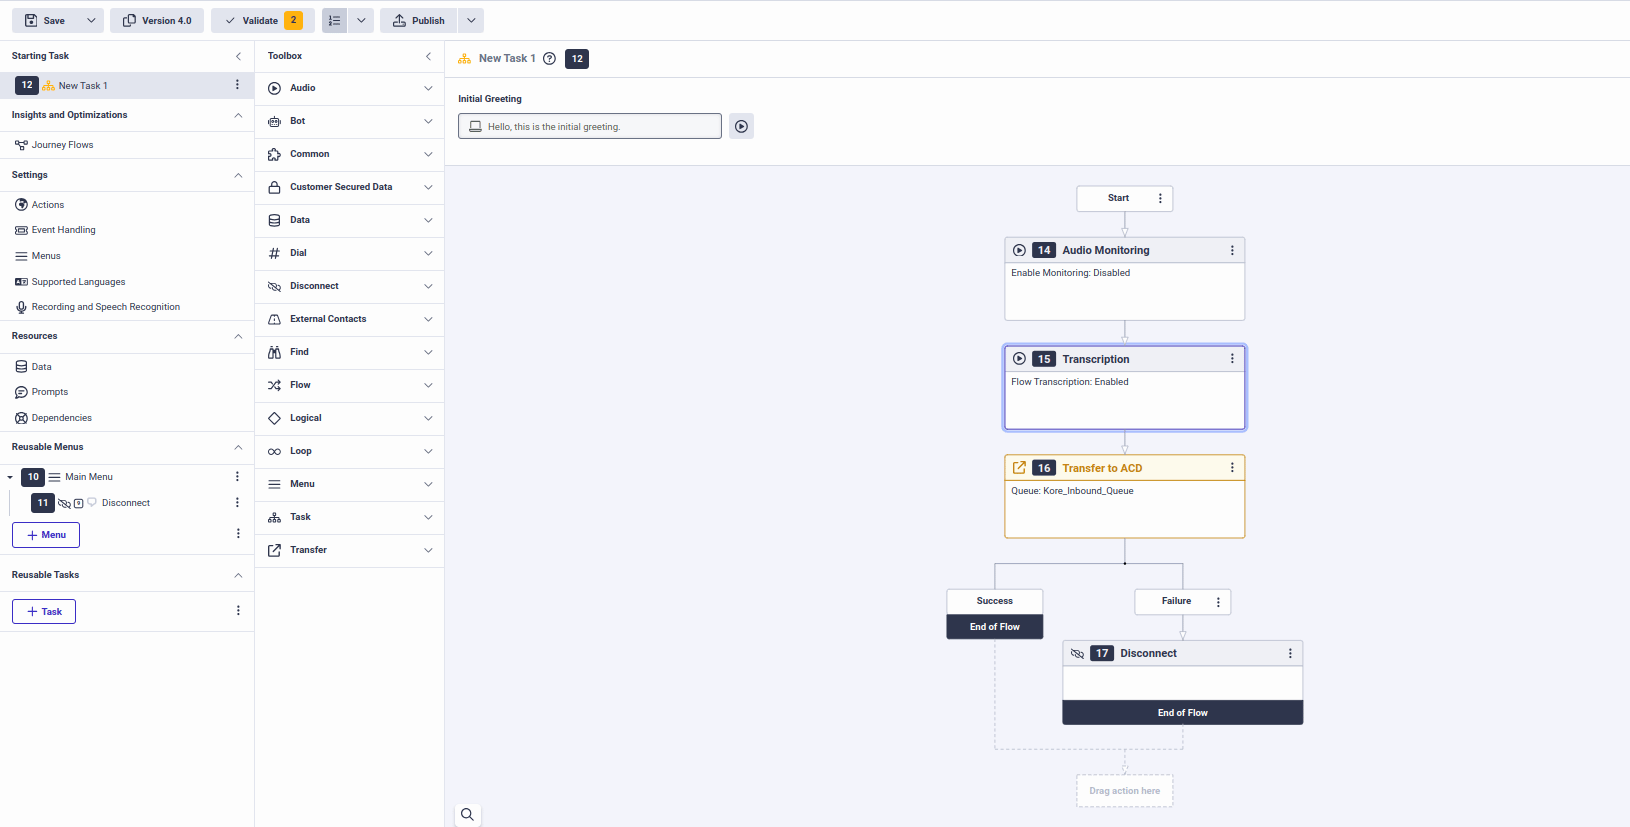
- Inside the Transfer to ACD node, select the queue name to transfer the call.
- The Transcription node is optional, if you have turned on Voice Transcription and Audio Monitoring in the queue-level voice configuration.
- Architect flow is a mandatory step, as it directs the incoming call to the Genesys agent desktop.
Access Custom Data and Secure Custom Data in Agent AI
You can access Custom Data and Secure Custom Data in:- Welcome Events in the Agent AI configuration page
- Dialog Tasks in the Agent AI automation page
{{context.session.UserContext.customData.internalMetaData.<key>}}. Follow the Access Custom Data doc for the detailed steps on how to access Custom Data.
You can access Secure Custom Data as {{context.session.UserContext.secureCustomData.<key>}}. Follow the same steps of the Access Custom Data doc for detailed information on how to access Secure Custom Data, except for the path being {{context.session.UserContext.secureCustomData.<key>}}.
If a URL-encoded JSON is provided in the
x_passthru_metadata, use the JavaScript option in the Message node. Then, parse the value of context.session.UserContext.customData.internalMetaData before accessing its content.Post Installation Setup
Start a Chat Request Simulation:-
Sign in to Genesys Developer Applications.
To start chat simulation, you must have access to the Genesys Developer portal (an account with Genesys).
-
Select Web messenger, select the Deployments, and then select Start Chat to initiate the chat request.
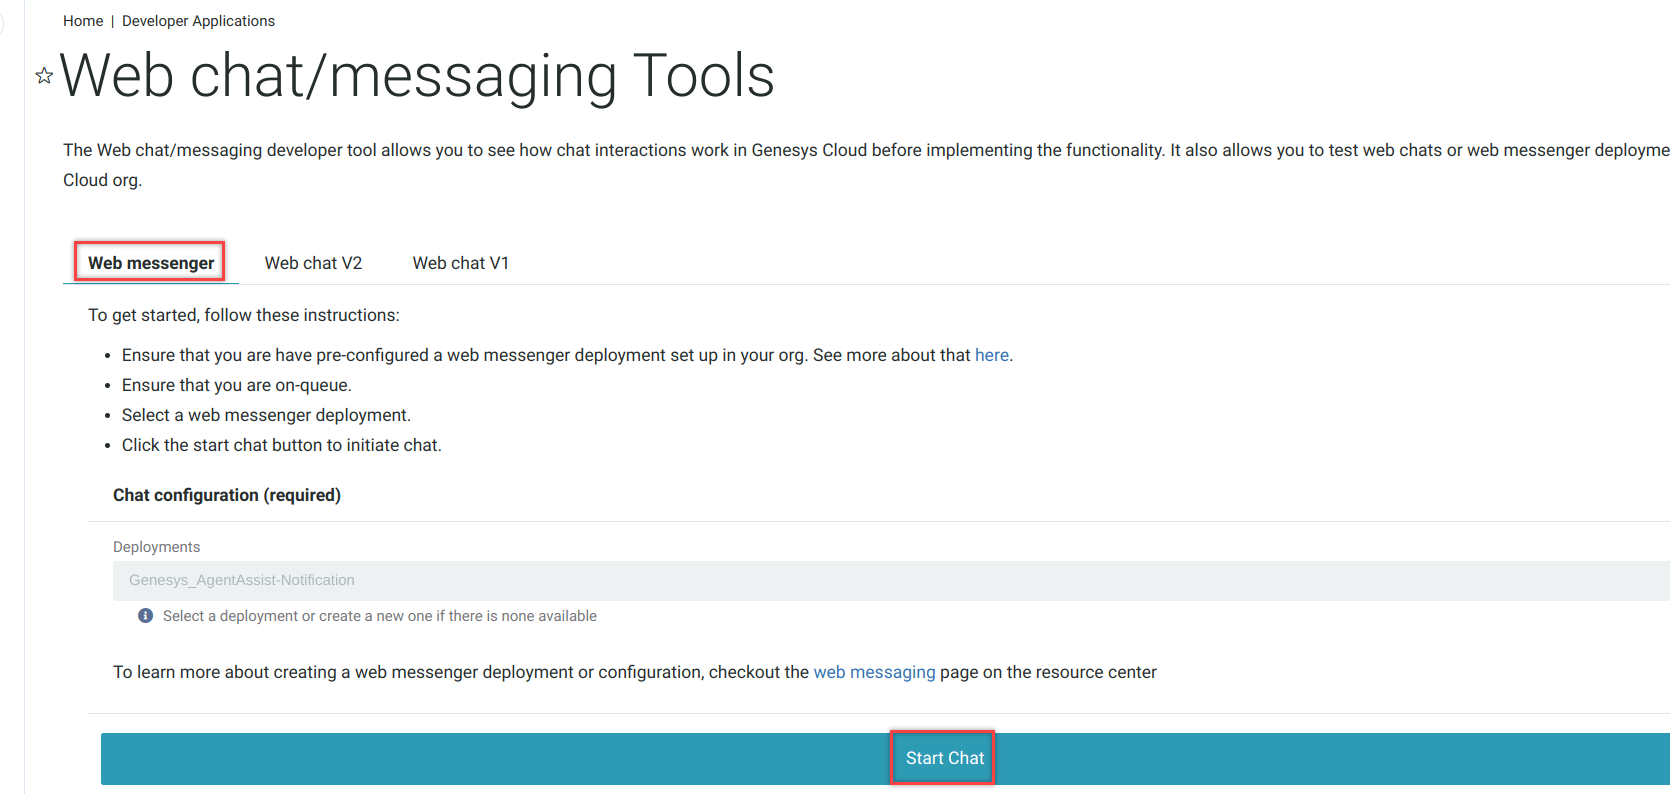
-
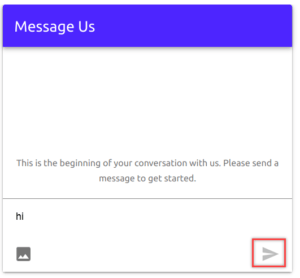
Enter a message on the Message Us window, and then select the Send icon.
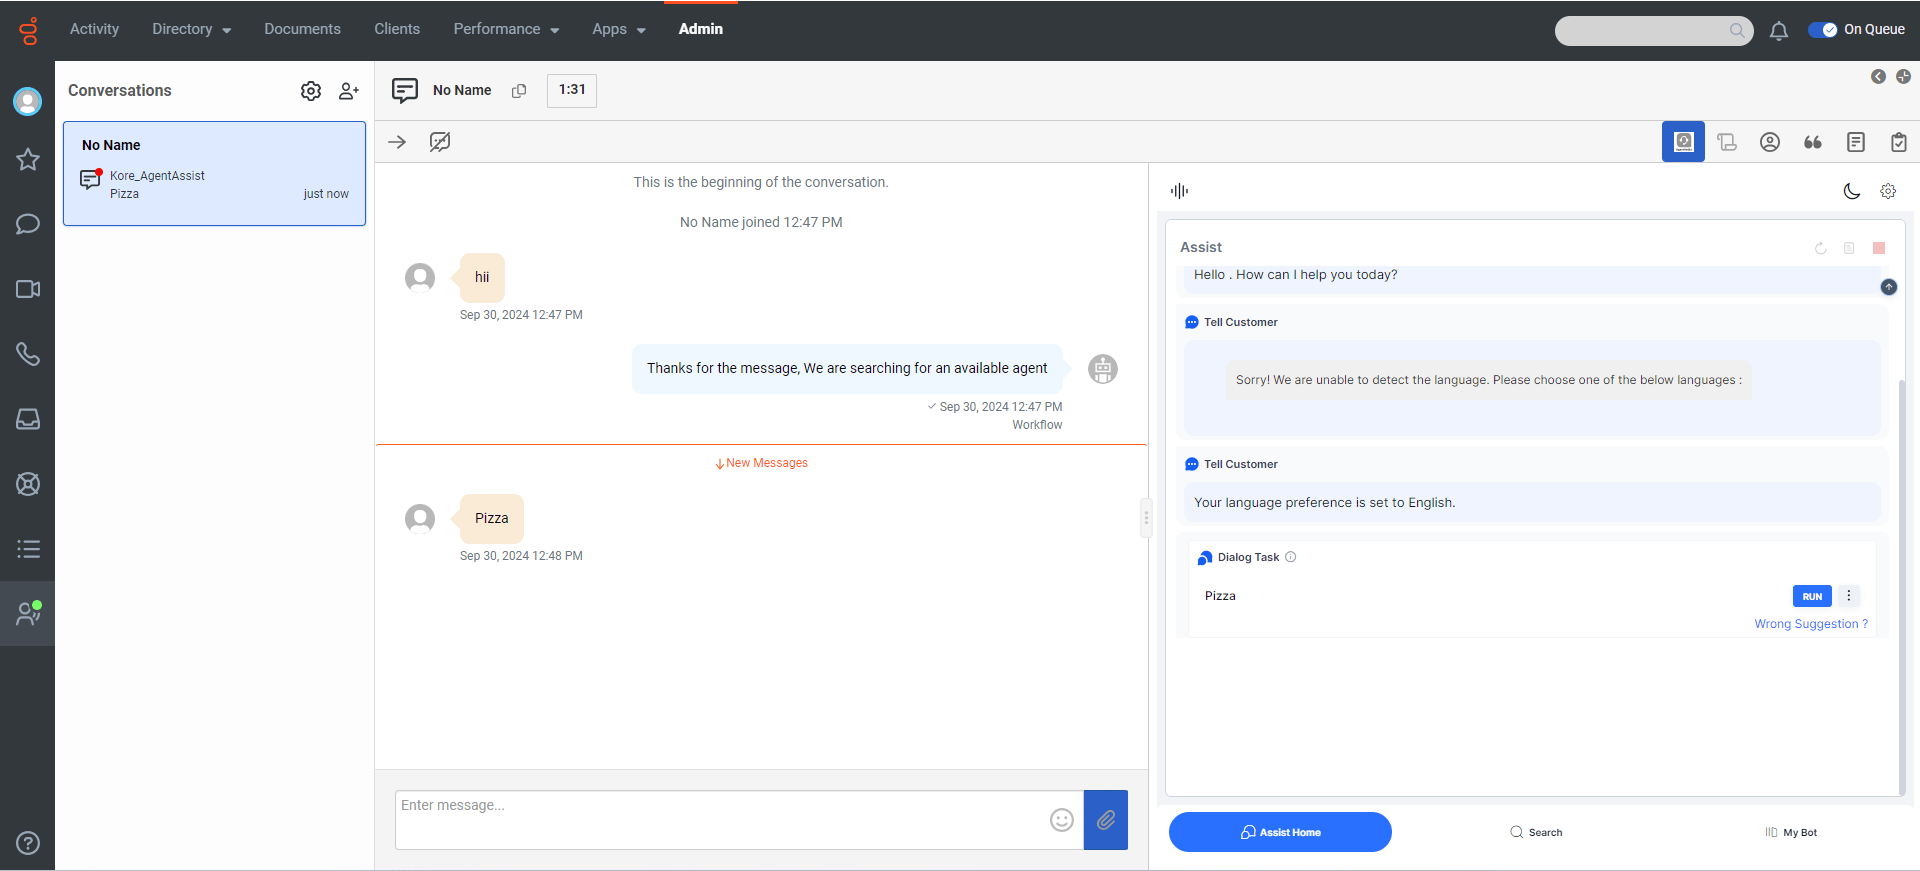
- Turn on the On Queue toggle on the upper-right corner of the page. A new chat notification appears on the Genesys Agent Desktop.
- Accept the conversation by selecting Answer on the left panel.
-
Select the Interaction Widget icon to view the Agent AI widget.
- In Call Routing, assign the Architect flow you created in a previous step to a Genesys phone number.
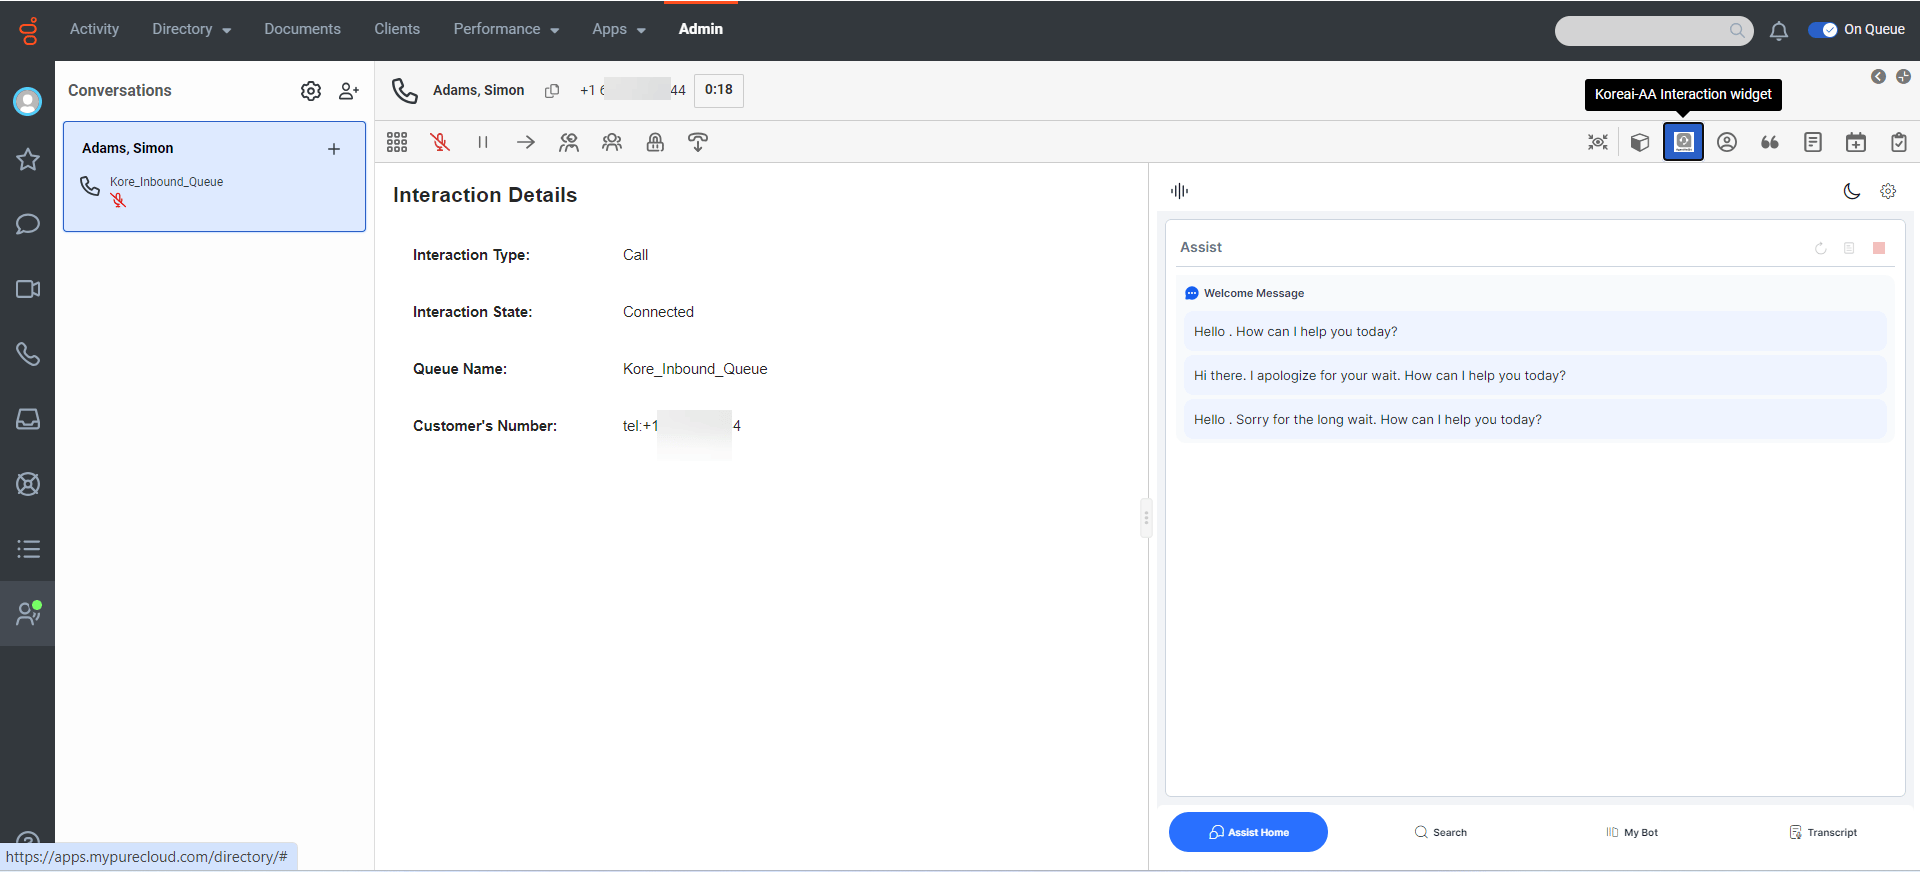
- Initiate a call using this Genesys phone number. A new call notification appears on the Genesys Agent Desktop.
- Accept the conversation by clicking Answer on the left panel.
- Select the Interaction Widget icon to view the Agent AI widget.
Set the default contextual panel to Kore Agent AI Interaction Widget
To streamline call handling and improve efficiency, you can embed the Agent AI widget as the primary contextual panel interaction widget. To set this up:- In Genesys Cloud, select Menu > Digital and Telephony > Interaction Assets > Panel Manager. This opens the Default Contextual Panel.
- Select the interaction widget name in both Voice and Web Messaging field dropdown lists (refer to step-4 of Create an Interaction Widget in Genesys for Agent AI).
-
Select Save.
Reload the Genesys Agent Desktop before testing this latest change.
Support for Agent Transfer
The Agent AI widget supports both Cold and Warm Transfers:- Cold Transfer: A cold transfer occurs when one agent hands over a conversation to another, and it’s applicable across Voice, Chat, and Email channels. The system generates a new conversation summary for the receiving agent and adds it to Agent-1’s Assist tab, along with feedback options. Agent-2 can modify the summary feedback for Voice and Email channels.
- Warm Transfer: A warm transfer is like a conference call between two agents, applicable to Voice and Chat channels. During the transfer, Agent-2 can modify the summary feedback. However, the Run, Override, Send, Copy, Terminate, Restart, and List View buttons remain unavailable until Agent-1 disconnects from the call.
Switch to Agent AI SDK (Optional)
You can embed the Agent AI widget into the Genesys desktop using the Web SDK. To do this, update the following configurations:Kore Data Table Change
- Go to the Kore Data Table.
- Select on the name of the Data Table.
-
Add a new column to the existing data table as isAgentAISDK and data type as string.
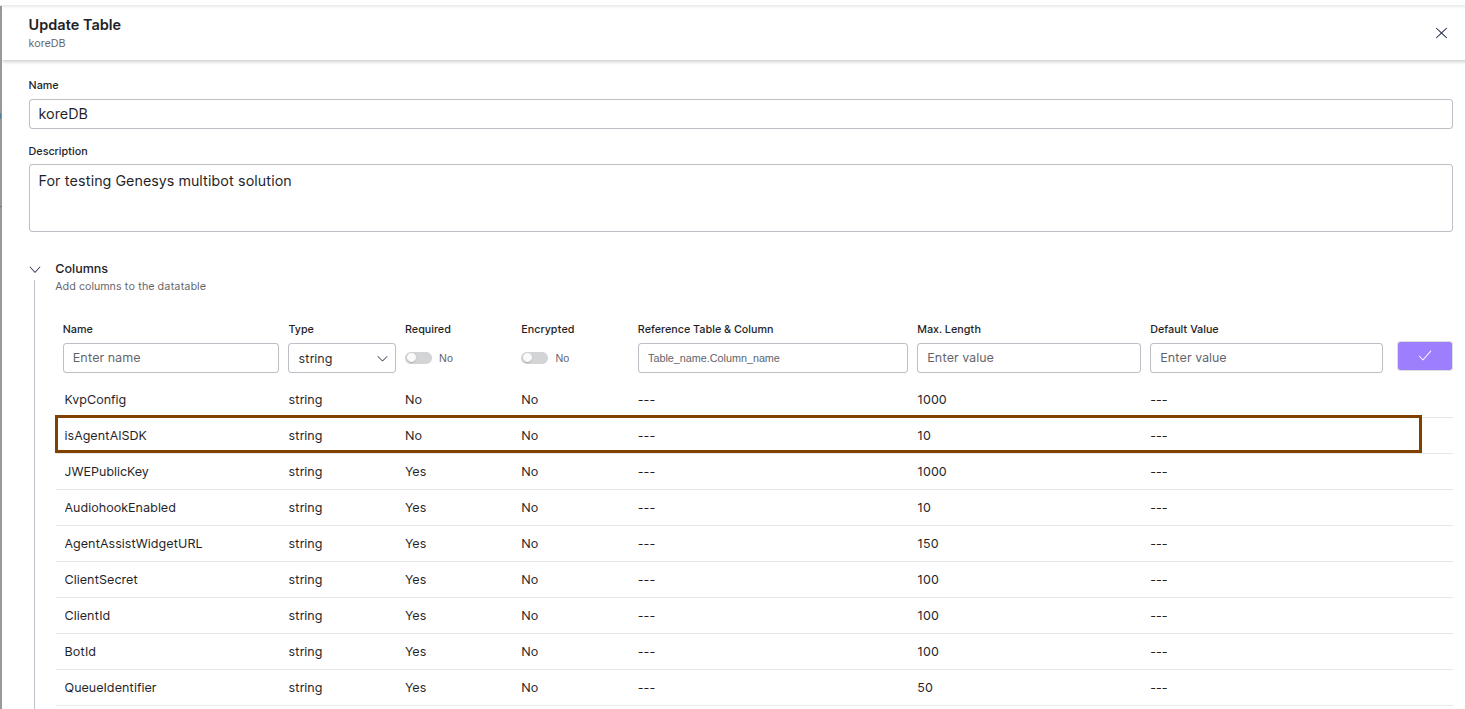
- Select Create/Update (for existing table configuration).